


Epson Stylus Pro 4880 review
Epson Stylus Pro 4880 printer review
Using the SP 4880 17″ A2+ Printer

Keith has removed all Google ads. Too many deceptive and irritating adverts.
Any ad links left are non tracking, to companies we know, trust and we've worked with for years [Park Cameras]
Ads helped pay for site running costs, so if you found something useful, please
...Make small KoFi donation?
...Subscribe to Keith's YouTube Channel
...Get Keith's book about how to use tilt/shift lenses
Our site contains affiliate links - these help support the site. See our Advertising policies for more

What do you get with the 4880?
The 4880 arrives in a big box. Unless you are very fit and strong, I’d not suggest unpacking and moving it on your own.

It’s just short of 40kg and right from the start has a much more solid feel than the 3800 I tested last year.
Both printers take a maximum paper width of 17″ and use Epson UltraChrome inks.
I’ll have more to say about differences between the two A2+ printers in the conclusions, but the bulk of this article reflects my usage of the 4880.If you want more technical specifications and Epson information, I’ve included it at the end of this article
There are 8 ink cartridge slots in all, meaning you have to choose whether to install the Matt Black or Photo Black when you first set up the printer.
The inks are the Epson K3 pigment ink set with vivid magenta.
The printer is supplied with 9 110ml cartridges and uses a significant amount of ink during its initial charging and setup.
This is a one off occurrence.
Waste ink goes into the maintenance tank, which can be replaced when full (it’s in the little drawer visible in the lower right side of the picture above)
It’s worth noting that the cartridges are also available with 220ml of ink.
The printer has a large paper tray for holding sheet paper.The cover opens (move mouse over image to see).
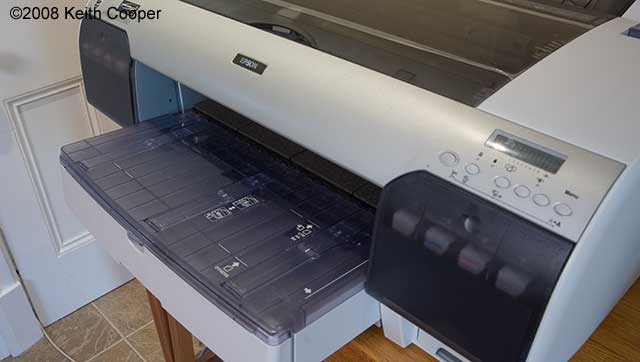

Not all papers are suitable for this option, so take notice of the suggested media stock levels noted inside.

The tray can be extended for bigger paper (move mouse over image to see)


There is also a roll paper option at the back of the printer (move mouse over image to see)


The roll holders support both 2 inch and 3 inch rolls via the use of the adaptors shown below

It’s best to unload roll paper and store it in its box if you are not using it for a while


Sheet paper can also be fed manually either into the top of the printer (where the roll paper goes in) or via the front. I’ll discuss this more in my conclusions, but it is usually quite an easy operation.
Connectivity
 You get a choice of USB2 or Ethernet to link your printer up to a computer. I used USB for connecting the 4880 to my laptop, and plugged in the Ethernet to the office network so as to be able to print from other computers in the building.
Setting up Ethernet network connectivity (for both PCs and Macs) is also pretty straightforward using the supplied utilities.
The picture shows the 4880 and laptop, whilst I was profiling a sample of paper with the X-Rite ColorMunki.
ColorMunki print profiling article
I did the tests using OSX 10.4 which doesn’t support the new Leopard (OSX 10.5) drivers that can take advantage of the 16 bit printing subsystem.
 There is included software that allows you to configure a lot of features of the printer remotely and to check on various counters and status.
The printer display is a clear but quite simple LCD.
In the picture you can see the normal display when printing.
The vertical bars give ink levels, while the level of the maintenance tank is at the far right, and an indicator to show the sort of paper selected is at the bottom left (sheet in this instance)
The printer menu allows many of the printer set up options to be altered, and can be used to instigate test prints for checking that all the print head nozzles are working.
Using the 4880
 For a quick test, I loaded a stack of ordinary plain A4 paper into the tray and printed out a 28 page pdf supplement to a book I’d just downloaded.
This was printed from my main office Mac and once I’d loaded the 4880 driver, it was a simple matter to select the printer and use it over the network.
The printer is a sturdy one (note the solid desk it is on) and prints stuff like this pretty effortlessly.
It’s worthwhile keeping some A4 plain paper permanently in the tray (when not using it for photo papers) since I like to check printer performance before wasting an expensive sheet of art paper due to a blocked nozzle or two.
The printer can do an optional auto nozzle check and clean when powering up.
I found this very useful for the first week or so of use, since after being shipped to me with inks already installed, the printer took a while to settle down.
You can see that the printer needs some space at the back. This is particularly so if you were to load stiff media from the front, since the printer pulls it in and sticks it out the back before printing.
In fact, with the front tray extended, you need quite a bit of space for this printer.
 The picture to the right shows the distance to the wall in the setup above.
The printer dimensions are listed as:
- 848mm x 765mm x 354mm (Paper Tray pushed in)
- 848mm x 1105mm x 354mm (Paper Tray pulled out)
Print testing
Testing a printer for print quality can be highly subjective, all the more so if you use your own (colour) images.
So for looking at colour and black and white performance I’ve initially used the Datacolor test image for colour, and my own black and white printer test image to start with.
The images (and many others) are available for download on this site
Both images have lots of components to specifically test different aspects of printer performance.
I also use both for testing the performance of printer profiles.
If you use either of them, be sure to read the explanatory notes that go with them.
Of course I do use my own prints for testing, but they are far less likely to (obviously) show up problems than the test images.


I tried a number of Epson media with the printer.
Since it initially came with photo black ink installed. I started with more glossy photo media.
I’ve recently produced a very large print for a local client (on my Epson 9600) of a view of Seattle on a cloudy day (but not raining ;-)
On the 9600 I printed it on Epson enhanced matt paper at seven feet wide – in the original (4.8GB) stitched file you can clearly see people standing at apartment windows. It’s meant to be a print that people can walk right up to and see new detail every time they look at it.

Printing at normal photo resolution (1440 dpi) and using the Epson supplied paper profiles produced clear sharp prints (at A2) that I had no trouble in finding homes for (friends looking for interior decoration on the cheap know the benefits of visiting me when I’m testing a big printer ;-) )
Printing bidirectionally or unidirectionally produced no real difference between prints, while going for higher printer resolutions – improved prints slightly – but only if I got out a magnifying glass.
 The 4880 benefits from an improved dither pattern (placing of the ink droplets) over earlier printers.
This makes prints look better, although it’s actually most noticeable on the test prints I use for creating printer profiles.
The 4880 has the ‘Vivid Magenta’ ink set which increases printer gamut.
For those of you with print industry experience it now manages colours such as a rhodamine reds and reflex blues with much greater accuracy.
Pigment inks have particles of coloured pigments embedded in a resin. A new version of the resin is designed reduce gloss differential and increase pigment density (beyond the K3 inkset and the older UltraChrome in my 9600). The reformulated resin and altered head design also supposedly decreases the likelihood of clogging.
Note that you cannot use the new (more viscous) inks in older printers.


The blues and reds of a few sunset pictures all printed out well, confirming again the quality of the supplied Epson profiles (move your mouse over the image to see the print)
It’s actually very difficult to spot differences in prints without direct comparisons, however I’ve just profiled a friend’s Epson 2400 with a new paper and was able to compare the Datacolor test image on the same paper with profiles I’d just created.
The 4880 showed more depth in the deep reds of the peppers and the deep blues in the folded fabrics looked better defined. Not a lot in it, but noticeable if you place the two prints together in a viewing cabinet.
I’ve looked at several new papers with the 4880, including Epson Exhibition Fibre, or Epson Traditional Photo Paper as it is known here in the UK. – Epson TPP review
I’ve used the Epson ABW black and white printing mode before when I looked at an R2400 with some alternative inks in it. This is an excellent way of getting good quality black and white prints.
Using the black and white test print, I tried the ABW printing at neutral settings. The three papers were all very good and showed no obvious ‘bronzing’, but particularly with the Premium Glossy Photo Paper, I noticed quite a bit of ‘gloss differential’ or ‘dull bits’ due to different glossiness of paper and inks.
The amount to which this is an issue depends on what you are doing with the pictures and how they will be viewed. I’d personally not want to print my black and white images on the glossy paper and found that the Epson Premium Luster gave very good results.
You can tint and tone images in the ABW section of the print driver, but I have a personal dislike of seeing my B/W images toned so although I can say it works fine, I couldn’t say how well you’d like the results. If I want a warmer looking print I’ll use a warmer paper, that’s about the most colour I want to see in one of my B/W images :-)
I’ve often used QTR linearising profiles in the past (I did with the 3800) but the 4880 ABW printing was pretty much spot on. I’ve written a short articles on creating greyscale icc profiles with QTR and the PrintFIX Pro measuring device and with the ColorMunki if you are curious and want more details.
Changing black inks
One feature of the 3800 that isn’t found in the 4880 is the facility to quickly change black inks from Photo Black (Pk) to Matte Black (Mk). The 4880 with its 8 ink carts, only has one black slot.
It’s interesting to note that numerous matt papers are actually supplied with Epson printer profiles for both MK and PK inks.
I’ve seen some debate about this and my own experience suggests that for Velvet Fine Art paper the Mk ink is essential for B/W prints, but you can use PK for colour images that don’t have any deep black shadows. Given the price of some of these art papers I’d not be too inclined to experiment ;-)
The black ink change is a somewhat convoluted procedure, so best make sure you really want to do so first.
It uses quite a lot of ink too, so isn’t cheap.
To start with you need the ink change cartridges.

These are empty ‘dummy’ cartridges that are used to minimise the amounts of non-black ink lost.
The carts go in the left hand ink bay. (move mouse over image to see inside)
You can also see the locking lever that holds the cartridges in place and needs to be moved during the process.
For my 9600 I have an ‘unauthorised’ method of ink changing, that saves on ink, however that printer is a few years old now and any such tricks were long since banished from the printer menu :-(
The ink swap process is started from the main menu.
During the ink swap procedure there are lots of whirring and general printer activity sounds.
You also get a series of instructions on the printer display telling you to raise and lower levers, and when to change cartridges.


I did originally mean to time this process, but the number of lever changes and other activities meant that I was standing there drinking a cup of tea, looking out of the window, while the printer wanted me to do something…
A simple beep when it need attention would have been useful, but then again this isn’t something I’d suspect you’d want to do very often…
The ‘waste’ ink all goes into the maintenance tank, so if your tank is nearly full, then have a spare ready…

and more lever operation…

After half an hour or so, the printer had Matt Black ink in it.
 I printed this A2 print on Velvet Fine art on the 4880 using Epson ABW mode.
Having just printed a 20″x30″ series of black and white images of Seattle for a local restaurant on my 9600, using the ImagePrint RIP, I was interested to see how the 4880 handles them.
Well, for sheet fed paper, you get to print closer to the bottom with the 4880 thus I was able to get a bigger image on the paper.
The tonality of the two images was virtually identical, with the ImagePrint version just edging it for neutrality under a variety of lighting conditions.
Given the software (and expense) needed to get good results from the 9600 I was very pleased with the ‘out of the box’ performance of the 4880.
I’ve tried a number of colour images on the 4880 too, with the matt black.
Once again the Epson colour profiles gave excellent results.
This could potentially be improved since there is also the Epson ColorBase software that is available as a download.
This allows you to create a calibration file to bring your particular printer back to factory aligned standard.
You need a spectrophotometer of a supported variety.
The real benefit comes for people with several identical printers where you need to minimise variation between individual printers.
 This is probably not so much use to people with just one printer, but I have heard it said that it can make a (just) perceptible improvement in the quality of prints.
Images like the Oregon Wheat Field one to the right came out very well on a rich paper like Velvet Fine Art
When it comes to framing and mounting pictures behind glass, I often like to use Epson Enhanced Matte paper.
It’s a bright white finish and when hung on the wall looks excellent. Although relatively thin it has never been any problem for me when framing.
I tried a series of colour prints on the Enhanced Matte and the improved gamut of the new inks was noticeable in several images that I’d previously printed on the 9600.
Not enough to make the old prints any less worthy, but just enough to show on a few more vivid images.
This matte paper doesn’t have the best gamut anyway, but for large display prints, I’ve found that when it’s laminated onto foamcore (or equivalent) and covered in a plastic film, it makes an excellent display medium.
Paper Loading
The printer supports roll paper (with or without using the inbuilt paper cutter) and sheet paper loaded from the paper tray or manually.
The picture below shows the print head assembly and the indicator showing where the paper cutter will work.
The various bits of black plastic underneath where the print head travels are also of use if you want to line up paper in different ways.

The normal way of loading sheet paper (if not via the tray) is to feed it in at the front, lining it up with various registration marks.
I’ve heard of people having difficulties with large sheets of paper being mis-fed and being rejected when loaded.
 One thing I noticed was that when you activated the paper lever, the mechanism could sometimes snatch the paper a bit unevenly.
Holding down the front edge of the paper when activating the lever did prevent this, although in general I didn’t have many paper loading issues at all.
The picture at the right shows an alternative way of loading paper.
In this case I’ve fed it through and lined it up with one of those bits of black plastic.
This might be of use if loading a longer sheet of paper or where you didn’t want it to poke out of the back of the printer. Note though, that the printer will assume it’s roll paper if you load by this route. You then need to press the paper type button on the front panel to get back to sheet feed.
The paper tray has worked flawlessly during testing with A4, A3 and A2 papers (where suitable for the tray)
The printer also has a vacuum system which keeps paper flatter, if it has developed a slight curl.
The printer prints borderless on many paper sizes, with a large array of size options in the paper setup options. I’d seriously recommend reading the documentation to get the hang of what it can do, and experimenting with prints on plain paper.
Conclusions
Print quality is excellent from this printer and the supplied printer profiles were very good.
It would have required quite a bit of work on my part (with top quality profiling software and hardware) to improve on them.
I’ve looked at the Epson ABW (Black and White) printing mode before and found it good, but not always quite good enough (for my own use).
This time, I found that the prints produced were generally good enough for me to be happy with, without any further adjustment or additional B/W profiling tricks. This isn’t to say they couldn’t be improved, but it would take some real effort compared to the ‘out of the box’ performance.
Do remember that this is when using Epson papers, so results with third party papers might be more variable and I’d probably look at making some form of linearising profile to fine tune things.
I’ve not done any detailed ink cost comparisons, but if you look at ink costs you can see that it’s somewhat cheaper than the 3800
Note – if anyone finds accurate, up to date comparisons of ink costs, please do let me know and I’ll update these figures
- $1.35 / ml with HP B9180 ink cartridges
- $0.95 / ml with Epson R2400 ink cartridges
- $0.75 / ml with Epson 3800 ink cartridges
- $0.65 / ml with Epson 110 ml ink cartridges used in 4880
- $0.58 / ml with Canon iPF5000 ink cartridges
- $0.51 / ml with Epson 220 ml ink cartridges used in 4880
The printer is solidly built and after a few initial failed nozzle checks, settled down perfectly. The whole thing looks (and is) a lot more robust than the 3800.
Printing with roll paper and the normal print drivers is always a bit hit and miss, and prone to waste paper.
You might want to look at additional print driver software to drive your printer if you are looking to make good use of roll paper. See my review of the ImageNest Mac software as an example.
If you use thicker papers, then do remember to set the platten gap to wide – this isn’t a problem for Epson media listed in the driver, but was an issue when I looked at a thicker paper, such as the Epson Traditional Photo Paper. I’ll have more to say in my forthcoming look at that paper, but suffice to say, this messed up my first print ;-) This is also worth noting if any of your papers have developed a slight ‘curl’ in the box.
Buying the Epson 4880
We make a specific point of not selling hardware, but if you found the review of help, please consider buying the 4880, or any other items at all, via our links with Amazon or B&H
Amazon UK link / Amazon Fr / Amazon De
Amazon USA link / Amazon Canada link
It won’t cost any more (nor less we’re afraid) but will contribute towards the running costs of our site.
Of course the elephant sitting in the corner of the room is that black ink swap procedure. It is cumbersome and wastes ink and maintenance tank capacity. Estimates of cost vary but I’d say that $50 wouldn’t be too wide of the mark.
Note – we have a ‘Use at your own risk’ unofficial 4880 black ink swap procedure for those interested.
My 9600 is permanently set with matt black ink. I print all my large black and white prints on matt paper, where it gives splendid results. This does mean that I don’t have the option of printing colour and some B/W prints on some of the newer ‘fibre’ type papers.
One minor annoyance (on a Mac OSX 10.4) was that after swapping black inks you have to reselect the printer in the printer setup utility, or else it won’t display the correct options. Printer drivers often have various quirks and I did have some initial problems how best to use roll paper, without lots of waste.
If you are looking at both this and the 3800 review (as I suspect many will be) you need to ask yourself some serious questions about what it is you want to do with your printing.
- The 3800 saves ink on swaps, but is more expensive to print.
- The 3800 has much more limited paper handling capacity – important if you are producing many prints.
- The 4880 costs more, but is faster and more robust.
Don’t forget too, that the inks have a limited lifetime, so if you only print a few prints a week, the 80ml carts of the 3800 might last a while.
For myself, with another printer set aside just for Mk ink, the choice would be simple. I’ll take the 4880 please!
Of course, with my large prints, it’s never quite so simple, which is why I’m hoping to have a look at the larger 7880 in the near future. I’ve also looked at several other papers with the 4880, but will cover those in some short reviews in the near future.
Summary
A solidly built printer capable of excellent print quality on roll and sheet media, colour and black and white.
Supplied printer profiles are of very good quality.
New K3 Vivid Magenta inks show less gloss differential and improved gamut over older printers.
Suffers from a cumbersome and wasteful black ink swap procedure, which might restrict your use of the printer as a general purpose printer.
| 4880 SPECIFICATION | |||||||||||||||||||||||||||||||
| Print Technology: | Epson Micro Piezo drop-on-demand inkjet technology Epson Variable-sized Droplet Technology and 3.5pl Epson Ultra Micro Dot Print head configuration: 180 nozzles x 8 colours |
||||||||||||||||||||||||||||||
| Ink System: | 9 colour pigmented ink (C, M, Y, LC, LM, LK, LLK, Photo K, Matte K) with CSIC with 8 slots (one slot for interchangeable Matte K and Photo K) Ink conversion cartridges required for ink change between Matte K and Photo K are delivered with the unit |
||||||||||||||||||||||||||||||
| Resolution: | 2880 x 1440dpi Epson Variable-sized Droplet Technology | ||||||||||||||||||||||||||||||
| Speed: | Up to 12 m2/Hr (Plain Paper/Draft mode) | ||||||||||||||||||||||||||||||
| Driver: | Mac OS X, OS 9. Microsoft Windows 98/ 2000 / XP | ||||||||||||||||||||||||||||||
| Interfaces: | Standard: USB 2.0 (Compatible with 1.1), IEEE 1394 (FireWire) Option: Expansion slot for Type B interface (Ethernet) |
||||||||||||||||||||||||||||||
| Roll Dimensions: | Core diameter 2” or 3″. Max. outside diameter 150mm | ||||||||||||||||||||||||||||||
| PAPER HANDLING | |||||||||||||||||||||||||||||||
| Roll Media: Cut Sheet: |
Single roll (1 roll < 150mm / Outside diameter ) Media width 203.2mm – 431.8mm (8″ – 17″) Minimum media length 279mm Media thickness 0.08mm – 0.50mmHigh capacity paper tray with automatic sheet feed (up to 250 pcs of Plain Paper) Manual insertion feeder for media up to 1.5mm Media width size A4/LTR – A2/C,(210mm – 431.8mm) Media length 279mm – 610mm. Media thickness 0.08mm – 1.50mm |
||||||||||||||||||||||||||||||
| PRINT MARGINS | |||||||||||||||||||||||||||||||
| Roll Media: | 4 modes available; mode 1: 3mm on all edges (top, sides, bottom); mode 2: 15mm (top and bottom), 3mm (sides); mode 3: 15mm (top, sides, bottom) mode 4: 25mm (top and bottom) 3mm (side)2 modes available; mode 1: 3mm (top, sides, bottom); mode 2: 3mm (top and sides) 14mm (bottom) |
||||||||||||||||||||||||||||||
| EDGE TO EDGE/BORDERLESS PRINTING | |||||||||||||||||||||||||||||||
| Roll Media / Cut Sheet: | Both edge-to-edge and full bleed*1 for the following media widths: 8″*2,10″, 12″,14″, 16″, 17″, 210mm, 257mm, 300mm, 329mm, 400mm, 420mm*1. Top and bottom edges can be automatically cut to any length*1 Full bleed only available on roll media *2 8″ & 420mm requires space |
||||||||||||||||||||||||||||||
| INK CARTRIDGES | |||||||||||||||||||||||||||||||
| 110 and 220ml ink capacity Intellidge cartridge system for ink level control even on re-inserted cartridges |
|||||||||||||||||||||||||||||||
|
|||||||||||||||||||||||||||||||
| LIGHTFASTNESS | |||||||||||||||||||||||||||||||
| Up to 75 years for colour prints In excess of 100 years for B&W prints |
|||||||||||||||||||||||||||||||
| WEIGHT | |||||||||||||||||||||||||||||||
| Approx. 39.4Kg (without ink and media) | |||||||||||||||||||||||||||||||
| DIMENSIONS | |||||||||||||||||||||||||||||||
| 848mm x 765mm x 354mm (Paper Tray Storage Min. Size) 848mm x 1105mm x 354mm (Paper Tray Expand Max. Size) |
|||||||||||||||||||||||||||||||
| NOISE LEVEL | |||||||||||||||||||||||||||||||
| Approx. 50dB | |||||||||||||||||||||||||||||||
| POWER CONSUMPTION | |||||||||||||||||||||||||||||||
| Printing: 59W or less Standby: 5W or less PowerOff: 1W or less |
|||||||||||||||||||||||||||||||
| OPTIONS | |||||||||||||||||||||||||||||||
|
|||||||||||||||||||||||||||||||
| WARRANTY | |||||||||||||||||||||||||||||||
| 1 year repair or replace Optional extension to 3 years |
|||||||||||||||||||||||||||||||
More Info – Epson Printer reviews
- Epson ET-8550 printer review 1st February 2026Full review of the Epson ET-8550 EcoTank printer. The 13"/A3+ six ink printer includes both pigment and dye based black inks which are filled from 70ml bottles of ink.
- Epson SC-P5300 printer review 29th March 2024Detailed review of the Epson SC-P5300 17" (A2) pigment ink printer with sheet feed and powered roll paper feed and paper cutter. It has 10 inks and no matte/photo black ink switching
- Epson ET-18100 printer review 21st June 2023Full Epson ET-18100 printer review. The 13""/A3+ sized six ink EcoTank printer filled from individual 70ml bottles of dye ink . Dye based printer excels
- Epson ET-8500 printer review 23rd April 2023Full review of the Epson ET-8500 EcoTank printer. The 8.5"/A4 six ink printer includes both pigment and dye based black inks which are filled from 70ml bottles of ink. Is it a good choice to learn high end art and photo printing?
- Epson ET-2850 printer review 26th February 2023Epson ET-2580 printer review. The EcoTank 8.5"/A4/Letter four ink printer includes pigment based black ink and dye based colour inks which are filled from 127ml/70ml bottles of ink.
- Epson SureColor P7500 printer review 17th July 2022Detailed review of the Epson SureColor SC-P7500 24" width large format printer. Using the P7500 for fine art and photo printing. Review applies to the larger 44" SC-P9500 as well. P7500 is also known as the P7540, P7550 ,P7560 and P7570 in some markets
- Epson WF-C8960 printer review 19th June 2022Keith Cooper's review of the Epson XP-15000 printer for photo printing, The A3+ or 13" width printer uses dye based inks with an extra red and grey ink. The review concentrates on using the printer for high quality photo output rather than it's 'office printer' functionality
- Video: Epson ET-8550 Review 27th June 2021Review: Keith Cooper looks at the Epson ET-8550 EcoTank printer - A3+/13 inch width. Review covers features, capabilities and print quality (46m 34s) Includes links to all of Keith's ET-8550 related videos
- Video: Epson XP-15000 review 13th March 2021Keith Cooper looks at the Epson XP-15000 A3+ (13" width) printer for making colour and B&W photo prints at up to 13" width. With double sided printing for plain paper documents and envelopes it has a paper tray for plain paper. (13m 40s)
- Epson XP-15000 printer review 5th March 2021Keith Cooper's review of the Epson XP-15000 printer for photo printing, The A3+ or 13" width printer uses dye based inks with an extra red and grey ink. The review concentrates on using the printer for high quality photo output rather than it's 'office printer' functionality
- Epson SC-P900 printer review 19th November 2020Detailed review of the Epson SC-P900 17" (A2) pigment ink printer with sheet feed and optional powered roll paper holder. It has 10 inks and no matte/photo black ink switching
- Video: Review of the Epson P900 printer 19th November 2020Keith Cooper looks at the Epson P900 17 inch (A2) printer. The video overview discusses the main printer features for sheet and roll paper printing (21 mins)
- Epson SC-P700 printer review 26th August 2020Detailed review of the Epson SC-P700 13" (A3+) pigment ink printer with sheet feed and roll paper holder. 10 inks and no matte/photo black ink switching
- Video: Review of the Epson P700 printer 26th August 2020Keith Cooper looks at the Epson P700 13 inch (A3+) printer. The video overview discusses the main printer features (11 mins)
- Epson SureLab SL-D700 review 15th August 2018Review of the Epson SureLab SL-D700 six colour photo printer. Supports roll media from 102-210mm wide. Prints up to 1 metre in length, with built in cutter
- Epson P5000 printer review 26th September 2017Review of the Epson Surecolor P5000 printer. 17 inch width A2, with roll support and paper cartridge for sheet media. Looking at print capabilities and colour management
- Epson SC-P20000 printer review 10th August 2017Review of the Epson SC-P20000 printer by Keith Cooper. 64 inch width large format printer with new UltraChrome Pro 10-colour ink-set including high density Mk/Pk inks and three grey inks for better Black & White printing
- Setting up the Epson P5000 printer 27th June 2017Setting up the 17" Epson P5000 printer - installation & setup for the SureColor P5000 A2 printer, software configuration, networking and colour calibration
- Mirage print software review (V3.5) 14th August 2016A review of the Mirage print software by Dinax. Tested with the Canon PRO-2000 printer, the software now supports Canon and Epson large format printers. One feature is its freedom from print length limitations, ideal for huge pano prints at photo print resolutions.
- Epson Expression Photo XP-960 printer review 25th May 2016Review of the Epson Expression Photo XP-960 printer. All-in-one printer/scanner/copier that supports double sided printing and photo prints up to A3 size (11"x17"). Dual paper tray
- Epson SureColor P7000 printer review 23rd March 2016Detailed review of the Epson SureColor SC-P7000 24" width large format printer. Using the P7000 for fine art and photo printing with the LLk ink option. Review applies to the larger 44" SC-P9000 as well.
- Epson Printer SureColor P400 review 22nd December 2015Detailed review of the Epson SureColor SC-P400 13 inch width (A3+) pigment ink printer. Wide range of media and prints on roll paper up to 3.2m long
- Epson SureColor SC-P800 printer review 20th April 2015Detailed review of the Epson SureColor P800 printer. A2 sheet paper (17" width) and roll paper support. Tested with a variety of paper types, colour and B&W
- Epson printer: SureColor P600 review 15th January 2015Detailed Epson SureColor P600 review. The SC-P600 is an A3 plus (13" width) pigment ink printer tested with different papers for colour and black & white. It supports borderless printing, roll paper and CD/DVD printing
- Epson SureColor P600 initial setup 14th January 2015Setting up the Epson SC-P600 A3plus (13 inch width) printer. Installing inks, drivers and connecting the printer to your computer.
- Epson Stylus Photo R2000 review 14th May 2013Epson Stylus Photo R2000 full review, using the SP R2000 A3+ printer for colour and black and white printing, with custom ICC profiles. 13 inch print width and roll media support
- Epson Stylus Pro SP4900 review 23rd October 2011Review of the Stylus Pro SP4900 11 colour 17 inch (A2) printer from Epson. Setup and printing. Includes fitting and use of the optional Spectroproofer unit.
- Epson Stylus Photo R3000 review 4th September 2011Detailed Epson Stylus Photo R3000 review. Using the SP R3000 A3+ printer for colour and black and white photo printing
- Epson Stylus Pro 3880 review 4th May 2010Review of the Epson Stylus Pro 3880 printer. Desktop printer is 17 inch print width and takes A2 sheets, photo and fine art papers. Colour and black and white printing
- Epson Stylus Photo R2880 review 4th September 2009Review of the Epson Stylus Pro R2880 printer. Desktop printer is 13 inch print width and takes A3+ sheets and roll, photo and fine art papers for colour and monochrome printing.
- Epson Stylus Pro 7880 printer review 29th June 2008Review of the Epson Stylus Pro 7880 printer. Large format printer is 24 inch print width and takes roll paper and sheet media, photo and fine art papers. Inc. 7880/9880 error codes
- Epson Stylus Pro 4880 review 29th April 2008Review of the Epson Stylus Pro 4880 17" A2+ Printer. Large desktop printer tested with a range of sheet and roll paper and fine-art and photo media types
- PermaJet Eco-Flo inking system for the R2400 28th August 2007Review of the PermaJet Eco-Flo inking system for the R2400. A continuos ink system with external ink tanks and third party ink
- Epson Stylus Pro 3800 review 29th June 2007Review of the Epson Stylus Pro 3800 printer. Desktop printer is 17 inch print width and takes A2 sheets, photo and fine art papers.
-- --
Never miss a new article or review - Sign up for our Newsletter (2-4 a month max.)More print related information from Keith
...or use the search box at the top of any pageReference pages and test images
- Printer Test Images
- B&W printer test image
- Printer cleaning
- Paper reviews
- Printer info/news/speculation Canon | Epson
We're an Amazon.com affiliate, so receive payment if you buy via Amazon US