


Epson ET-8550 printer review
Epson ET-8550 printer review
13″/A3+ EcoTank printer

Keith has removed all Google ads. Too many deceptive and irritating adverts.
Any ad links left are non tracking, to companies we know, trust and we've worked with for years [Park Cameras]
Ads helped pay for site running costs, so if you found something useful, please
...Make small KoFi donation?
...Subscribe to Keith's YouTube Channel
...Get Keith's book about how to use tilt/shift lenses
Our site contains affiliate links - these help support the site. See our Advertising policies for more
Article Index
- Printer features
- Setup
- Connectivity
- Ink refilling
- Media handling
- Scanning
- Office functions
- Colour management [important for the 8550]
- ICC Profiles for 8550/8500
- Black and White
- Printing
- Epson software
- Choosing papers [do not ignore!]
- Conclusions
- Full Specifications
Keith Cooper’s Epson ET-8550 EcoTank printer review
The 13″ width A3+ printer is the first ‘cartridge free’ or tank based printer Keith has looked at for a detailed review. It has a hybrid ink set, with both pigment and dye black inks.
Many UPDATES 2024, 25, 26
This review dates from 2020, but in 2024 was extensively updated and extended when we got our own et-8550 for our office. New videos have been added as well, covering things like installation, setup, maintenance, profiles and fixing Mac ‘AirPrint’ problems.
2026: Included my design for a rear paper loading tray for the rear paper feed.
Jump to my >> ICC Profiles <<
These are available on request
[a Ko-Fi donation is all that’s asked for them…]

The key to what makes this printer different…
Please take time to understand the importance of using icc profiles and the best media settings. You don’t need to be able to make profiles [there are some listed in the review], but it explains why some papers perform better than others. Remember that only the VFA media setting uses ALL inks for matte papers. In particular, don’t assume that a paper which worked well on your old printer will perform as well with the 8550 [it could even work better].
The review is complemented with a range of YouTube videos exploring aspects of using the printer.
Important related article
Choosing the best resolution settings for your images. Why a lot of ‘advice’ on settings you might hear is wrong.
Includes videos
The test images referred to in the review and in many videos, use the free Datacolor test image from my
Misc. Updates
- May 2023: A firmware update addresses marks left on some papers by the pickup rollers – this is not the ‘dents’ left on some thicker/softer papers. Check your printer for firmware updates.
- 2025/26 The collection of icc profiles has been expanded
Videos
I’ve made a number of videos to go along with this review:
- ET-8550 review
(Original 45m video – complements this review
Do note that the written review has been updated
over the years. Videos are set at publish time)
Set-up and maintenance [note dates]
- Epson ET-8550 printer setup, ink fill & initialisation. Software & fixing the Mac AirPrint problem [2024]
- How many prints do you get from a full ET-8550 set of inks? [2026]
- ET-8550 Setting the correct ink levels [2026]
- Why and how to: Epson ET8550 ink refilling, top-up and ink level setting. Keeping your printer well [2024]
- Replacing Epson ET8550 maintenance cart/ tank/box. Check capacity and fitting replacement [2024]
- ET-8550 ink misting/overspray – Always check ANY new printer [2025]
- Epson ET-8550 cleaning, and UK 5yr warranty offer [2025]
- Epson Ecotank ET-8550 ET-8550 maintenance tips. Things to keep your inkjet printer healthy
- ET-8550 advanced cleaning
- ET-8550 setup [original review]
Printer add-ons
Profiles and paper choices
- Printing B&W on the Epson 8550 with Only Black Pigment Ink
- Beyond the Basics: Solving ET-8550 Black & White Printing Issues
- Don’t Believe the Specs! Printing Archival Matte on the Epson ET-8550
- Making your prints jump off the page – with metallic papers
- Printing Astronomical Images on Metallic Paper. Red River Polar Gloss and ET-8550
- Metallic Paper and printing Deep Sky Astro images on the ET-8550
- Ilford Metallic Gloss paper tested on the ET- 8550
- Cheap ET-8550 Photo Papers & Canvas tested
- 100+ ICC Profiles I’ve made for the ET-8550 ink tank printer. Use both blacks
- An ET-8550 super power. Why the VFA print mode is so great with matte & fine art papers and cards
- Epson ET-8550 cheap photo paper. Looking at cheap and ultra cheap Koala brand photo paper
- What are the secrets to getting the best ET-8550 Black and White printing performance?
- What cardstock works BEST on the Epson ET-8550/8500? Print settings & test image for evaluating card
- Which paper types are best and worst on the ET-8550 Ecotank printer. Ilford paper test & profiling
- Printing vinyl stickers. Epson ET-8550 media settings and icc colour profiles. Avoid smudges
- How to print the bright colours you want on matte paper and card. What can your printer manage?
- ET-8550 has two black inks. Why they are there, how they work and when both are used
- Why the ET-8550 isn’t a pro printer & why I don’t care. A new printer profile explains all
- Cheap matte photo paper review – is it any good on the ET-8550. Profiles for colour and B&W
- Using a scanner for better black and white printing. Epson ET-8550
- ET-8550 Best media settings for Black and White printing. When colour is not like B&W
- Mastering Matte Photo Paper Prints on Epson ET-8550: Best Settings and profiles [02/25]
- All new ET-8550 icc printer profiles. How I make profiles to fit different paper types and styles [2024]
- i1Studio/CCStudio – making ET-8550 icc profiles
- How long will inkjet prints last? [Ecotank 8550/8500] Photo and art print lifetimes. Finding answers
- Hahnemüle release collection [20+] of free ICC profiles for the Epson ET-8550/8500 [02/25]
Using the printer
- Epson ET-8550 Firmware Update info
- Epson ET-8550 printer update and request for questions. Six ink Eco-tank printer.[2024]
- ET-8550 Q&A – using the printer [Dec 2021]
Specific printing examples
- 8550 custom media sizes for panoramic printing. When is 13 inch not 13 inch? [when it is 329mm]
- ET-8550 Borderless photo print
- ET-8550 Panoramic print
- ET-8550 Black and White
- ET-8550 B&W Pano print on roll paper
- ET-8550 Colour fine art and paper choices
- ET-8550 Canvas printing
- ET-8550 Double sided photo prints
- ET-8550 Poster board printing
- ET-8550 Printing on clear film
- ET-8550 Art scan and greeting card print
- ET-8550 paper/card choices for greeting cards
- Selling your ET-8550 prints?
ET-8500 videos
Remember that apart from size, the 8500is the same as the 8550
ET-8550 printer review – overview
The Epson EcoTank ET-8550 is a 6 ink A3+ (13″ width) multifunction printer. In this review I’m primarily concentrating on its use for printing photos and artwork, and how to get the best results from its interesting hybrid ink set. In some regions it has the L8180 model number – I believe they are the same [as are black and white versions of the printer.
I’ve also reviewed the similar Epson ET-8500. This is an identical printer, but only takes paper up to 8.5″ width or A4 size. As part of this I created some additional 8500/8550 ICC profiles and have a number of additional videos which are mostly of relevance to 8550 users as well.
Printer features
The printer includes a flatbed scanner, so is marketed with the ability to ‘print,copy and scan’.
It’s this ‘home office’ pitch which has left many wondering if it’s a good option for photo printing?
How does it compare with dedicated photo printers? This was one of the main reasons for making my ET-8550 printer review.
The answer is as always ‘it depends’, but for those daunted by the length of my written reviews, the answer is ‘very well …with the right paper choices’
The ink system has two interesting features compared to the normal photo printer.

No cartridges
You fill ink tanks from bottles. I’ll look at this below, but essentially the ink from the bottles is used to fill the tanks from above,
Hybrid ink set
The ink set has two blacks, a dye one and a pigment one. There is a grey dye and the traditional Cyan/Magenta/Yellow dye based colours.
This mixed ink set means that the print characteristics are not simply like a dye or pigment ink based printer, but a hybrid, the results of which depend on paper type and media settings used when printing. The results of this are clear in my creation of colour ICC printer profiles and printing in both colour and black and white.
ET-8550 printer review: A more modern interface?
The large (10.9cm) colour touch screen is easy to work with, but if you like, there is an Epson App (Smart Panel) which duplicates many control functions via a phone or tablet. The printer also has USB and SD card sockets at the front, allowing for direct printing, and the use of these devices as network storage. Whilst you might not want to go out and replace your file servers yet, both devices appeared on my local network as storage,
I will look at use of mobile devices later, but not in any great detail, since the main aim of this review is to look at high end print making, and that isn’t yet something I associate (yet) with printing from mobile devices.


Printer setup
I’ve a detailed look at the setup process in its own article. Also, a video looking at the 8550 setup process.
There is a lot of blue tape to remove – check inside and round the back as well. There are two yellow plastic shipping clamps with the print tray. They are only relevant for initial [empty] shipping, since once you’ve put ink into the printer, it needs moving with care – there is a small blue catch which locks the print head.

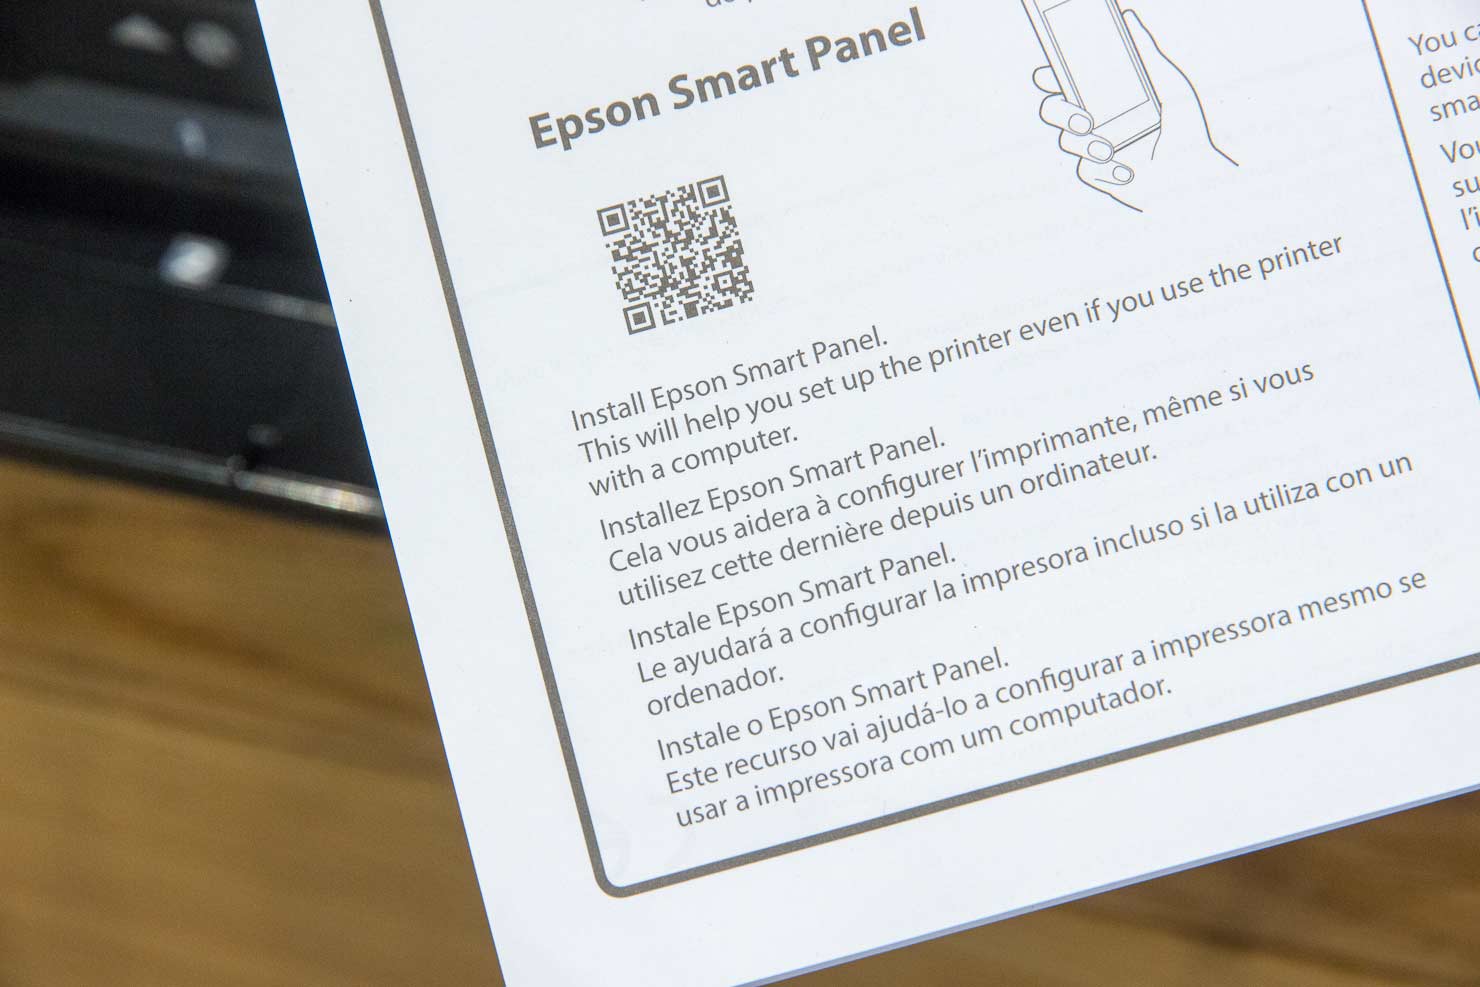
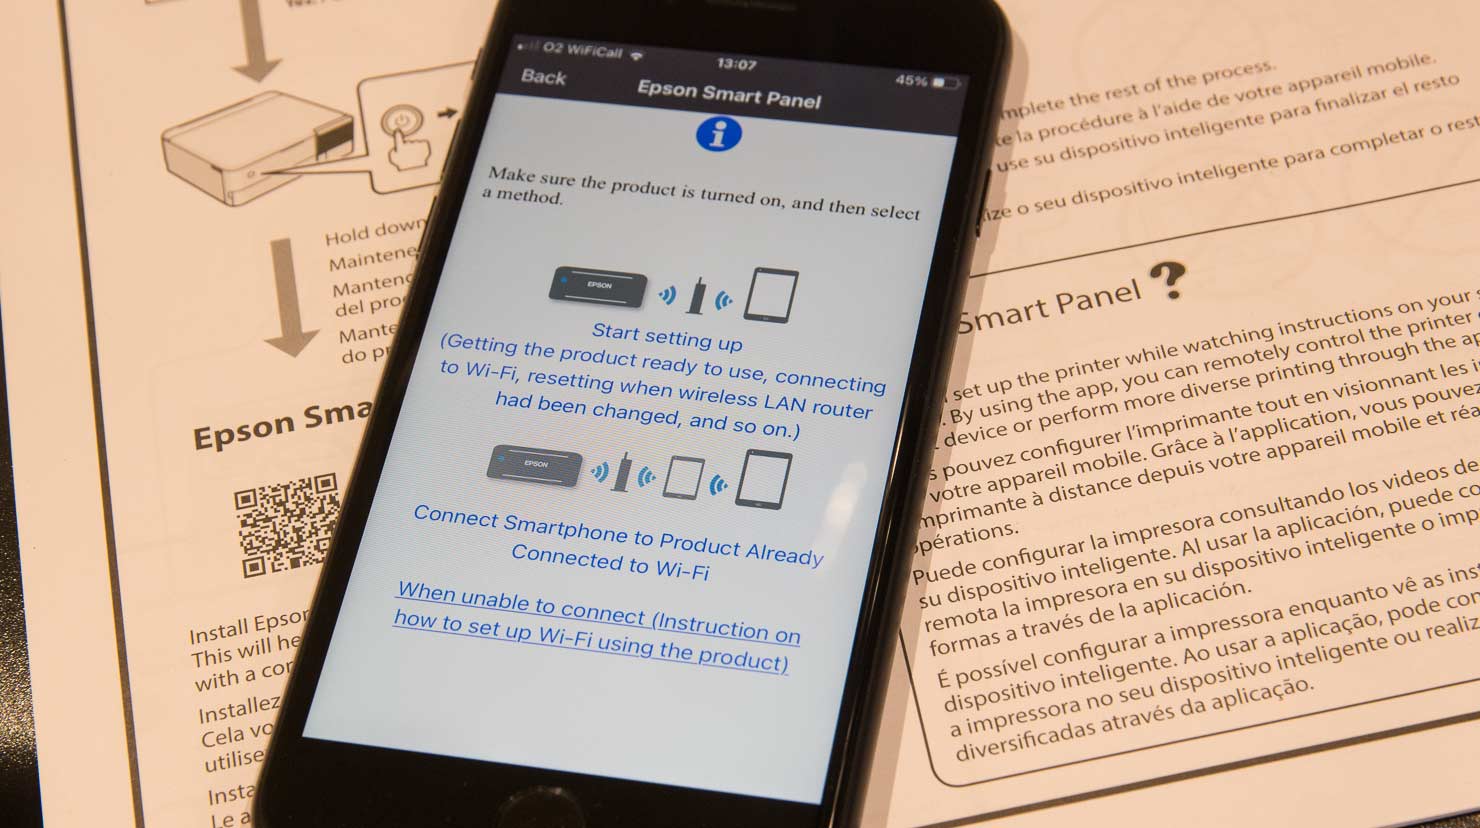
There is a phone app that will guide you through the complete setup if you like.
Yes, you don’t need a computer connected – I cannot see why I’d ever want to do this, but Epson doesn’t go to this trouble for no reason…

Here’s the set-up for the wireless connectivity. You can connect directly, or as I have, connect the printer to one of our home networks.
Filling the ink
This is the different bit – no ink carts to load, just fill the six tanks from bottles.
Note: Someone contacted me that they had mistakenly set up the printer with no ink in it. I’ve no idea how you could do this, but Epson’s fix was to do the ink tank fillings and then do a couple of nozzle checks and a deep clean. This fixed things.

Lifting the cover and blue tank caps gives access to the fill points.

As a double check, I’d note that the bottles are physically keyed, so that the wrong ink bottle won’t physically attach to the fill port.

The filling automatically stops when the tank reaches its ‘full’ level.
DO NOTsSqueeze the ink bottles.
After filling, there is ink left in the bottles. This can be used later to top off the tanks.

The Epson install software (on my MacBook in this instance) is fairly smart, giving you a number of ways of connecting the printer.
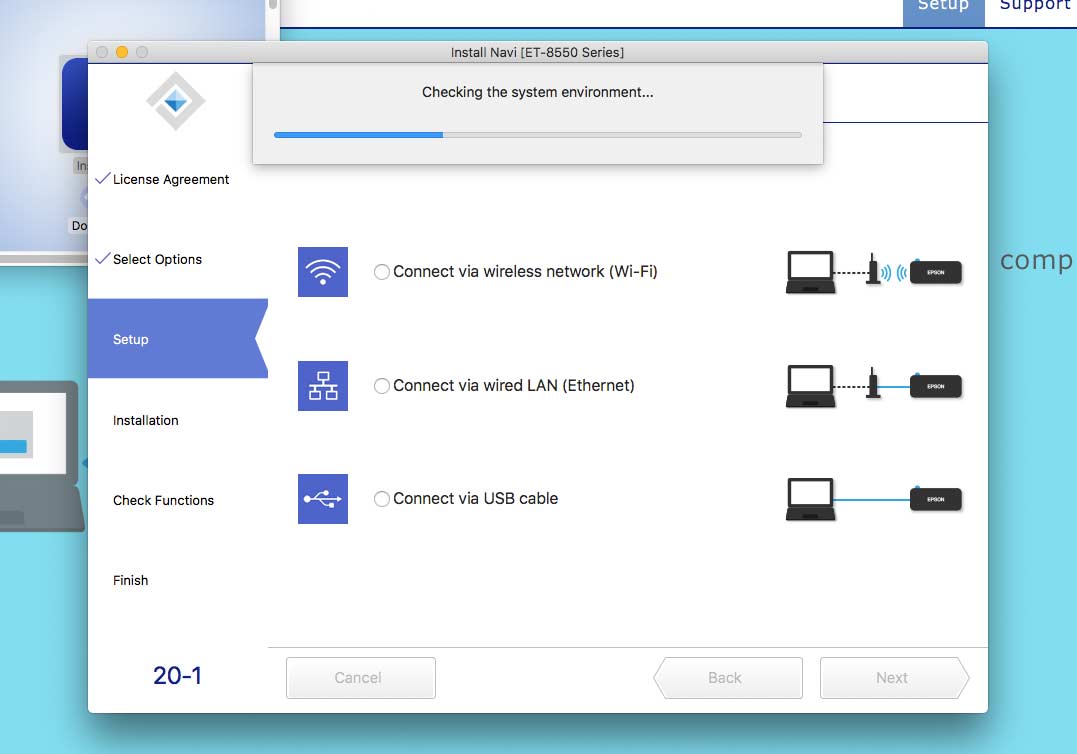
Once set up, there is a range of software you can install in addition to the printer driver.
Note that during printer driver setup, various Epson paper ICC profiles will be installed on your system. I’ll come back to profiles later, when looking at colour management, since along with media choices, they are key to getting optimal photo printing results from the 8550.
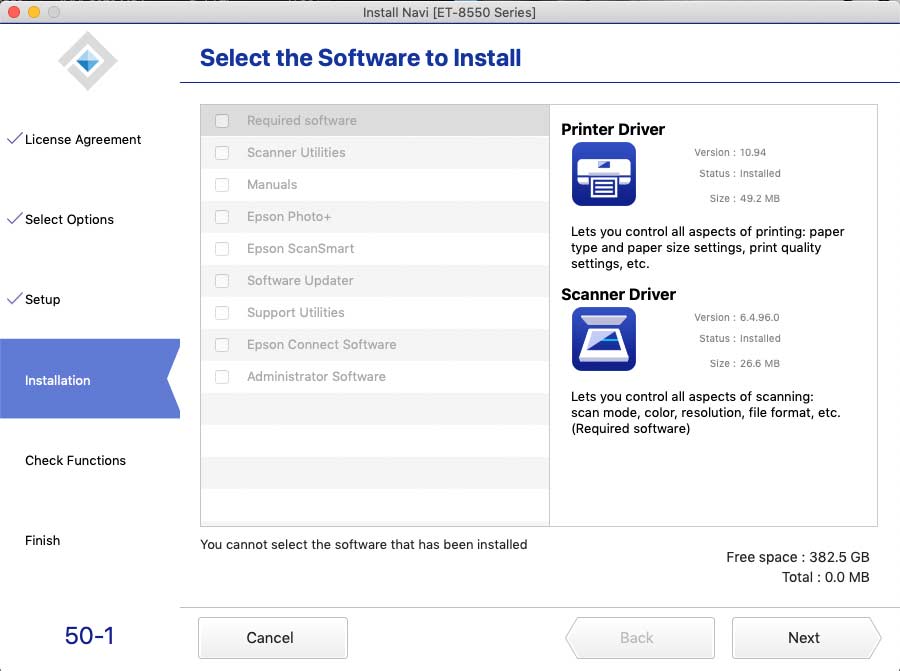
I’m going to suggest installing all of the options, since some of the software many be more useful that you’d thought.
Just one quick note for Mac users. Makes sure that the printer instance set up on your system is not the ‘AirPrint’ version. This has a reduced set of functionality and has little use for normal printing – the first time I did it by mistake I spent a while wondering why most of my printer driver options had vanished…
I’d also note that a side effect of the AirPrint driver being installed is that Epson Print Layout [EPL] won’t work.

The display above is on the older Mac I did the original review with.
The look and feel of MacOS has changed quite a bit in some areas, but unfortunately the AirPrint problem persists.
I’ve made a new [late 2024] video about setting up the 8550, which includes newer screenshots and more about avoiding the AirPrint problem
In particular, make sure you actually read what the installer says and go through the ‘select software’ step and don’t just accept the default offered.

Connectivity
As well as the wireless option I’m using for testing, the printer has Ethernet (100MB) and USB-B connections at the back.

Note that you can have multiple connection methods for an individual computer, but each one will appear as a ‘different’ instance of the printer. So, since I also used USB when testing, I have two 8550 printers in my (MacBook) printer list – one USB and one on the network (wirelessly).
The printer also has an SD card slot and USB socket at the front. These can be used for memory cards and sticks, as well as a ‘PictBridge’ connection to cameras.

The devices attached can be shared on your network, as well as being an optional repository for scans made with the built in scanner.
Here’s A USB stick with 5 photos on it – the server is mounted on my MacBook desktop.

Note how it appears as two servers: ‘Epson ET-8550 Series’ for Mac and ‘epson098c06’ for windows users.
Yes I do name servers on our network using Arabic star names. It goes back to when I was a UNIX sysadmin 30 years ago… ;-)
The printer screen offers several options when you plug in a device.

The ‘various prints’ option links to all sorts of layout and printing options.
Here, I’ve selected four pictures from the memory stick to print 4-up on a page with a striped background.

There is a lot of stuff like this, but for details I’m afraid you’ll have to read the manual…
ET-8550 printer review: Ink refilling
One of the key features of the 8550 is that you get to refill the ink tanks once they get low.
Using the spare ink left over, it was time to top up the tanks (remember ink is used during setup – filling the various tubes and printhead.
I’m using the grey ink here.

Lifting the cap, the bottle just slots in place – do not squeeze it. Just let it fill.

The precise ink levels in the carts are tricky to show., but here’s the grey ink refilled.

However, the ink levels are not reported.
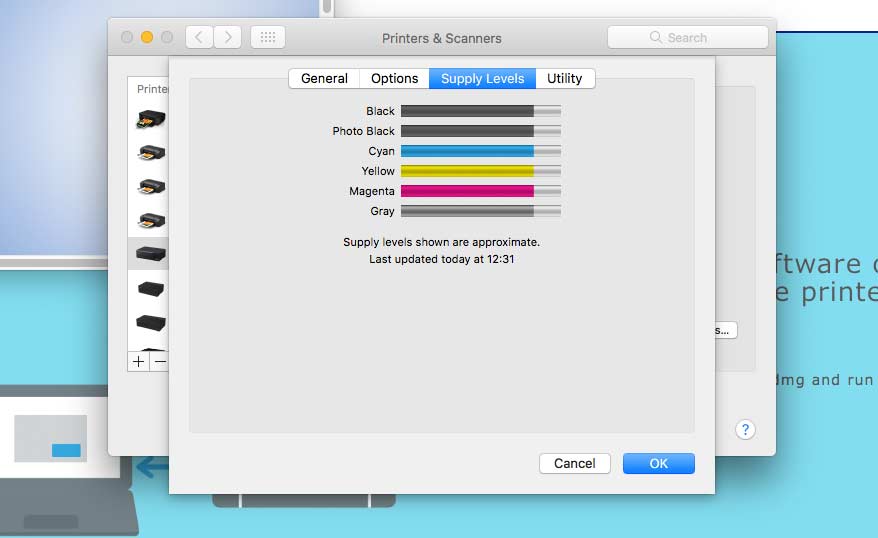
Here lies another difference from normal cartridges. With cartridges, the printer knows how much ink it started with and knows how much has been used. This give a way to calculate the ink remaining – there are no level detectors in cartridges.
However, I’ve just topped up the grey ink. You need to go to the printer menu and select the ink filling options – there you can tell the printer that a tank is now ‘full’

Setting the grey to ‘full’ now registers the level.

An important aspect of this is that you shouldn’t top up any inks unless you are filling them to the full mark, and registering it. If the printer doesn’t know the ink levels, there is a risk it won’t flag up an empty tank and run dry – never a good thing to do with inkjet printers.
The updated level even shows up on my phone’s printer control.

Yay! another use for the phone, apart from saving me a walk into another room to switch off the printer.
Maintenance cart
There is a maintenance cart to the left of the ink tanks,designed to soak up ink used in cleaning over time. It is easily replaceable, but I suspect will last a long time – I’d not bother getting a spare until it started showing as very low in capacity.

Transport lock
With the ink feed system, you really don’t want the print head moving whilst transporting the printer. It’s possible for ink to syphon through the pipes and head if tilted too much.
So, there is a head locking mechanism which should be engaged if moving the printer


That does not mean you can now tip the printer on its side. It does make spills rather less likely. Interestingly enough, Epson supply a big plastic bag for transporting the printer – just in case.
Head alignment
After setting up the printer, it’s worth running through the head alignment process to optimise print quality. Although it’s possible to do this with plain paper, I found that using a photo paper made it easier to check the test prints.
The head adjustment is accessed via the maintenance menu.

There are two settings to adjust

Several sheets are required.

Fortunately, this is only really needed the once.
It’s something that is of more benefit if you plan on printing at higher quality settings and with lots of detail in your images. The printer worked just fine before it, but I always carry out such adjustments if offered, with any printer I test.
Media handling
The printer has a range of ways of getting media through it.


Remember to load single sided paper printing side down in the trays
It gets reversed when printing – you generally don’t want to try and print on the back of photo paper.
The paper sizes and media types are set from the front panel when loading paper.
It’s possible for the computer settings to override the settings on the printer, but I always make a habit of setting the correct paper and size if possible, on the printer first. This has, over the years, saved me an awful lot of wasted paper though mistakes, in return for a few seconds setting the printer…

The front tray is good for plain paper. Thin photo paper will work as well but I don’t generally want photo paper going through the duplexer unit at the back.

I have tried double sided photo paper in the lower tray – it did not go well.
Under the tray is a CD/DVD holder for printing on disks

It loads just above the tray.

Do however make sure you are using a printable disk that works with inkjet printing, since with the wrong disk type ink won’t dry well and will quickly smudge.
For Epson DVD/CD printing software, see my XP-15000 review.
The second tray is for smaller photo paper. This works for thin paper.
I tried thin card and thick photo paper, with similarly unsuccessful results as with double sided printing.

The problem is that paper gets folded back over itself via the duplexer unit at the back. Fortunately this is easy to remove if need be for clearing jams.
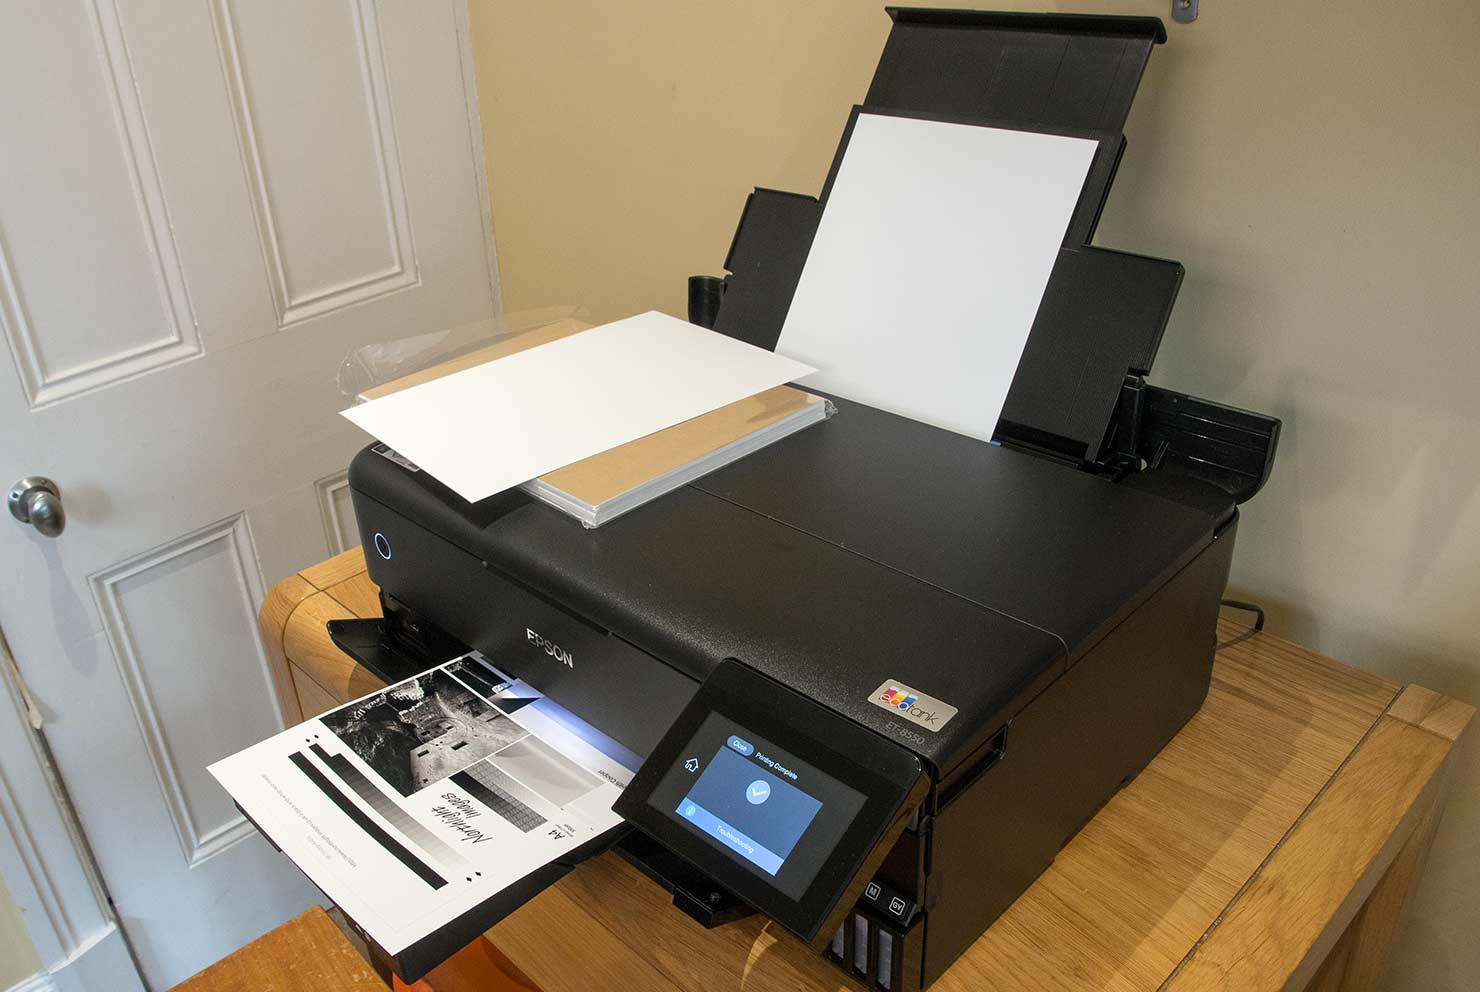
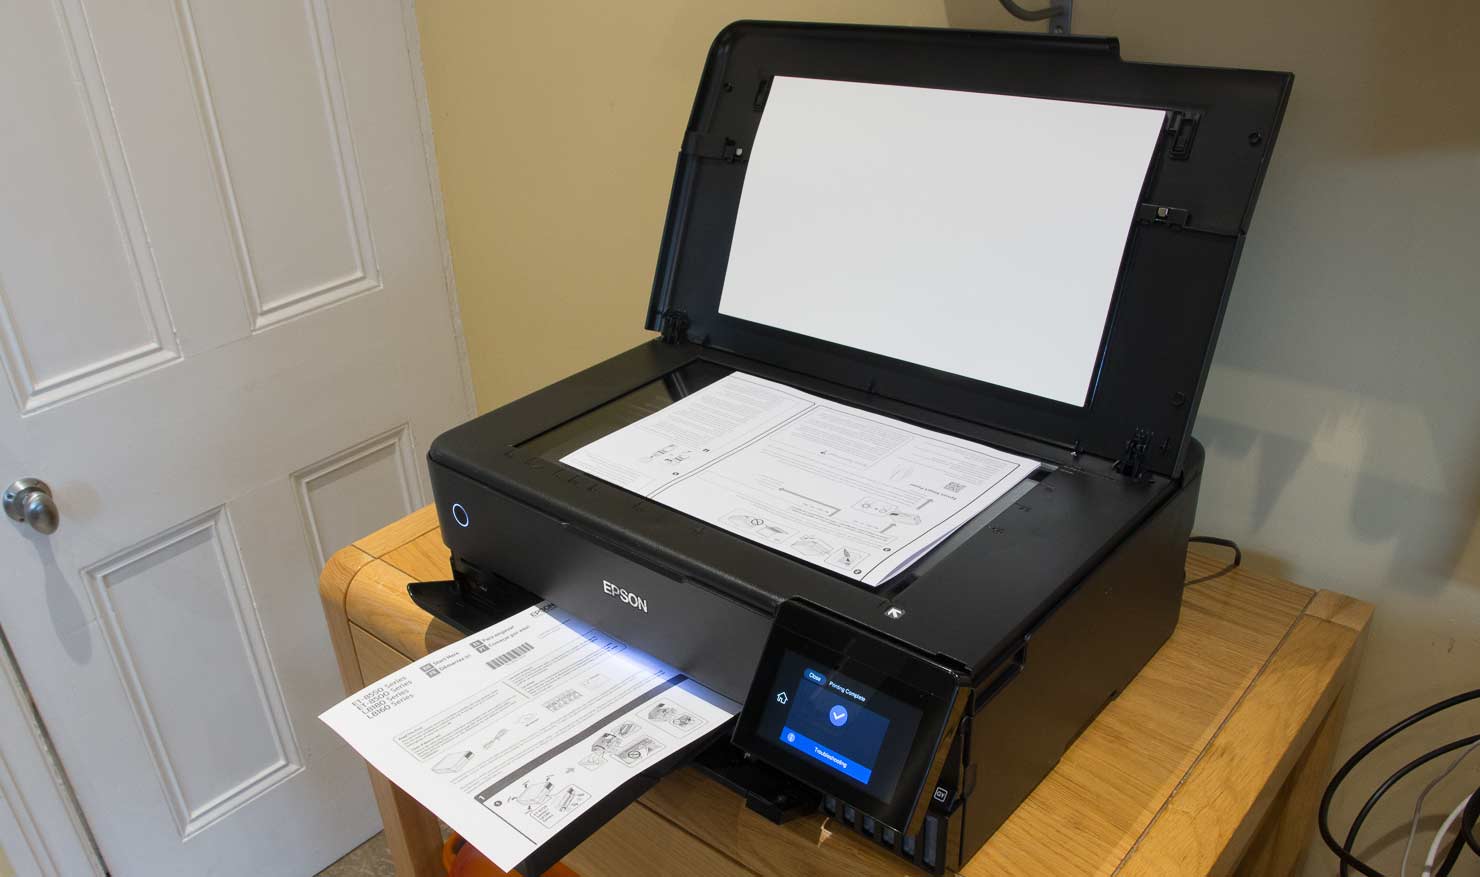
The top feed
This is where almost all my printing started.
There’s a cover over the extensible guides.

Extend it as needed for the paper size in use.

Here. set for A3+ or 13″ x 19″

Note that if you want to use A3+ sheets there is space needed above and to the rear of the printer.
The tray is motorised and will extend as needed, and retract at power-off, of via the menu.

That and some space at the front. This is a test sheet for creating a printer profile (see later for more colour management and profile info).

Note the interior light close to where the paper is coming out.
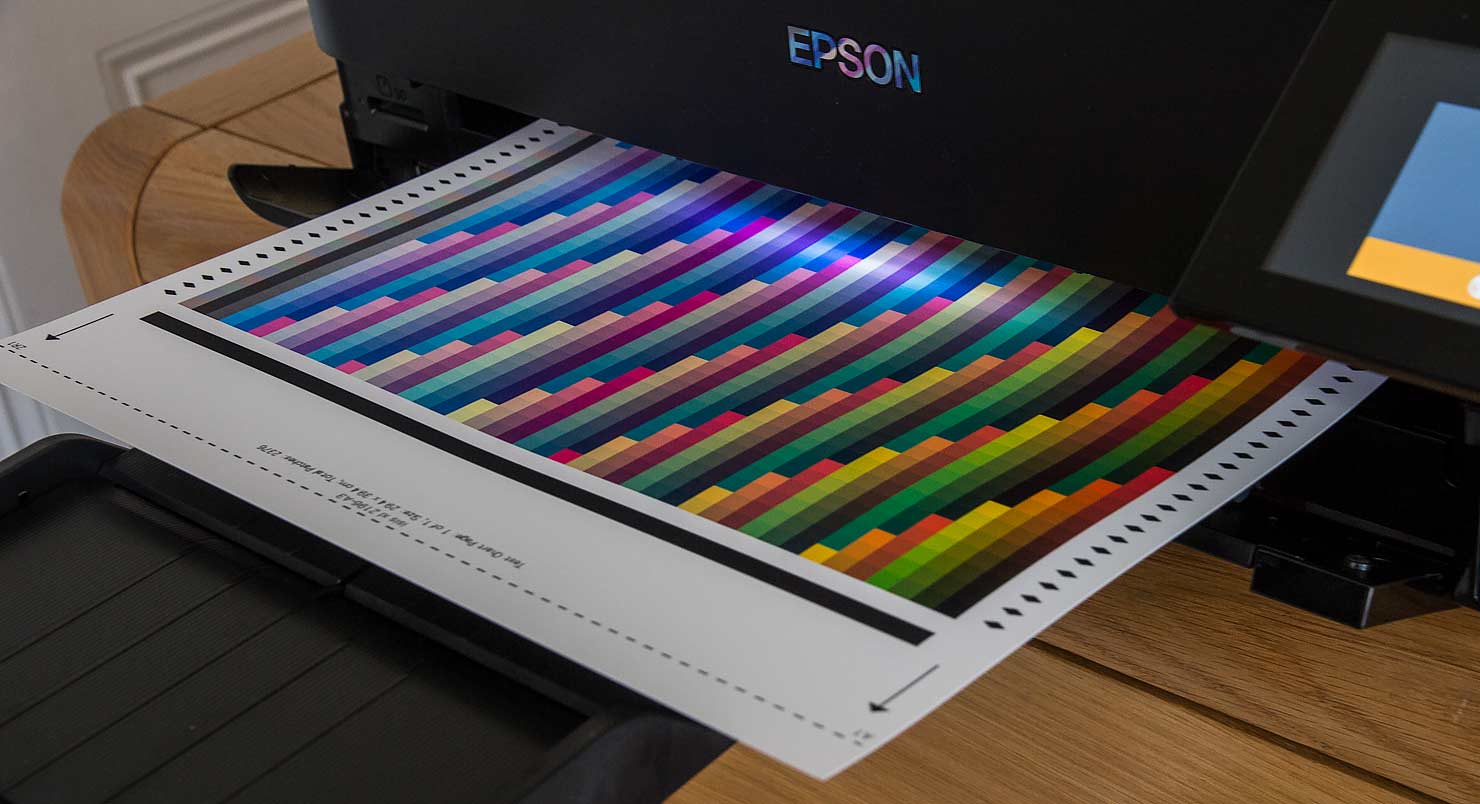
The LED is a very blue white and definitely not a light to make any judgements of print colour accuracy with.
Smaller paper
Seen here with A4 sheets stacked in the feed tray.
The precise number does depend on paper size and thickness, so if you’re trying a new paper, start off with just a few sheets, once you know that one works fine.

The printer supports a number of smaller paper sizes which may be used for cards and the like. Borderless printing is available for some paper sizes, but not others (A5 and A6 for example).

Custom paper
The top feed can also take custom sheet sizes, such as this 1 metre length cut from a 13″ roll of matte art paper.

Custom size limits are noted in the manual as:
- User Defined(mm): 182×254 to 329×2000
These are not available for mobile device printing
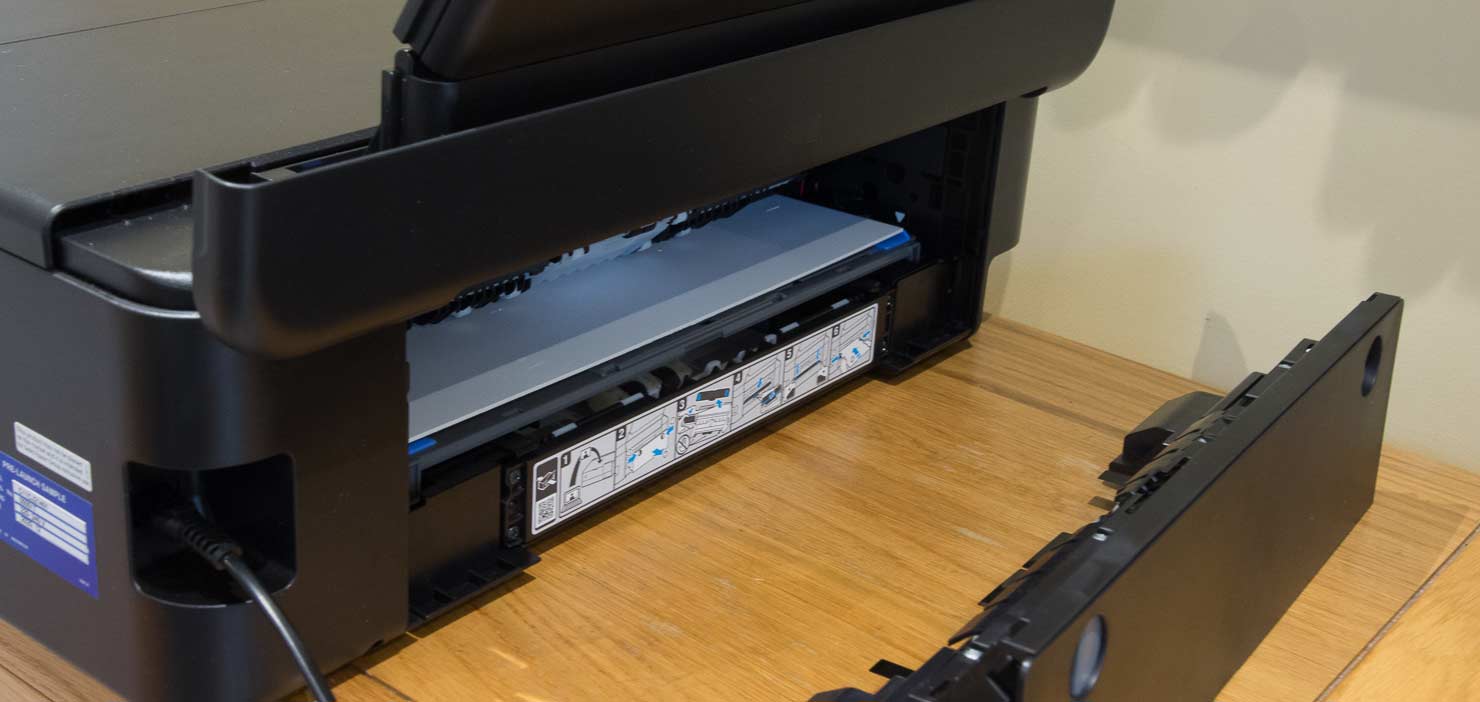
The rear feed
Paper can be fed through the back of the printer, where the print path is direct and unbent through to the front.
This feed supports board ip to 1.3mm thick.

You need to remove the duplexer unit. Lift the top feed guide to access the two spring loaded catches.
The whole unit comes out.

Attached to the duplexer is the grey and blue feed guide for the rear slot.

This unclips.

The guide is then attached at the rear of the printer – it just clips in place.

When using the rear feed, wait until the printer tells you to load the media.
It will be pulled through the printer.
I’m using Epson Matte poster board here (A3+ 13″ x 19″)
One minor gripe is that the jaws of the feed guide at the back won’t accept board this thick, whilst the printer is quite happy with it.

If using this board very much, I’d be tempted to bend the blue plastic tabs (carefully) or use the add-on loading tray I developed.
The print worked just fine though.

Using the rear feed does enforce margins and a fairly large trailing margin [19mm] – no borderless printing.
There’s no way round the edge margins – remember they are the same whatever size media you use – that make a much bigger difference on small media like cards.

There is a video looking at the making of this print on the board.
Now for an entirely DIY approach which I hope might be of use to someone…
Making a rear paper feed tray
The ET-8550 can have issues feeding thicker paper via the top loading slot. With thicker art papers the feed mechanism can leave marks [‘dents’] on papers.
During testing of a range of high quality art papers, a significant proportion of the samples would not load via the top, so an easier solution to using the rear feed path was sought.
The wooden tray – here created for feeding A3+/13×19″ is offered as a potential solution if you need to use the rear feed much. Placing the side rails closer to the midline would support other paper sizes,
A 10 minute video covers the design basics and includes key dimensions
It’s meant to be an easy fix needing little in the way of construction skills.

ET-8550 printer review: Scanning
The built in scanner can be used as a basic copier onto plain paper. It has no document feed, but to be fair if I want document feeding I’ll buy a full time office printer. For myself, the ‘office functions’ of this printer are a distant second in my concerns compared with art/photo printing.
The scanner has a rated 1,200 x 4,800 dpi resolution – what you choose to use it at though will depend a lot on what you are scanning and why. The glass is ~8.5″ x 14″
I wanted to see if it could be used for something a bit more taxing. Scanning a watercolour painting and printing as a greeting card. I have a video about this and will shortly have a more detailed article.
Here’s the artwork, a watercolour painting. It’s slightly oversize for the scanner glass.

To get round the size limitation I scanned the image twice and then flat stitched the images in Photoshop.
The included Epson Scan software is quite competent, and allows you to turn off auto corrections. Note that some of those higher resolutions will include interpolation from the actual scan data.

Just to see how well the scanner does, I scanned an X-Rite Colorchecker SG card.

Saving the image as a TIFF file (colour management turned off), I was able to import it into i1Profiler to create a custom profile.
I looked at this feature a while ago in a review [i1profiler scanner profiling]

The profile is assigned to the RAW scan file.
This animated GIF gives a feel for the sort of improvement it’s possible to get.

That suggests that with some work it should be possible to get quite good scans using the Epson software.
However, for many years I’ve driven all my scanners (film and flatbed) from Vuescan.
It’s a superb bit of software and happily works with thousands of scanners no longer supported, as well as new ones.

Here’s the scan of one side of the print – note the shadowing on the right.
The scanner was also somewhat variable in how much it picked up the texture of the paper – easily fixed in Photoshop with a masked curves layer.
A very slight hue shift was applied to the blue/purple areas to better match the original print.

The original image was scanned at 1200ppi.
This pushes the file resolution well above what might be thought best for such prints. Now that in itself is not really a problem but I was printing the image on one of my card templates, which are 300 ppi, so I needed to scale the image. The sharpening of the scaling gives the resulting cards very good crisp detail, whilst still maintaining the watercolour look.
The particular card here is a 285gsm etching paper from Fotospeed in the UK, which I’ve created a custom profile for.

Note that I’m printing using the VFA media setting. As I’ll show in a bit, this is the one where both pigment and dye blacks are used, giving particularly good results on a paper like this, once profiled.

ET-8550 printer review: Office functions
The printer works well with plain paper, single or double sided. The pigment black gives good crisp text although the dye colours give just the sort of slightly washed out I’d expect printing colour on plain paper.
That’s not an 8550 complaint – if I want vibrant pie charts and sales graphs on plain paper, I’ll get a colour laser printer and accept that it won’t be much good for photos…
It’s not bad though and faster than using specialist photo printers, which with their smaller cartridges always make me think about ink use when printing the odd document.
The main tray takes just over 100 sheets of plain paper – not huge, but once again more than enough for my would be use of printing the odd invoice or letter. A single sheet of text prints in only a couple of seconds, with a bit of a delay if it needs duplexing.
Copying works fine (with enlargement too) and the printer has an array of preset documents you can print – from calendar and reminder sheets, to musical score sheets and graph paper. Access these from the aptly named ‘Various Prints’ menu option.
You can scan to an attached USB memory stick and print images from devices in various formats as in the example shown earlier.
From my limited (recent) experience of office printing, the printer doesn’t feel particularly fast (or slow), and if it’s home/office printing that you really want then this printer, with its emphasis on creative imaging is perhaps less likely what you are looking for.
I can’t say much more since testing office printers is way beyond my area of interest, but I’m sure you’ll find some more general reviews/comparisons where the concept of ICC profiles never entered the reviewer’s thought process ;-)
Test prints
With any new printer I’ve a series of known test images that I always start off printing, I know what these images look like on different types of paper and many different printers. It’s a quick way of seeing if the printer is up to more detailed testing, since if it can’t manage one of these images, it’s not going to suddenly look better with others.
I always suggest using such images when testing new papers, rather than your own favourite photos. If you can print an image you like the quality of, from these, then it makes refining the printing of your own work so much easier.
- The images (and many others) are available for free download on this site.


Both images have lots of components to specifically test different aspects of printer performance.
I also use both for testing the performance of printer profiles. If you make use of them, then do be sure to read the explanatory notes that go with them.
Colour management
The hybrid ink set of the 8550 can be thought of as a CMYK dye based printer with the addition of a grey dye ink and a pigment black ink optimised for text printing. This ET-8550 printer review is actually my first look at this type of ink setup – I have subsequently looked at the more basic ET-2850 which has only four inks.
The grey ink allows for mixing with the strong colours, and along with variable drop sizes helping negate some of the need for light colours – usually light cyan and light magenta. It also helps in greyscale reproduction delivering better B&W printing (I’ll be returning to B&W in a bit).
At first thought, the black pigment ink might be thought of a primarily for text printing, but a closer analysis shows that for the vfa media setting, it is used with the dye inks.
Making profiles
The Epson installer places a range of Epson ICC profiles for different Epson media onto your computer. That’s fine, but I also wanted to test the printer with an assortment of other papers.

As a result of this I’ve created profiles for quite a few papers (Epson and third party). These were made using A3+ target sheets with just shy of 3000 patches per target. The targets were measured with an X-Rite i1iSis spectrophotometer and profiles created with i1Profiler. Remember that a profile is made for use with a particular media setting, and that setting may have a different name to the paper you are using.
Epson ICC profiles
Since originally writing this review, Epson have started producing a few more ICC profiles for the 8550. They are available from some Epson web sites
- Epson US 8550 info/profiles [ ‘signature worthy’ papers]
- Signature Worthy Exhibition Fiber Paper v1.00
- Signature Worthy Metallic Photo Paper Luster v1.00
- Signature Worthy Metallic Photo Paper Glossy v1.00
- Signature Worthy Hot Press Natural v1.00
- Signature Worthy Hot Press Bright v1.00
These proved difficult to download – the link above is nominally a Mac one, but the profiles work for any system
On the Mac, the basic Epson icc profiles may not appear in some applications. They can be found in the system files and copied to appear in Lightroom/PS etc.
For people not wanting to delve into the system, these profiles are included in the set I have available.
Profiles created for my ET-8550/8500 printer reviews
This was originally [2020] a simple list but has gotten a bit complex as I’ve added new profiles.
This table now [Mar 26] represents all the profiles I’ve made. For some papers there may be multiple experimental profiles. See the notes below.
| Paper Name | ICC Profile Name |
|---|---|
| Arches Aquarelle Rag 310 | 8550_CansonArchesAquaRag-310_vfa_hq.icc |
| Arches BFK Rives White 310 | 8550_CansonArchesBFKRPWhite-310_vfa_hq.icc |
| Arches BFK Rives Pure White 310 | 8550_CansonArchesBFKRPureW-310_vfa_hq.icc |
| — | — |
| Brilliant Matte DS 230 | 8550_BrillMatDS230_ematte_hq.icc |
| ^^ | 8550_BrillMatDS230_vfa_hq.icc |
| — | — |
| Canson Rag Photographique 310 | 8550 CansonRagP VFA hq.icc |
| Canson Rag Photographique II 310 | 8550_CansonRagPhot2_vfa_hq.icc |
| Canson Baryta Photographique II 310 | 8550_CansonBarytaPhot2_psgp_hq.icc |
| Canson Baryta Photographique [matt] II 310 | 8550_CansonBarytaPhot2Matt_vfa_hq.icc |
| Canson Baryta Prestige II 310 | 8550_CansonBarytaPrest-II-340_vfa_hq.icc |
| Canson Platine Fibre Rag 310 | 8550_CansonPlatineFibRag_psgp_hq.icc |
| Canson Edition Etching Rag II 310 | 8550_CansonEtchRag-II-310_vfa_hq.icc |
| Canson Photosatin RC 270 | 8550_CansonPhoSatin270_psgp_hq.icc |
| Canson Photogloss RC 270 | 8550_CansonPhoGloss270_upgp_hq.icc |
| ^^ | 8550_CansonPhoGloss270_pgpp_hq.icc |
| — | — |
| Canon Premium Fine Art Rough | 8550_CanonPFAR_vfa_hq.icc |
| Canon Pro Luster | 8550_CanonProLus_psgpp_q.icc |
| Canon Pro Platinum | 8550_CanonProPlat_pgpp_q.icc |
| Canon Premium Fine Art Smooth | 8550_CanonPFAS_vfa_hq.icc |
| Canon FAPM1 | 8550_CanonFAPM1_vfa_hq.icc |
| Canon PM101 | 8550_CanonPM101_ematte_q.icc |
| ^^ | 8550_CanonPM101_vfa_hq.icc |
| — | — |
| Epson CPN [Cold Press Natural] | 8550 CPN VFA hq.icc |
| Epson HPB [Hot Press Bright] | 8550 HPB VFA hq.icc |
| Epson TPP [Traditional Photo Paper aka Exhibition Fiber] | 8550 TPP PremSemiGl hq.icc |
| Epson PGPP [Premium Glossy Photo Paper] | 8550 PGPP PGPP q.icc |
| Epson Value Gloss | 8550_EpsonValueGloss_pqij_q.icc |
| Epson Premium Lustre [aka ‘Ultra’] | 8550 EpsonLustre PremSemiGl hq.icc |
| Epson Premium Semigloss | 8550_EpsonPremSG_psgpp_q.icc |
| Epson Standard proofing paper | 8550_EpsStdProofPaper205_psgpp_q.icc |
| Epson Archival Matte [std] | 8550_EpsonArcMat_ematte_q.icc |
| ^^ | 8550_EpsonArcMat_vfa_hq.icc |
| Epson Enhanced Matte | 8550_EpsonEnhMat_vfa_hq.icc |
| Epson Archival Matte [‘super’] | 8550_EpsArcMat_vfa_hq-5513-n0.icc |
| ^^ | 8550_EpsArcMat_vfa_hq-5513-n50_opt.icc |
| ^^ | 8550_EpsArcMat_vfa_hq-5513-n50.icc |
| ^^ | 8550_EpsArcMat_vfa_hq-5513-n100.icc |
| Epson Velvet Fine Art [‘super’] | 8550_EpsonVFA_vfa-5513.icc |
| ^^ | 8550_EpsonVFA_vfa-opt.icc |
| Epson Ultra Premium Gloss | 8550_EpsonUltraGloss_eug_hq.icc |
| Epson Watercolour Radiant White | 8550_EpsonWCRW_vfa_q.icc |
| — | — |
| Fotospeed Platinum Cotton 305 | 8550 FSPlatCo305 VFA hq.icc |
| Fotospeed Etching 285 | 8550 FSEtch285 VFA.icc |
| Fotospeed Cotton Etching 305gsm | 8550_FSCotEtch305_vfa_hq.icc |
| Fotospeed Metallic Lustre 275 | 8550_FSMetLus275_psgpp_q.icc |
| Fotospeed Natural Smooth 310 | 8550_FSNatSmoo310_vfa_hq.icc |
| Fotospeed Platinum Etching Cotton 310 | 8550_FSPlatEtchCot310_vfa_hq.icc |
| Fotospeed Platinum Matte 280 -super | 8550_FSPlatMat280_vfa_hq_5513.icc |
| ^^ | 8550_FSPlatMat280_vfa_hq_5513_opt.icc |
| Fotospeed Smooth Cotton 300 -super | 8550_FSSmooCot300_vfa_hq_5513.icc |
| ^^ | 8550_FSSmooCot300_vfa_hq_5513_opt.icc |
| Fotospeed HWS Lite 215 -super | 8550_FSHWSLite215_vfa_hq_5513.icc |
| ^^ | 8550_FSHWSLite215_vfa_hq_5513_opt.icc |
| — | — |
| Hahnemuhle Smooth Fine Art 265[‘HSFA’ from HP] | 8550 HSFA265 VFA hq.icc |
| Hahnemuhle Watercolor 210 [from HP] | 8550 HanWC210 VFA hq.icc |
| Hahnemuhle Photo Rag Matt Baryta 308 | 8550_HMPRMatBar308_vfa_hq.icc |
| Hahnemuhle Sustainable Photo Satin 220 | 8550_HMSusPhoSat220_psgp_q.icc |
| — | — |
| HP Artist Matte Canvas 380 | 8550 HPAMCanv380 VFA hq.icc |
| — | — |
| Ilford Gold Fibre Pearl 290gsm (GPGFP) | 8550_IlfGGFP290_psgpp_q.icc |
| Ilford Gold Fibre Gloss 310gsm (GPGFG) | 8550_IlfGGFG310_psgpp_q.icc |
| Ilford Smooth Pearl 310gsm (GPSPP) | 8550_IlfGPSPP310_psgpp_q.icc |
| Ilford Smooth Gloss 310gsm (GPSGP) | 8550_IlfGPSGP310_pgpp_q.icc |
| Ilford Smooth Cotton Rag 310gsm (GPSC) | 8550_IlfGPSC310_vfa_hq.icc |
| Ilford Textured Cotton Rag 310gsm (GPTC) | 8550_IlfGPTC310_vfa_hq.icc |
| Ilford Metallic Gloss 260gsm (GPMG) | 8550_IlfMet260GPMG_pgpp_hq_opt.icc |
| ^^ | 4 profiles, use M0 opt as default |
| — | — |
| Innova Hot Press bright white | 8550_InnovaIFA115hpbw_vfa_hq.icc |
| Innova Cold Press bright white | 8550_InnovaIFA116cpbw_vfa_hq.icc |
| Innova Ultrasmooth Gloss | 8550_InnovaIFA49USG_psgpp_q.icc |
| Innova IFA39 | 8550_InnovaIFA39_ematte_q.icc |
| ^^ | 8550_InnovaIFA39_vfa_hq.icc |
| — | — |
| Koala 200gsm glossy photo | 8550_KoalaHiGloPP200_pgpp_q.icc |
| Koala 250gsm Satin Photo Paper | 8550_KoalaPPPSatin250_sgpp_q.icc |
| — | — |
| Kodak 240gsm PremiumPhoto Glossy |
8550_KodakPPPGloss240_sgpp_q.icc
|
| — | — |
| Olmec PMA230 | 8550_OlmPMA230_ematte_q.icc |
| ^^ | 8550_OlmPMA230_vfa_hq.icc |
| Olmec OLM71 Metallic Gloss | 8550_OLM71PhoMetGlo_pgpp_q.icc |
| Olmec OLM72 Metallic Lustre | 8550_OLM72PhoMetLus_psgp_q.icc |
| — | — |
| PermaJet Titanium Lustre 280 | 8550 PJTiLus280 PremSemiGl q hq.icc |
| PermaJet Titanium Gloss 300 [2 versions] | 8500_PjTigl300_pgpp_q.icc |
| ^^ | 8500_PjTigl300_pgpp_smoo_q.icc |
| PermaJet Titanium Gloss 300 [optimised] | 8550_PJTiGl300_pgpp-5513.icc |
| ^^ | 8550_PJTiGl300_pgpp-opt.icc |
| PermaJet Double Sided Lustre 295 | 8550 PJ_DSLus295 PremSemiGl hq.icc |
| PermaJet Oyster 271 | 8500_PjOy271_sgpp_q.icc |
| PermaJet Portrait Rag 285 | 8550_PJPortRag285_vfa_hq.icc |
| PermaJet Portrait Rag 305 | 8550_PJPortRag305_vfa_hq.icc |
| PermaJet Watercolour Artist 240 | 8500_PjWCA250_vfa_hq.icc |
| PermaJet Ultra Pearl 295 gsm | 8550_PJUltraPearl295_psgpp_q.icc |
| PermaJet Matt 240 [‘super’] | 8550_PJMattPlus240_vfa-5513.icc |
| ^^ | 8550_PJMattPlus240_vfa-opt.icc |
| — | — |
| Pinnacle Lustre 300 | 8550 PinLus300 PremSemiGl q.icc |
| Pinnacle Matte 230 [matches many bright white matte papers] | 8550 PinMat230 EMatte hq.icc |
| ^^ | 8550 PinMat230 EMatte q.icc |
| ^^ | 8550 PinMat230 VFA hq.icc |
| Pinnacle Photo Matte 130 | 8550_PinPhotMat120_ematte_q.icc |
| ^^ | 8550_PinPhotMat120_vfa_hq.icc |
| Pinnacle Cotton Rag 310 | 8500_PinCotRag310_VFA_hq.icc |
| Pinnacle Cotton Rag bright white 310 | 8500_PinCotRBW310_VFA_hq.icc |
| Pinnacle Etching 310 | 8550 PinEtch310 VFA hq.icc |
| Pinnacle VFA 275 | 8550 PinVFA275 VFA hq.icc |
| Pinnacle Semi Gloss 300 | 8550 PinSemiGl300 PremSemiGl hq.icc |
| Pinnacle Photo Gloss 240 | 8550 PinPhoGloss240 glossy hq.icc |
| Pinnacle Double sided Matte 300 | 8550 PinDSMatte300 VFA hq.icc |
| Pinnacle Etching 310 | 8500_PinEtch310_VFA_hq.icc |
| — | — |
| PPD 9 Glossy 260gsm | 8550_PPD9Gloss260_psgpp_q.icc |
| PPD 41 Glossy 180gsm | 8550_PPD41Gloss180_psgpp_q.icc |
| PPD 82 Satin 200gsm | 8550_PPD82Satin200_psgpp_q.icc |
| PPD 85 Cotton canvas 340gsm [Photo black] | 8550_PPD85Canvas340_matte_q.icc |
| PPD 85 Cotton canvas 340gsm [Pigment black] | 8550_PPD85Canvas340_vfa_q.icc |
| — | — |
| Red River Polar Metallic Gloss 255 | 8550_RRPolarMetGl255_upgp_hq.icc |
| ^^ | 8550_RRPolarMetGl255_upgp_hq_opt.icc |
| — | — |
| Stickiply Vinyl glossy | 8550_StpGloss_glossy_q.icc |
| ^^ | 8550_StpGloss_pgpp_q.icc |
| ^^ | 8550_StpGloss_pqij_q.icc |
| Stickiply Vinyl Holographic | 8550_StpHolo_pqij_q_2.icc |
| ^^ | 8550_StpHolo_pqij_q.icc |
| Stickiply Vinyl Matte | 8550_StpMatte_pqij_q.icc |
| — | — |
| Somerset Enhanced Satin 225 | 8550_SomersetEnhSatin225_vfa_hq.icc |
| Somerset Enhanced Velvet 330 | 8550_SomersetEnhVelv330_vfa_hq.icc |
| Somerset Enhanced Watercolour 240 | 8550_SomersetWCRag240_vfa_hq.icc |
Notes for US paper users
I’m led to believe that Epson Archival Matte is sold as Ultra Premium Presentation Paper Matte in the US. A slightly thinner version (9.8 vs 10.3 mil, 48 vs 51 lb) is marketed as Premium Presentation Paper Matte.
For the art papers names vary, but remember that Hot Press is Smooth and Cold Press is Rough or Textured.
Epson Ultra Premium Luster is the same as Epson Premium Lustre elsewhere. For Ultra Premium Glossy, try the latest UPG one or the Premium glossy [PGPP] at the premium glossy media setting
In general, it seems that any time you see ‘Ultra’ in a paper name, it’s just marketing aimed at the US market.
Profile notes and naming
8500/8550 ones are interchangeable.
For the experimental profiles ‘super’, they are there to experiment with – start with any marked ‘opt’
The profiles I made have the media setting used in their names. Essentially the ink mix used is set ONLY by the media setting used. The profile chosen does not set ink use.
My newer profile names are typically of the format:
Printer_name – Paper_name – Media_setting_to_use – quality*
*only there to indicate the quality setting used in the profiling – not a requirement to use.
Note that there is only the ‘std’ quality setting available in EPL for vfa – this is ‘hq’ in my profiles.
It’s worth noting that this printer does not have a setting for Premium Lustre – so I used the Premium Semi-Gloss [PremSG or PSGPP] quite often.
Where there are multiple profiles for a paper, they may use different media settings.
There are several versions of some papers, since using the VFA media setting can be quite different to the matte on some papers [Experiment!] This is a key element of why the 8550/8500 can give such good results on some papers – see below for more about this.
Paper names and availability varies, so for example, the Epson HPB is very similar to many Innova Smooth Bright White rag papers, and the CPN similar to many rough/textured ‘natural white’ rag art papers.
Making new 8550 icc profiles?
If you’re curious about making your own profiles for the 8550, I have a video about this:
Using the i1Studio/CCStudio with the ET-8550
Since we now have an 8550 in the office, I will be making more profiles, but only of papers I have available.. If you are outside of the UK and know of a popular good paper – why not ask the supplier to send us some to test/profile? I’ve a short [3 min] video which explains more.
Email me at Northlight if you are interested?
*Note that IFA115 and IFA116 are likely to be found under different names/brands [Hot Press Bright White, Cold Press Bright White. The specific Innova ‘equivalents’ you can buy would be Smooth Cotton High White (IFA-14) and Cold Press Rough Textured Bright White Cotton (IFA-27) in the Innova Fine Art range. Innova are one of the companies suppliying paper to many other companies.
Matte Photo Papers – VFA vs Epson Matte media settings [02/25]
Epson Premium SemiGloss is added [03/25] and discussed in this video
A 230gsm double sided matte photo paper is tested on the 8550. How it performs and how I found the best settings to get good colour and B&W prints from the paper. The process is covered in this 20 min video
Printing Vinyl stickers
Several profiles for matte/glossy/holographic sticker materials.
‘Super’ quality Epson Archival matte profiles
Colour profiles, but optimised for B&W – experimental
Newer testing [Apr. 26] suggests that using the N0 versions of the profiles and Perceptual rendering intent may produce better results for B&W. See:
Using cheap paper – two Koala brand papers
Testing a 200gsm glossy paper and a 250gsm satin paper, the heavier one works better and gives a wider range of colours.
Ilford Gallerie – papers
More to follow…
Why the media setting can make such a huge difference to some prints
It was in looking at the measurement I noticed some distinct changes in results with the same paper, but using different media settings. In particular it seems that the VFA setting uses CMY colour with grey and the pigment black ink. It also uses the dye black to some extent.
Update: Since making all my subsequent profiles I’ve looked at the data and it seems that the vfa setting uses all inks, with the pigment black just used in the deepest areas. This and the higher ink loading explains the varying behaviour of matte media with the matte and vfa media settings.
I also have 2 short [~10 mins] video covering the topic:
- ET-8550 has two black inks. Why they are there, how they work and when both are used
- An ET-8550 super power. Why the VFA print mode is so great with matte & fine art papers and cards
Adding that pigment black to the mix makes for interesting results.
These two screenshots are from measuring the Pinnacle Matte 230, after printing with both the VFA and Epson Matte settings. The data to the left is from measuring full black [click to enlarge]
The first is with the Epson Matte paper setting.

The feature to note is the rise at the red end of the spectral plot. This is typical of dye inks and one reason why getting good B&W prints from dye based printers can take some effort. It can show as a colour matching failure [sometimes called illuminant metamerism], as unwanted colour tints, especially under tungsten lighting, which has a strong red/IR bias to its spectrum.
Compare the graph with this one using the same paper, but the VFA setting. The flat curve is what I expect to see from pigment ink printers.

Remember that this example is only for solid black, and the mix of inks will vary with the printed colour.
I’ll come back to just what this means in practice when considering paper choices, but above all it means that your favourite papers from a previous dye or pigment ink printer may OR may not be good with the ET-8550.
It also means that ICC profiles are vital if you want to make good use of third party papers – my printing suggests that this printer is capable of very nice looking prints.
Black and White
In all examples I tried during the original [2020] review, the ABW mode of the printer driver was generally superior to printing using either Epson’s or my own ICC profiles.
But… testing moves on
Subsequent testing [2025] has shown that with some papers you could create ICC profiles which give extremely good results for B&W printing. The best example of this would be my experimental profiles for B&W [and colour] for Epson Archival Matte. These were made with well over 5000 patches for the targets and optimised for neutrality. They are available in my profiles collection and covered in this [2025] video.
Straightforward B&W printing with EPL
In the example below, I’m printing two B&W images via the Epson EPL software on different media (this is from my B&W video)

The images were opened in Photoshop, and exported to EPL. However, you can use it as a stand-alone print application.

In diffuse daylight the slight warmth of the ‘natural’ paper shows (printed with he VFA media setting) and overall print neutrality is good.
The print on Epson TPP paper is using the premium glossy media setting, there not being one for ‘baryta’ style papers. It also shows a bit more of a slight colour cast. Do bear in mind that this is tricky to show reliably in photographs.
The lack of media settings for some papers means that you may well need to do a bit of experimenting to see if a particular paper looks good with B&W printing on the 8550.
As part of my testing I printed dozens of A4 test images. This particular version of my B&W test image is designed for quick measurement with an i1iSis spectrophotometer, but I have many other versions of the test image freely available.
- A black and white test image
- Video – using the B&W test image
- Video: What are the secrets to getting the best ET-8550 Black and White printing performance?
The upshot of my testing is that the ink set of the 8550 is capable of creating good looking B&W prints, but once again you need to see whether your paper is OK for your needs.
Much as I’d love to give an ‘approved’ list of papers for B&W, I can’t. I get a steady stream of people from the US asking if paper X or Y is OK? Sorry, I’m in the UK and only get to test papers available here – even then, some companies have never asked me to look at their papers and especially in current times I can’t afford to buy rolls/boxes of expensive paper on a whim…
Pigment black ink only on the 8550?
It seems that if you select plain paper as the media type and then greyscale in the printer driver, the printer prints with only the black pigment ink. As with many black pigments this has a slight warmth to it. The prints do have a grainy look to them, but are only using the one ink.
It only works with matte papers since the pigment ink does not adhere well to gloss/lustre papers.
I’ve a more detailed look at this in this video
ET-8550 printer review: Roll paper?
There is no direct roll support for the ET-8550, but it will print sheets cut from a roll.
Just in case you thought it might be possible to rig up some form of roll holder behind the printer, it won’t work. The printer needs to detect the end of a sheet. With a roll, that won’t happen until the whole roll has been fed through the printer [I’m told – I didn’t try this myself!]
13″ rolls of paper are less common, but this example is HWS Lite 215 – a cotton rag paper from Fotospeed in the UK

Printed using the VFA media setting and the ABW print mode. Take care with feeding and margins. See also the note below about custom paper sizes.
Similar papers – very different results
In general, art papers print well with the 8550 ink set, especially with the VFA media setting. That said, experimentation is necessary.
Here are two sets of measurements of a B&W test print. The first one uses Epson Hot Press Bright, a good smooth cotton rag paper with a modest amount of brightener.
Look at the line of ‘L’s. It’s pretty straight, indicating a nice linear response with no noticeable shadow crunching. The DMax is ~1.75, so a good black for an art paper.
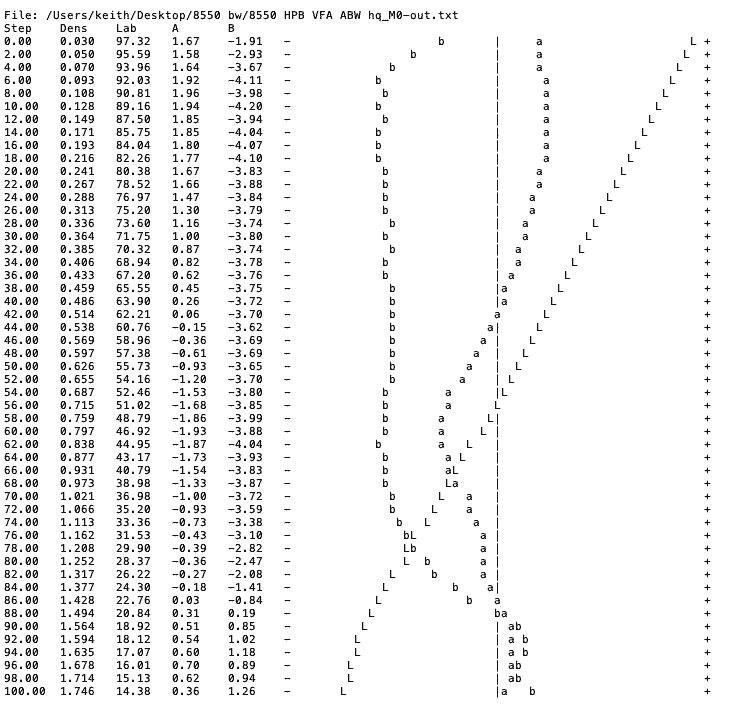
Secondly, a Hahnemuhle 265gsm smooth fine art paper. Now this is one I still have boxes of from when HP last sent me a large printer to test (2009 – where are you HP? )
It’s a nice paper, and I’ve used it as a generic cotton art paper for testing with many printers and printer profiling set-ups.
However, look at the L line from the test print (again using the VFA media setting).
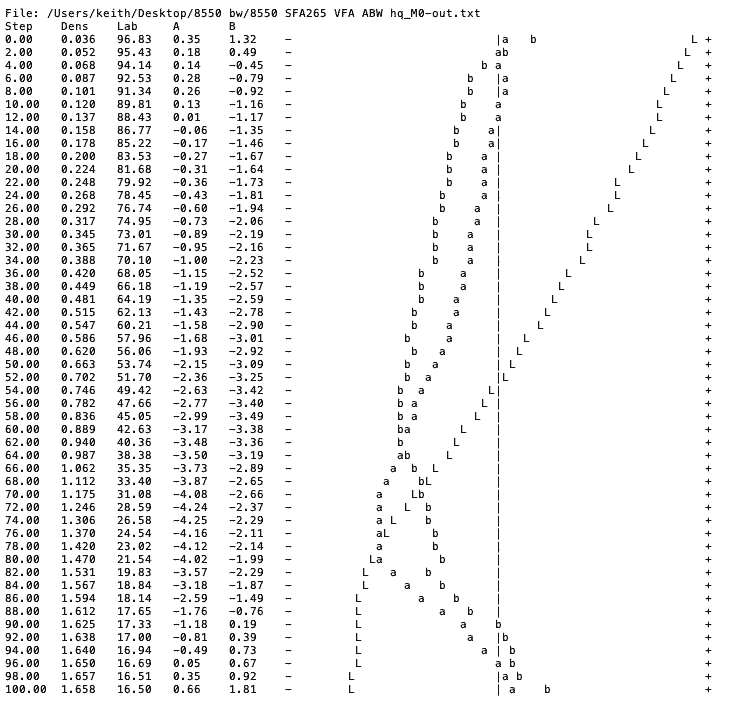
Nice and linear until about 85% black where it flattens considerably. This paper produces seriously crunched shadows.
Why the difference?
It’s the paper coating – the layer that matches ink to paper. It’s handling the mix of inks differently to the first paper. My suspicion is that pigment black is starting to be added to the ink mix at ~80%
Does that mean the paper is no good with this printer?
No, you can print with the EpsonMatte media setting for B&W and it’s passable, but doesn’t really get the look I’m seeing on the other rag papers (such as cold press natural).
Is this true with colour?
No, where I’ve made full ICC profiles of both the papers, the results are obviously different even from the profiling targets.

Note how the intensity of colour and depth of blacks is distinctly greater on the 265gsm paper.
You don’t normally see this much difference between two very similar style papers. Looking at the blacks on the right, they show distinct crunching, as I’m seeing in the B&W prints.
However, that’s one of the things profiles can ‘fix’.
After making profiles I’ve got these screenshots of the gamut size of the two papers.
First the Epson Hot Press Bright
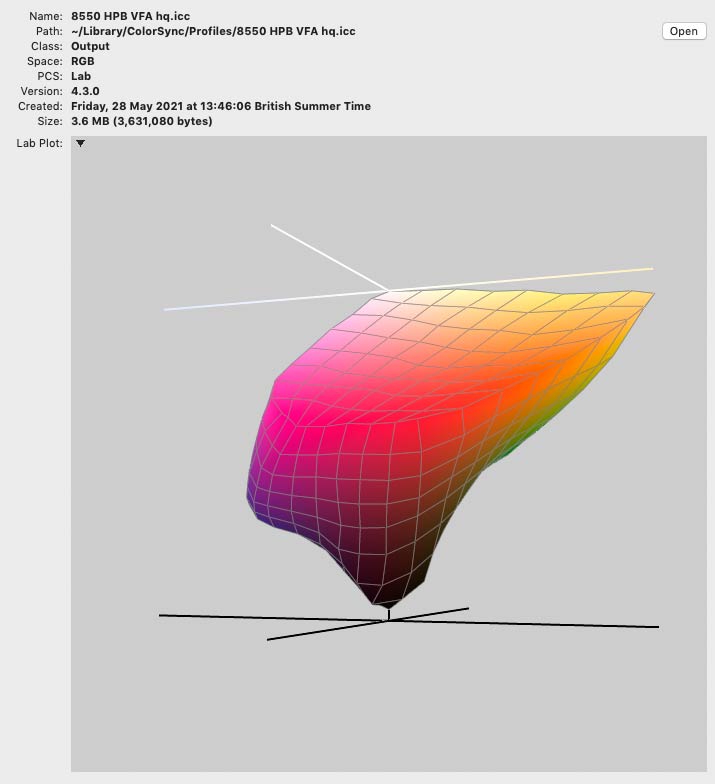
The sort of shape I’d associate with art papers.
See how the Hahnemuhle SFA 265gsm has a much larger gamut
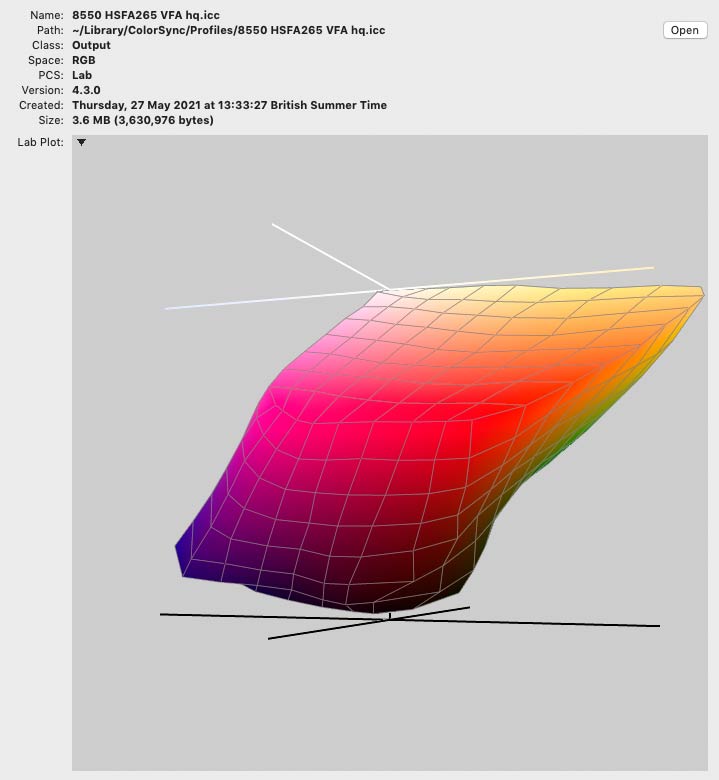
This is more the style of gamut I might see on a baryta paper on a pigment ink based printer.
Taking one of my test images, which has some difficult to print colours in it, I get two very different looking prints

Now, neither of these is ‘correct’ or ‘wrong’ They are the best example I’ve seen for a long while that shows how profiling produces the ‘best’ results for a particular paper, not makes them all the same or matches your screen
Printing
Most images during my testing were printed from Photoshop – albeit an old version (CS6). Some were printed directly and others using the Epson EPL software.
Borderless works well, but do be careful with the image expansion. If you’re not careful, it’s possible to get a fine white margin. This didn’t happen with the EPL software, but you have to remember that borderless relies on expanding the image beyond the page edge.

Note that if you want to print a lot of borderless prints, there will be overspray, and you will need to clean the inside of the printer to prevent ink buildup. I used absorbent kitchen roll to dab the plastic and foam under the print area.
Image quality and speed
The high quality setting was used for making most of my profiles and many prints it’s slower, but not enough to seriously bother me. At around 2 minutes for a standard quality A3+ borderless, it rises to over 9 minutes at the highest print quality setting. The B&W print mode and some media settings will require the higher quality setting.
If you’ve images with fine detail printed at high resolution it’s worth doing a few test prints to see if it makes a visible difference to your prints.
However I’d suggest leaving them overnight to make the comparison, and perhaps giving them to someone else to compare. Too many photographers (IMHO) get tied up in image detail concerns that few people can spot, when they would be better off paying attention to their photographic and editing skills.
For my testing of the similar ET-8500 [an A4/letter version of the 8550] I carried out some detailed comparisons, looking at print detail. Looking at how sending more detail to the printer and the high quality settings affected print quality.
High quality may be slower but could well be worth the wait.
Custom paper sizes
The printer accepts custom paper sizes up to just short of a metre. Some printer marketing points to lengths up to 2m, but not on my Mac.
The panoramic print below was on a Fotospeed Lustre paper from a 13″ roll.

Be careful with the width set for custom papers – there seems to be limits for what can be fed through a particular slot.
Hence the width set at 329mm above rather than 330mm. I’ve heard of people having problems setting widths for custom papers. If your 13″ x30″ custom size wont work, try 12.95″ width in the custom size setting
2025: A short video about this issue
Take care with margins if your custom paper size is not exactly the same as the physical media. Also, measure your paper width – it’s not uncommon for there to be minor differences between stated and actual sizes.
Here’s the print after printing.

There is a video about this print: Making an ET-8550 pano print
Epson software
The Epson Print Layout (EPL) print software is not installed with the driver, but is available directly from Epson
Now, it doesn’t mention the ET-8550 specifically and I did find some glitches in setting custom paper sizes, but when it worked it worked just fine (On a Mac running 10.14 [and recently 15.2]- we have no win PCs here) As I mentioned earlier, EPL won’t work if you have the Mac AirPrint driver installed.
I used it with an A3+ (13″ x 19″) sheet of canvas for an A4 gallery wrap print.

Choosing papers
In previous printers I’ve looked at, the distinction between pigment inks and dye based inks was clear. In general, pigment inks gave superior B&W prints and with the usual increased number of inks, often finer gradations and smoother output and better performance with strong dark colours.
Similarly, dyes excelled with bright colourful images, especially on glossy papers.
Pigment inks were for prints that could last for many years and dyes for snaps that were not to be kept.
Well, dyes (with the 8550) now look to push the 30-50 year mark which with good media and storage/display will suit many purposes [see also a video about this in the list at the top of the page]
A limitation of the ET-8550 is the limited range of media types available in the driver – that and the current lack of ICC profiles for third party media.
I expect more paper supply companies to offer profiles, and some will even build a custom profile if you order some paper.
The 8550 produced good results on gloss and lustre papers – this is just using the dye inks and results are broadly what I’d expect, probably with an improvement over straight CMYK printers with the addition of the grey ink.
Many Baryta style papers such as the Epson TPP looked good, but these usually excel on pigment ink printers.
Where the pigment black ink comes in, and I believe it’s only at the VFA setting, it makes a considerable difference to performance with matt art papers. The differences are quite distinctive, as I showed earlier.
Unfortunately, there’s no way I know of knowing which category a particular art paper will fall into without testing.
So, a Hahnemuhle 210gsm watercolour paper was in the ‘big gamut’ category, whilst the Fotospeed Platinum Cotton 305 was in the small gamut camp (and hence much better for B&W). For some colour images (such as the scanned watercolour) it worked well, but paper choice should partly be driven by what sorts of image you want to print.
So, if someone on a forum tells you a paper is ‘great’ and hasn’t tried it with the 8550, take the advice with a suitable pinch of salt. Even more so if they just mention a brand.
The Epson supplied profiles are OK to start off with, but a limited range of papers.
Update: I’ve also tested the 8550 with a clear 160 micron clear film. See the videos list at the top of the page
ET-8550 printer review conclusions
The printer is small and compact for a 13″ printer, although if you start using large media, you’ll quickly find out how much extra space is needed.
No parts of the printer left me feeling I was likely to break them, although I come across a vocal subset of printer users who seem to feel that if there are not steel girders in its construction somewhere, it’s not worth using. They will pass it by.
The paper tray seems best used for plain paper and thin photo paper – almost all my photo prints and cards went in via the top.
The initial one-off alignment process is fiddly and I was glad I had my old geology hand lens to look at the printed details.
The photo speed at highest printing quality feels slow, meaning that I’d not want to be printing a large number of greeting cards unless I had something else to do whilst feeding/minding the printer. It’s not really slow, just I come across people wanting to print large volumes of prints and forgetting the time element in their (general lack of) costing calculations.
The office functions are advanced enough that they will handle basic home office needs. It copies – great. It doesn’t have a document feeder, so what? This isn’t the office copier…
Take care to understand the importance of profiles and media settings if you are after high quality matte prints – this is very paper dependent. The VFA paper media type is the key for many matte and fine art papers – this uses ALL inks, so you get the benefit of the pigment black but you need ICC Profiles created for this use. See the notes above.
Some thicker softer card showed roller indentations [2] via the top feed – this seems very media and printer dependent. Some faulty printers were replaced by Epson. Check this when getting a new printer – I’ve tested three of them and it was not a problem. It can show that a paper is just too thick/soft for your particular printer. If I had a printer which if did it on an Epson media, I would demand a replacement…
The rear paper feed is good, taking media up to 1.3mm thick, but I found it sometimes awkward to use. This is why I developed the DIY loading tray design for thicker media.
I can’t offer any good guide to ink usage, given the very varied nature of printing/testing I do, however after a lot of prints, the ink levels had not moved very much – yes it is almost certainly quite a bit cheaper to run than many other desktop printers I’ve looked at.
Update 2026 – I’ve a video looking at 8550 ink use
Ink loading and refilling is pretty much idiot-proof, but of course it’s possible to squirt ink all over the place, but you really would have to be quite incompetent to manage it ;-)
To answer some assorted questions I’ve been asked after some of my videos:
- No it doesn’t work with dye-sub inks – you can initialise it with them, but forget any warranty
- If you want to print cards on cheap card stock, the results will look awful
- No it doesn’t print some vinyl stickers – it needs media designed for aqueous inkjet printing.
Update – one found and tested, see the video I made about sticker printing.
Who is it for
I can see the printer appealing to a designer/photographer who wants to get into printing more seriously, but without the desire to go up to the dedicated pigment photo printers. Here, the office functions are in the useful category and help offset what is still not a cheap printer.
Print quality can be excellent but is very dependent on paper choices and profiles. This is fine for some users, but if you are just looking for something ‘that works’ the limitations of available media may be an issue to start with.
This is a printer that can fire the printing enthusiasm – sure, paper will cost and the inks will need filling up, but it’s easy to use.
Given my background using big large format printers, it’s not a printer I’d choose for prints I would sell, but definitely one where I’d happily put the prints on my wall.
–oOo–
This review is unusual in that due to web site issues it was originally finished some time after all my videos. Do have a look at them for particular examples of using the 8550. However, do note that the original review video itself is ~45mins long…
Questions are always welcome – email me at Northlight.
Some of my ET-8550 videos
This has been extended when we got an 8550 for our office.
See the main list of videos [regularly updated] at the top of the page
- ET-8550 review (45m – complements this review)
Using the 8550
- All new ET-8550 icc printer profiles. How I make profiles to fit different paper types and styles [2024]
- Epson ET-8550 printer setup, ink fill & initialisation. Software & fixing the Mac AirPrint problem [2024]
- Replacing Epson ET8550 maintenance cart/ tank/box. Check capacity and fitting replacement [2024]
- Epson ET-8550 printer update and request for questions. Six ink Eco-tank printer.[2024]
- ET-8550 Q&A – using the printer [2021]
- ET-8550 setup
- ET-8550 Borderless photo print
- ET-8550 Panoramic print
- ET-8550 Black and White
- ET-8550 B&W Pano print on roll paper
- ET-8550 Colour fine art and paper choices
- ET-8550 Canvas printing
- ET-8550 Double sided photo prints
- ET-8550 Poster board printing
- ET-8550 Printing on clear film
- ET-8550 Art scan and greeting card print
- ET-8550 paper/card choices for greeting cards
- Selling your ET-8550 prints?
- i1Studio/CCStudio – making ET-8550 icc profiles
- Epson Ecotank ET-8550 ET-8550 maintenance tips. Things to keep your inkjet printer healthy
- ET-8550 advanced cleaning
- How long will inkjet prints last? [Ecotank 8550/8500] Photo and art print lifetimes. Finding answers
Related articles
ET-8500 videos
- 8500 printer review
- 8500 rear paper feed
- 8500 Small canvas prints
- 8500 panoramic landscape print
- Borderless photo printing on the 8500
- Colour photo printing on the 8500
- ET-8500 printer setup
- ET-8500 – printer intro
Full specifications
From Epson
Technology
- Printing Method: 6-colour inkjet printer
- Nozzle Configuration: 360 Nozzles Black, 180 Nozzles per Color
- Minimum Droplet Size: 1.5 pl, With Variable-Sized Droplet Technology
- Printing Resolution: 5,760 x 1,440 DPI
- Category: Home, Photo
- All-in-One Functions: Print, Scan, Copy
- Printing Speed ISO/IEC 24734: 16 pages/min Monochrome, 12 pages/min Colour
- Printing Speed: 32 pages/min Monochrome (plain paper 75 g/m²), 32 pages/min Colour (plain paper 75 g/m²), 25 Seconds per 10 x 15 cm photo (Epson Premium Glossy Photo Paper)
- Colours: Black, Photo Black, Cyan, Yellow, Magenta, Grey
Scan
- Optical Resolution: 1,200 DPI x 4,800 DPI (Horizontal x Vertical)
- Output formats: BMP, JPEG, TIFF, multi-TIFF, PDF, searchable PDF, PNG
- Scanner type: Contact image sensor (CIS)
Paper/Media handling
- Number of paper trays: 3
- Paper Formats: A3+, A3 (29.7×42.0 cm), A4 (21.0×29.7 cm), A5 (14.8×21.0 cm), A6 (10.5×14.8 cm), B5 (17.6×25.7 cm), B6 (12.5×17.6 cm), C6 (Envelope), DL (Envelope), No. 10 (Envelope), Letter, 10 x 15 cm, 13 x 18 cm, 100 x 148 mm, User defined, B4 (25.7×36.4 cm), Legal, Executive
- Duplex: Yes (A4, plain paper)
- Rear paper path (special media): Yes
- Media Handling: Automatic duplex (A4, plain paper), Borderless print, CD/DVD print, Fine Art Paper Path, Rear specialty media feed, Thick Media Support
General
- Energy Use: 17 Watt (standalone copying, ISO/IEC 24712 pattern), 0.8 Watt (sleep mode), 7.5 Watt (Ready), 0.3 Watt (Power off), TEC 0.16 kWh/week
- Supply Voltage: AC 220 V – 240 V, 50 Hz – 60 Hz
- Product dimensions: 523 x 379 x 169 mm (Width x Depth x Height)
- Product weight: 11.1 kg
- Noise Level: 5 B (A) with Epson Premium Glossy Photo Paper / Photo RPM mode – 37 dB (A) with Epson Premium Glossy Photo Paper / Photo RPM mode
- Compatible Operating Systems: Mac OS X 10.6.8 or later, Windows 10 (32/64 bit), Windows 7 (32/64 bit), Windows 8 (32/64 bit), Windows 8.1 (32/64 bit), Windows Vista, Windows XP Professional x64 Edition SP2 or later, Windows XP SP3 or later (32-bit),
- Included Software: Epson Photo+, Epson ScanSmart, EpsonNet Config
- Interfaces: USB, Ethernet, Wireless LAN IEEE 802.11a/b/g/n/ac, Wi-Fi Direct, USB host, SD Card Slot
- Mobile and Cloud printing services: Apple AirPrint
- What’s in the box: AC cable, Ink set, Quick Start Guide, Warranty document
- Colour: Black
Other Features
- Panel: Type: Color, Touchscreen, Diagonal: 10.9 cm
- Memory Cards: SD, SDHC, SDXC, MicroSD*, MicroSDHC*, MicroSDXC*, MiniSD*, MiniSDHC*, Mini SDXC* (* Adaptor required, not supplied in box)
- Features: Touchscreen, PictBridge, Direct Print, Direct print from USB
Never miss a new article or review - Sign up for our occasional (ad-free) Newsletter
and please do subscribe to Keith's YouTube Channel
Other areas of our site that may be of interest...
All the latest articles/reviews and photo news items appear on Keith's Photo blog

Keith explains tilt and shift lenses
Keith has written a book that looks at the many ways that tilt/shift lenses can benefit your photography from a technical and creative point of view. If not in the UK check for import issues and maybe try an on-line bookshop. Keith has no connection with sales of the book.
ISBN 9781785007712
There is also a specific index page on the site with links to all Keith's articles, reviews and videos about using tilt and shift.
We've a whole section of the site devoted to Digital Black and White photography and printing. It covers all of Keith's specialist articles and reviews. Other sections include Colour management and Keith's camera hacks - there are over 1200 articles/reviews here...
We're an Amazon.com affiliate, so receive payment if you buy via Amazon US
Keith | Jan 5, 2026 at 3:00 pm
It’s the paper thickness for the top slot. The rear feed cannot print borderless
John V | Dec 31, 2025 at 12:20 pm
I’m looking at purchasing a high quality printer for borderless printing (predominantly A4 and A3) on 350-400gsm card. Do you know if this printer has a maximum paper weight for borderless printing?
Thanks in advance!
John
Keith | Nov 29, 2025 at 3:21 pm
I really don’t rate the ink subscriptions scheme as worthwhile for the majority of potential printer owner.
Unless you have pretty well defined and regular print needs, it is unlikely to give anywhere the suggested potential savings…
I’ve tried only the papers listed here – for this printer. Ilford are simply not a common paper here so I only tested the few referred to in the one video
Iodice Alessandro | Nov 28, 2025 at 12:40 pm
Hello Keith,
I’m really pleased to have discovered you, your videos, your explanations, …
I’m split between the sc-p 900 and the 8550.
With Epson’s ink subscription, use of the 900 might become more affordable.
My question is, for me to choose, did you try the Ilford matt duo 310g ? With any printer ? With the 8550 ?
Right now, I’m using our Club’s printer, the Stylus pro 3880 with a canson baryta ICC, and the photo black ink, and it turns to be nice to my eyes. Maybe just lacking of punch.
Thanks for everything !
Alex from France
Keith | Nov 17, 2025 at 10:28 am
If you use the vfa media setting, it will use all inks on any paper used – but that may not work very well. That is why I created the profiles – they just match the full set of inks to the paper
David Tvardík | Nov 13, 2025 at 3:43 pm
Hello Keith.
Thank you very much for the perfect and detailed review!
I am considering buying it (or rather the EPSOU EcoTank L8180 type – which should be the same printer as the ET-8550 – I am from the Czech Republic and this version is sold here). However, I am interested in whether this printer offers printing on matte paper using pigment black ink, or will I need a special ICC profile – for example from you.
And if the printer itself has this option, can I choose it for any matte paper, or only for selected types?
Thank you very much.
I appreciate your work!
I wish you beautiful days.
David Tvardík
Keith | Nov 5, 2025 at 3:44 pm
Can you email me? This comment system is rathe clunky to use
Nicolas de Vooght | Nov 4, 2025 at 1:52 am
Dear Keith;
First of all I would like to thank you for your incredible work on this website and your Youtube channel. You have really helped me make my first steps into the world of printing. After more than 40 years taking photos, I am now hanging my own photos on my walls!
I am based in Vancouver BC, a city of beautiful landscapes and dark rainy months.
Following your advice I purchased an Epson ET-8550 (December 2024). I was attracted to the size of prints (up to A3+ or 13×19 inches). Importantly the tank system for the inks really convinced me. I have printed over 300 photos in letter size (A4) and my inks are not even half empty. Plus I still have the surplus ink left over from the initial setup! I was turned off by the outrageous cost of in cartridges in other printers.
My issues: problematic RED colours.
I carefully followed your advice during initial setup. Including printing all the tests. My system is Windows 10.
Monitor: BenQ PD2700Q. Factory-calibrated to Delta E =1.28 (outstanding!). Additionally I regularly calibrate the monitor with Datacolor SpyderX Elite.
Paper: I have only used Epson paper till now (to reduce unknowns). Ultra Premium Luster, Ultra Premium Glossy and Ultra Premium Presentation Matte and Premium Presentation matte.
Software: NX Studio for RAW processing (a Nikon software) plus Paintshop Pro from Corel for fine tuning.
Following your advice I have been primarily using Epson Print Layout (EPL). For BW the results (using ABW) are good. For colours, initially I had defective reds. The red colours were printing very weakly. This was visible in your test images (including the Datacolor test with 16 small photos). The nozzle check came out OK.
After 2 months, when I was seriously considering returning the printer, the deficient reds corrected themselves!
About 4 months later the problem reappeared. Nozzle check revealed a blocked red and yellow nozzle. The nozzle cleaning corrected this.
Another 2 months (in September) the problematic reds reappeared. Once again I performed the nozzle check. Red nozzle blocked. Cleaned it and it is now printing.
This repeated issue with the red nozzle has me worried long term. My warranty in Canada is only 12 months. Lucky you with 5 year warranties!!!
My second issue is EPL. I find that printing colour on Presentation Matte produces good strong colours. Very pleasant.
BUT …. colour on the Luster and Glossy papers is weak. I know that the printer can do better because I I printed your ICC profiles and the colours (esp. red) look vibrant.
I have resorted to printing via Paintshop Pro (PSP). EPL can work inside PSP. When I use PSP, EPL has much more adjustments. I can “cheat” by using the colour adjustments such as Epson Vivid as well as Brightness, Saturation and fine tuning of colours. At that point I can “tweak” the colours to come out looking good. These adjustments are individual for each photo.
But this work around is not what you are doing. So I feel like I am cheating or missing something in my system.
Sorry for the long letter. I wanted to give you an accurate idea of my system.
Kind regards from Vancouver,
Nicolas
Keith | Oct 1, 2025 at 11:48 pm
No replacement any time soon…
ADF? That is an out and out office printer feature, and in general I don’t cover such printers. I believe there are some ADF Epson ecotank versions, but I only really test printers for photo/art printing.
Tim Jaeger | Oct 1, 2025 at 10:38 pm
Thank you Keith. Great review. We are in need of replacing our HP PageWide Pro 477dw printers. We had 2 of them – 1 in our business and 1 in our home. They both lasted about 8 years, but recently both developed some serious print bar issues. The ET-8550 was released in 2021. Do you think there is a newer replacement planned soon? For our business we must have automatic document feeder (ADF). Do you know if there is an optional addon for ADF for the 8550? We are thinking of going with the 8550 for our home and the Canon Maxify GX7150 for our clinic. Just looking for your insights on the ADF side of things. Thank you. Tim
A. K. | Sep 11, 2025 at 4:48 pm
Today I tried the “Ilford Galerie Smooth Cotton Sprite” paper.
I used keith’s icc profile for the “Ilford Galerie Smooth Cotton Rag”, with the “Velvet Fine Art” media setting, and also using “relative colorimetric”, to print black and white srgb jpegs. Wow! First matte cotton paper print from my 8550 that had no bluish/greenish tint, great linearity, no feeding problems, all at the same time.
If anyone else is looking for a smooth cotton paper for black and white, I recommend you try it with the same settings.
And by the way, the “Ilford Galerie Smooth Cotton Rag”, which is the paper the icc profile was actually made for, exhibited an ever so subtle, but nasty greenish tint with keith’s profile, completely unlike the “Ilford Galerie Smooth Cotton Sprite”, which is very similar in apperance. Different coating I guess?
Anyway, I hope this helps!
Michael Bacon | Aug 23, 2025 at 9:08 am
I agree wholeheartedly with ET8550Enyojer’s remark in their post of Dec 15, 2024 @ 3:17 pm about images used in advertising. Too many online sellers still fail to grasp what the prospective buyer wants to see and learn. When we have no practical possibility of seeing and feeling the item for ourselves, we need information conveyed as fully as possible within the medium of the internet. Pictures of the packaging do nothing for the new buyer, and no one is going to risk many 10s of pounds/dollars on the chance that the contents are what we hope for. Buying a pig in a poke comes to mind.
That’s one of the reasons why Keith’s reviews are immensely helpful, and I wish paper suppliers would recognise the service he provides – to them – and send him samples.
Compiling a ‘database’ of paper specifications by name would be very useful, and as he has pointed out many branded papers are sourced from just a few papermills.
Keith | Aug 14, 2025 at 3:54 pm
Nope – try asking on the printing forum at DPReview
I’ve never used such systems for anything image related I’m afraid. [ran my phone exchange a treat, but photo editing – that’s far too much like hard work ;-) ]
Florian Hofmann | Aug 13, 2025 at 10:03 pm
Hey Keith,
do you know if there is a way to produce good quality prints on Linux with the ET-8550? Thank you for the videos and the reviews. It is likely I will be buying this printer thanks to you.
Best
Florian
Keith | Jun 27, 2025 at 9:48 am
Ah, did you miss the sections of the review which deals with scanning? ;-)
Scanner profiles included in the set of printer profiles I have available
Nick Parsons | Jun 26, 2025 at 11:30 am
Kieth,
To re-iterate what so many people have said, thank you for all your fantastic, clear work. Certainly made me buy an ET-8550 which I am increasingly getting to grips with now.
One question – have you made an ICC profile for the scanner, or is that simply a question that betrays my ignorance?
Kind regards,
Nick
Keith | Jun 8, 2025 at 12:27 pm
It worked just fine on this printer
However, some printers do seem to mark thick papers and need to be fed from the rear
George Muellerleile | Jun 8, 2025 at 3:15 am
This has to do with another video, one where you printed two examples of architecture, a cathedral, and one a modern new building, in black and white. The cathedral image was printed on Cold Press Natural Epson paper that is listed as being 21 mil thick. Everything I have read about this printer (ET-8550) tells me that the max thickness for the upper rear feed is 16 mil. Will the printer actually handle 21 mil thickness paper, or perhaps I have read the wrong spec. Please enlighten me. Thanks.
Keith | May 15, 2025 at 9:46 am
It’s seen on some papers/printers.
If it does it on Epson photo papers, I’d want it replacing [I say Epson papers since they will ask…]
Alex A | May 14, 2025 at 9:09 pm
Thanks for the deep review and detailed setup guide!
I just got my new ET-8550 (L8180) and the first test prints are great. I, however, noticed one annoying thing: there are thin vertical lines across the prints. They are very fine but still visible on glossy papers from a certain angle. They do not look like the inking defects (e.g. like those of misaligned print heads or clogged nozzles) but rather like fine mechanical scratches on glossy paper surface. The paper transport rollers, I guess.
I wonder if this is normal for this printer + paper type combination, or I need to request a replacement.
Tom Goodell | May 3, 2025 at 6:52 pm
Many thanks for all your work to help us understand this printer! I’ve had one for a few years and am still very happy with it. I print exclusively with paper from Red River Paper in the US, and I use their ICC profiles which work great.
I thought I would share a paper jamming problem I had with the printer that may have ended up with my replacing it, had I not stumbled upon a solution on a Reddit forum. I load all of my photo paper through the top slot, and I print mostly 8.5×11 up to 13×19. Recently the printer started failing in the middle of a print and reporting a paper jam, even though the paper was traveling through the printer just fine. After quite a bit of searching I came across this comment on reddit:
https://www.reddit.com/r/Epson/comments/14btknj/et_8550_phantom_paper_jam/
There’s a ribbon cable that I think transports the ink. If you’re on the left side of the printer with the top raised up and look toward the print head, you can see the cable on the right side. There are flimsy little plastic clips that hold it in place along the top of the cable. One of those clips had come loose and when the print head hit the ribbon it interpreted it as a paper jam. It’s a little tricky, but I was able to reach in and reattach the clip and everything worked fine.
Keith | Apr 25, 2025 at 8:54 am
Thanks – note added
I never use the tray for anything but plain paper, so had forgotten this.
Daniel Bordeleau | Apr 25, 2025 at 6:02 am
Thank you for your excellent review of the et-8550. I have one suggestion for you.
The papier management is quite spécial With four différents way to feed the Printer. I use letter size single weight premium luster paper in tray no 2 to adjust Lightning, contrast etc. And I use the top feeder for 13X19 final print.
My problem is with tray no. 2. You must absolutely put your paper face down. It is said in the instructions, but Epson dose not insiste on how important it is. If you don’t, as it happen to me, you create a huge mess. The ink does not dry and stain the interior of the Printer and also yours fingers. I don’t know the best way to clean that.
À spécial notice in your review would be welcome.
Keith | Apr 4, 2025 at 3:36 pm
Can you email me please – different system
Alexandre Cardoso | Mar 31, 2025 at 5:13 pm
Thanks for the super review. I just bought the printer and I am just waiting for it to arrive. I will like to try your profiles to help me start. Have a nice day.
Peter Howell | Feb 22, 2025 at 12:07 pm
Than you for this review of the ET-8550.
I had great difficulty in finding such a detailed review of this printer I am considering buying. You clearly understand what is needed in such a review and your detailed explanations are much appreciated.
I am more certain about buying this printer and that I will need to experiment with the type of paper and printer settings to get the bets out of my photography.
Additionally your videos are, like this review, a masterclass.
Much appreciated
Peter
Keith | Feb 6, 2025 at 12:08 pm
The key to using good matte papers with he 8550 is the VFA setting – see in this article
It is very likely that unless you use VFA you will get sub-optimal results.
I would only use VFA when making my profiles… do note too, the example of the SFA265 above
ET8550Enyojer | Feb 4, 2025 at 7:05 pm
After seeing Hahnemuehle VFA paper setting recomendation “Photo Rag” and having a custom made profile with matte setting, is it worth to re-do a custom profile again for VFA setting or will the gains be minimum?
With minimum I mean a sligthly less blue in 100% black “bullseye pattern” in your B&W image.
Unless you got to very deep blacks (which turn a little blue due being dye) my custom RGB profile had very neutral greys on your A4 test image.
Hahn Photo Rag and Canson Rag photographique work well with Chromalife100+ or Claria ET dye inks, once you made a custom profile. I mean they are matte paper, but they are not like other matter papers where you get a very poor black if you use black photo dye inks.
Keith | Jan 25, 2025 at 12:12 pm
Not one I can help with [the lb weight designations are a US only designation BTW] I fed cards in the top when testing.
Try asking on the printing forum at DPReview? Quite a few 8550 users there IIRC
Rob Schuff | Jan 24, 2025 at 9:04 pm
Hi Keith,
Another followup for the ET-8550. I’ve been trying to find paper handling specs that address paper **weight**. I am finding that the rear slot (flat feed from the back) does not handle 7inx10in Red River Polar Matte 88 lb Greeting Cards correctly. Every time I print on the coated side with this paper the image ends up not square with the paper (about 3-4 mm across about 140mm width image) . I have been exceedingly careful to feed straight and ensure the guides are not spread too far apart. Printing the exact same paper but at the 60lb weight printed fine the first time! I have tried this with “thick paper” driver setting in both the on and off positions. Might you have any insights here?
Keith | Jan 22, 2025 at 12:13 pm
Thanks for noting this
– I believe this is mentioned in my video about using the rear slot.
It’s one reason I rarely ever use the rear slot ;-)
Rob Schuff | Jan 21, 2025 at 2:20 pm
Thank you, Keith, for your excellent and thorough reviews of this printer. I have discovered one constraint with using the rear paper slot when attempting to print on high-quality matte greeting card paper (Red River Polar Matte – 330 gsm) after repeated jams in the rear feeder, uncoated side up. This constraint is that the trailing end of the media will have an unprintable area of 0.8 inches. I could not find mention of this anywhere for quite some time! Hopefully this will help others who come by here, but It might be good to post this issue in some of the greeting card sections of your reviews/ methods articles.
Thanks and bravo to you, Keith for helping so many of us!
Keith | Jan 5, 2025 at 2:32 pm
Indeed – the decision is purely a marketing one from my POV
I might lean on the use of pigment inks with other printers and perhaps even a spurious mention of ‘Giclee’ if the market warranted it.
All depends on just who is asking about ‘archival’ ;-)
Carlos | Jan 3, 2025 at 4:35 pm
“I assume you wouldn’t or shouldn’t sell any of these prints as archival quality or am I mistaken?”
Why not? Epson claims 300 year lifespan if properly stored:
“Breath-taking photo quality
Both photography enthusiasts and semi-professionals are sure to appreciate the enhanced level of quality produced by its six-colour inks. It delivers detailed images and realistic skin tones with smooth tonal gradations and deeper, more natural blacks. Designed with longevity in mind, the high-quality ink can last for 300 years in a photo album.”
Also wilhelm-research.com states more than 200 year if stored in dark room / archival conditions:
https://www.wilhelm-research.com/epson/WIR_Epson_EcoTank_Photo_ET-8500_and_ET-8550_Printers_2024-08-09.pdf
ET8550Enyojer | Dec 26, 2024 at 6:37 pm
An update *for those owners who had problems with baryta paper surface damaged by central LD roller*:
Innova IFA49 is very thin and flexible, thiner than any other baryta paper compatible with dye inks I’ve tried.
It could be fed from “Casette 2”, thus minimizing rollers damage. I’ve tested it as last resource to be able to use it with my Epson and it works. Activate first “thick paper” option on printer and feed one sheet each time on casette 2.
If your ET8550 vertical feeder does not cause problems, keep using that way with vertical feed.
ET8550Enyojer | Dec 16, 2024 at 12:22 pm
Nevemind, I found it googling last night:
(Innova FibaPrint Ultra Smooth Gloss)
BTW 22 euro in taxes + shipment, Euro zone is crazy.
Keith | Dec 16, 2024 at 9:35 am
Can you email me – different systems I work on. Use the address on the contact page [ideally not the actual form – it has problems]
ET8550Enyojer | Dec 15, 2024 at 3:17 pm
Hi, I watched the ET8550 video you uploaded today about new papers.
As I posted on a comment a few weeks ago I currently use for Et8550 some luster/pearl/semigloss papers with great sucess (Canon Luster, Ilford smooth pearl and a local provider high oba inexpensive version of them but that looks very good)… but I miss the look & feel of some baryta dye compatible papers that I had used time ago with a dye A3 canon printer, that due >300g thickness & “softness of the paper” this epson top paper feer does not like or support.
I do not seek something special “barytesque”, just the “slighty textured and just a bit extra of gloss for a semigloss paper” that my current semigloss papers do not provide, the ones above.
In your video you mention Innova Ultrasmooth gloss 285 as “baryta-like”. Do you mind share a photo of the print at 45degre angle so I can see the texture & gloss with ink in it? It could be the A3 paper with patches for profiling,
After I watched your video I googled that paper name and in my local provider or innovaart.com there is no actual image of the “finish” or “look & feel” of the paper in the way we can see on Hahnemühle web, so consumers can make a more informed purchase. They just show the paper boxes… not the actual paper with a print on it so we can get a hint of the texture.
Is that Innova Ultrasmooth gloss have similar “textured gloss” as we see in this other papers in your web?
https://www.northlight-images.co.uk/innova-exhibition-cotton-gloss-ifa45/
https://www.northlight-images.co.uk/paper-review-innova-fibaprint-warm-cotton-gloss-335gsm/
I like them, but I like more the exhibition.
As I said before I just want a “more textured semigloss” that behave properly with ET8550 dyes, that perform equally to Canon Luster or some other variants in gamut and dmax, but a slightly more textured, close to the 2 links from your web.
That Innova Ultrasmooth gloss is not so expensive, 30 euro + taxes 25s A4 for testing… but I’d like to avoid buying it if it has not the textured gloss I seek.
Thanks in advance and great work.
Keith | Dec 2, 2024 at 11:43 am
minimum borders should show when creating custom paper sizes – just checked on the 8550 and it says 0mm
You might need to make a custom page size – and with EPL a custom slot setup.
Not something I’ve tested though – the EPL manual has some more details on this – time to get some plain paper the same size to test I’d suggest ;-)
Stephan Tamminga | Dec 2, 2024 at 8:41 am
Your review (and video) of the ET-8550 made me buy this recently and as an amateur photographer starting to dabble in printing I’m very happy so far. Before I start buying expensive larger paper formats, could you tell what the true minimum margins are on A3 paper when NOT printing borderless? EPL says 3mm, but I don’t know how accurate that is. I would prefer to avoid borderless due to the pollution you mention, but when framing it the white border should not get too wide to be able to fit in a standard-sized passe-partout. I already found out that A4 borders are also 3mm, which makes the white border too large.
Keith | Nov 27, 2024 at 1:31 pm
Once I’ve finished my current printer testing I’ll return to the 8550 and have a look at this in more detail.
ET8550Enyojer | Nov 25, 2024 at 9:58 am
Hi,
There are some baryta-like papers compatible with dye inks (compatible = high dmax), like Hahn phot rag pearl or Canson Baryta Prestige that I’ve used with sucess in the past with a Canon Pixma IX6**0 (a CYMK dye + pigment black for text only).
When I tried with ET8550 year ago its LD central roller damaged the Hahn photo rag pearl while feeding the sheet and two moths ago tested a print with Canson Baryta Prestige and it got jammed (after firmware update that solved LD roller damage on soft semigloss) and I had to remove the sheet manually.
Are there some papers “barya-like” suitable for ET8550? I do not care if it’s 200-250 gram (to avoid jam), I want the look & feel of those papers. Best if they are available in Euro zone (red river catalog seems out of my grasp).
Thanks in advance for your printer reviews.
Keith | Aug 1, 2024 at 1:36 pm
You didn’t miss it – see my email reply ;-)
Written articles/reviews let me fix/edit/update – unlike the videos ;-)
Lionel Barker | Aug 1, 2024 at 11:56 am
Sorry. I did read carefully enough – you wrote this
The profiles I made have the media setting used in their names, but it’s worth noting that this printer does not have a setting for Premium Lustre – so I used the Premium Semi-Gloss [PremSG] quite often.
Keith | Aug 1, 2024 at 11:25 am
Yes – SG
Lionel Barker | Aug 1, 2024 at 11:02 am
This is a great review. I have just bought an ET-8550. I noticed in the printer driver AND on the touch screen control on the printer itself that there is no media type – “Epson Ultra Premium Photo Paper Luster” even though it’s in the online manual for the printer.
Do think Epson removed this in later version of the printer?
What media type should I used in its place when I use a Lustre Paper?
I was thinking “Epson Premium Photo Paper Semi-gloss”
Keith | Feb 15, 2024 at 10:20 am
Some people have said they prefer the colour rendition of mine, but it’s not a huge difference [for the Epson papers]
Indranil Chandra | Feb 15, 2024 at 1:39 am
Hello, thanks a lot for the incredibly detailed review. I’m a novice when it comes to printing. Have been watching your videos and reading articles from this website the last couple of weeks and learnt a lot. For the Epson papers, have you noticed any difference in output between the profiles you have created and the one that are created by Epson?
Keith | Dec 13, 2023 at 2:45 pm
Sorry – never tested that one
David Hargreaves | Dec 12, 2023 at 7:46 pm
Thank you for such a detailed review, with useful tips included. I have to replace my Epson Stylus Photo 1500W as (1) there is a fault with my print head (a workaround still gives me excellent prints but I don’t know for how long) and (2) Epson have stopped making the Epson ‘Owl’ inks I always used. I’ve considered other Epson A3+ printers and the Canon Pro 200. However, I am leaning towards this as the best balance of quality and economy (saving ink cartridge costs). Did you ever use the Stylus Photo 1500W and, if so, can you offer any thoughts on image quality compared to this ET8550?
Keith | Mar 24, 2023 at 11:01 am
It’s an 8500 here again [A4]
Unfortunately such optimisation makes little difference since I’m starting off [typically] with nearly 3k patches
Maybe if I was using an i1Studio/Colormunki/ccstudio – but I only ever got near that when I need to do a review of it. I’ve looked at its so called B&W profiles in the past and was not greatly impressed.
Vincent | Mar 23, 2023 at 9:09 am
I read in DPReview that you have an ET8550 back.
Do you mind using that printer as an example of RGB ICC profile optimization for B&W?
I mean, let’s pick one paper type where ABW does not perform well (because it does not behave like Epson equivalent or other reasons). Let’s make an RGB ICC profile, evaluate it subjectively and in a*b*L*. Optimize it (one or two variants), test improvement.
Keith | Mar 13, 2023 at 1:32 pm
Not unless someone gives or lends me a printer to test it on I’m afraid
Jochen Reimers | Mar 6, 2023 at 4:21 pm
I am in the process of buying a cheap printer for B&W prints.
Then I discovered a carbonpigment based ink “Carbonprint Graphite” for Epson EcoTank ET-8500 / ET-8550 from farbenwerk.
This carbon ink is also available for many other Epson printers.
It would be nice if you could consider testing this ink.
Kind Regards
Jochen
Keith | Feb 25, 2023 at 12:35 pm
I’ve not tried printing from InDesign I’m afraid – have you tried installing and printing from Epson Print Layout? It can work as a plugin in Photoshop.
Are you using CMYK in InDesign? I know that’s caused issues sometimes for people – can you export as RGB and then check that your blacks are truly black
Also – try using the VFA media setting – it uses the pigment black
Sorry not to have any specific info though…
Tanya Harvey | Feb 25, 2023 at 3:32 am
I recently bought an ET-8550 to replace my old Stylus Photo 2200, which I had to give up on because the ink had dried up, and I couldn’t find any replacement ink for some of the colors. I print greeting cards of my artwork and photos. I printed several of my designs from InDesign CS6 onto the same Epson paper I used before and compared them to my old cards. While the color looks comparable, the images are a little softer, and the text looks noticeably worse. Looking at the printed text under my dissecting scope, I can see that there is a lot of white in the letters instead of solid black like those printed on the 2200. I tried different fonts and printing from a PDF. No change. After not getting any help from Epson tech support, but seeing that the text printed fine on the nozzle check, I tried printing from Microsoft Word. Both the text and image look a bit better. Do you know if there’s a workaround other than resetting up all my images in Word or upgrading my Adobe products?
Thanks for all the info on your site!
Keith | Dec 26, 2022 at 10:42 am
I certainly wouldn’t, but a good looking print on an archival paper might well impress people enough.
For me it’s an ethical/business question – others might not think it ;-)
Robert Harvey | Dec 25, 2022 at 12:27 am
I assume you wouldn’t or shouldn’t sell any of these prints as archival quality or am I mistaken?
Keith | Nov 24, 2022 at 12:49 pm
I’ve never tried any ‘signature worthy’ papers
Metallic is not the same paper
Bikram Saha | Nov 24, 2022 at 11:26 am
Hi Keith,
Thanks for inspiring me to take print I love the printer and Its quality. Although I am a novice. Learned a lot from your videos. I have a question about the ICC profile. I have got the EPSON Signature Worthy Ultra-premium Photo Paper (S041407), and I can see in your blog you mentioned the EPSON Signature worthy ICC Profile.
My confusion is on the ICC profile download page. It has the word “Mettalic”: Signature Worthy Metallic Photo Paper Luster v1.00 and I am not sure the Paper I got is similar to the ICC profile mentioned here.
I would appreciate it if you could shed some light.
Keith | Aug 20, 2022 at 10:33 am
Email me with what you want…
Fonn | Aug 20, 2022 at 7:29 am
Hello, thank you for such a complete and didactic review. I am waiting for this printer to arrive. I wanted to ask if the profiles that you have created and that you offer for non-commercial use and experimentation would work for any printer of this precise model, like mine or if it is necessary to make a profile for each specific printer at all. I don’t know if I’m asking nonsense. Thank you very much.
David Ord | May 1, 2022 at 9:51 pm
Having paid for one in December it arrived a week ago. I printed 1 A3 picture and about 100 a4 sheets and then it decided that it had a paper jam and wouldn’t feed any paper in. I sent it back and actually recieved a replacement! hopefully this one will keep working as the A3 looked really good. The EPL software seems to have moved – I found it at https://epson.com/epson-print-layout.
The videos are great by the way.
Keith | Apr 12, 2022 at 4:29 pm
No idea I’m afraid – we’re in the UK
Joycelyn | Apr 12, 2022 at 3:01 pm
Hi hi where can I buy this in the US, I’ve been looking for months
Chris Smith | Apr 6, 2022 at 7:28 pm
Hi Keith,
Thank you so much for the detailed written review and videos on all aspects of the Epson ET-8550. It was on the strength of this material and your comparisons against other printers that has now led me to purchasing this printer.
Thankfully it is back in stock at Epson UK, as of writing this, and I’ve started to explore it starting with Epson papers and test images. I did print a couple of my own images and was thrilled with the default setting results. I do have a calibrated monitor.
I haven’t even started the process of investigating other profiled papers yet, or figured out whether I will print from Photoshop or Lightroom or stick with the Epson Print Layout software on the Mac which is very straightforward.
I have used the Epson Smart Panel app on the iPhone and it worked well, it also led me to download Epson Print Layout on the iPhone which does use colour profiles for the Epson papers. Certainly acceptable for the iPhone camera images.
Thanks again for answering my email question so quickly too.
Kind Regards,
Chris
Janika B. | Feb 12, 2022 at 10:30 am
Thank you for this extremely detailed review! I’ve been using the Epson Expression Photo XP-960 for several years now to print my photos, but the cost of the cartridges and plastic waste is annoying me, so I’m considering a new printer and looking at the EcoTank models in particular. This sounds like it might be the perfect replacement for me!
Keith | Dec 31, 2021 at 2:41 pm
Make sure you have not selected the AirPrint version of the driver.
Go to the Epson Installer and set the printer up again if this gets nowhere
I test on quite old Macs, so have no specific versions – the B&W mode should just be there
If you’re stuck – email me – the comments system is extremely clunky ;-)
Johannes A | Dec 31, 2021 at 12:06 am
Hi Keith,
this is a brilliant piece. I already bought one before I found this but now I a am curious about the ABW menu in the print-dialogue that I cannot seem to find. I have installed the latest driver for Mac OS from the epson website (.com)
Which driver version do you use? Could you point me to the correct one or share yours?
Have a good start to the new year.
All the best,
Johannes
Damian | Dec 2, 2021 at 2:37 am
Brilliant work Keith!
Thanks for sharing all this.
Have aquired an ET8550 after watching several of your videos.
All the best
Ali AlArab | Aug 7, 2021 at 5:26 pm
Thank you for the very detailed review and the numerous videos on YouTube. We bought this printer and recently started printing photos at home which we never did before. For a beginner like me who never printed more than black and white A4 papers before it was very helpful and informative. I think this is a fantastic printer to learn printing on due to low cost and ability to experiment with. It also doesn’t hurt that it can produce good quality photos once we improve our technique in printing.
thank you for always being available and answering questions too.
best
Ali
Rick Fee | Aug 5, 2021 at 8:20 pm
Superb report, thank you, Keith!