


Canon PRO-200 printer review
Printer review: Canon Pixma PRO-200
Testing Canon’s replacement for the 13″ PRO-100
...Get our Newsletter for new articles/reviews and please subscribe to Keith's YouTube Channel
...Keith's book about how to use tilt/shift lenses is now available.
Our site contains affiliate links - these help support the site. See our Advertising policies for more
Keith has been testing the Canon Pixma PRO-200 printer for a while and written up this longish review.
There is another article going into setting up a new printer in more detail.
Note: Keith has also started making short videos to go with articles/reviews (see below/right).
Please do feel free to ask questions, directly or via the comments at the foot of this review.
UK price for the PRO-200 : £449
$599 in the US
Buying a PRO-200 from B&H
helps support our site.

Related articles
- Setting up the PRO-200
- B&W printing with the PRO-200
- PRO-200 best driver settings and print detail [inc. video]
Videos
- PRO-200 setup
- Canon PRO-200 review overview
- PRO-200 – Q&A Using the PRO-200
- B&W printing questions
- PRO-200 A B&W fine art print
- PRO-200 – an A3+ glossy borderless print
- PRO-200 – using fine art papers
- PRO-200 – Panoramic prints
- PRO-200 – gallery wrap canvas
- PRO-200 – greeting cards
- PRO-200 – a basic colour print
- PRO-200 or PRO-300?
- G550 or PRO-200?
The Canon Pixma PRO-200
The PRO-200 is physically very similar to the PRO-300 I reviewed a few months ago. It’s the follow-on to the PRO-100 I reviewed back in 2014.
Don’t like reading? ;-) Yes the 200 is a lot better than the 100, paper handling is excellent and the inks seem to give a slight improvement in print quality. It has a screen. The paper border restrictions are gone, but it’s more expensive. See also my PRO-200 video
The review covers many aspects of using the printer, including colour management and custom media.
During my printing I’ve been using Canon’s new ‘Professional Print and Layout’ (PPL) software (free) as well as my more usual direct printing from Photoshop. PPL also works as a plugin for Lightroom and Photoshop and is well worth looking at for high end printing.
I”m doing my testing from our various Macs. Most of what’s here should be equally applicable for Win PC users.

PRO-200 features
The full specs are at the foot of this article, but it’s a 13″ width A3+ printer with 8 dye based ink channels.
The 8 inks are listed as ‘ChromaLife 100+’ (CLI-65) : Y/M/C/PC/PM/Gy/LGy/BK.
Basically a six ink CcMmYK inkjet printer, but with two grey inks added.
Canon suggests that red and blue reproduction is improved, along with deeper blacks than the PRO-100.
The weight has gone down from the 19.7kg of the PRO-100 to 14.1kg
Canon give this as the space needed for using the PRO-200. This would be for A3+ paper (13″ x 19″)
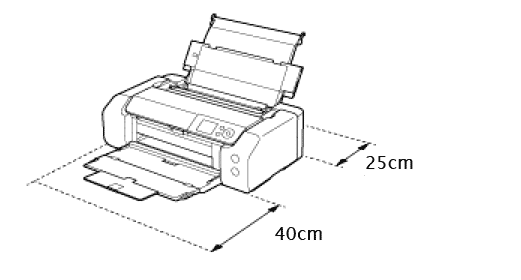
Do note the space above the printer too, if you’re going to have a shelf over it.

The rear feed also sticks out somewhat.

Fortunately, not one paper I tried actually needed to go via the rear slot. Perhaps if you’ve an art paper of over 400 gsm or flexible card it might be needed. However, the paper handling of the 200 (and the mechanically similar 300) is very good and even multiple sheets of 300gsm art paper fed via the top – not recommended, but it worked.
The printer prints borderless on any standard size paper and now supports a custom page length of up to 990mm (~39″). The prints below are from my: Making panoramic prints on the PRO-200 video

Max print resolution is 4800 (horizontal) x 2400 (vertical) dpi
It has a 3″ colour LCD display (not touch screen) and two paper feed paths, one from the top (multi-sheet) and one at the rear for heavier art papers (single sheet).
Connectivity includes Ethernet. WiFi and USB.
Compared to the PRO-100 it’s a bit smaller and quite a bit lighter. It is virtually the same size as the pigment ink based PRO-300 I looked at a few months ago.
Setting up the printer
If you’ve just got a PRO-200 then I’ve a much more detailed guide to PRO-200 setup
The printer comes with the following:
- CD/DVD disc printing tray
- Documentation
- Setup ink cartridges
- Power cord
- Print head
Whilst quite bulky the printer is easily moveable. The printer in its box is in a plastic bag with lifting handles.

You need to fit the print head assembly to the new printer.

Note the orange bit of plastic. Basically anything this colour needs to be removed during the setup process. If you look at the screen above, you can see part of an animated setup guide.
Personally I never liked the ‘two big buttons’ interface style of the older PRO-10 and 100 – the screen may not be a touch screen, but makes printer setup and operation a whole lot friendlier and less error-prone for those new to printing.

Then, the 8 ink carts are fitted. These just clip into the head assembly.
After installation I suggest immediately doing a print head alignment. The test print here is using plain paper, but a couple of A4 sheets of photo paper will optimise the results.

Do take time to do this.

The alignment prints.
You can run this any time. I’d suggest doing it again in 6 months, or if the printer is transported any distance.
There are quite a few guides available from the printer screen. Some include QR codes linking to on-line manuals.
After physically setting up the printer, you’ll need to connect it to what you want to print from. This is described in more detail in my PRO-200 setup article and video
There are however a few observations I’d make
Connectivity
The printer accepts connection by wireless, Ethernet or good old USB. I always set printer up first with a basic USB connection, since there are no network issues to consider.

When using USB, don’t connect the cable until the printer is set up.
For Ethernet and WiFi, the printer was able to find all the relevant info and set itself up. There are clear guides via the printer screen or manual.
Unfortunately, any wireless use kills the wired connection. You can’t use both – a regrettable omission from my point of view, but it’s the same with the PRO-300
Once the printer is on my network, it’s easy to find it and set up the driver.
The Mac ‘AirPrint Problem’
When setting up the printer I was careful to avoid any driver options with ‘AirPrint’ in the name.
The problem is that it’s easily selected as a default. It offers a simplified interface, and has over the years been a common source of ‘where have my printer settings gone’ queries on forums.
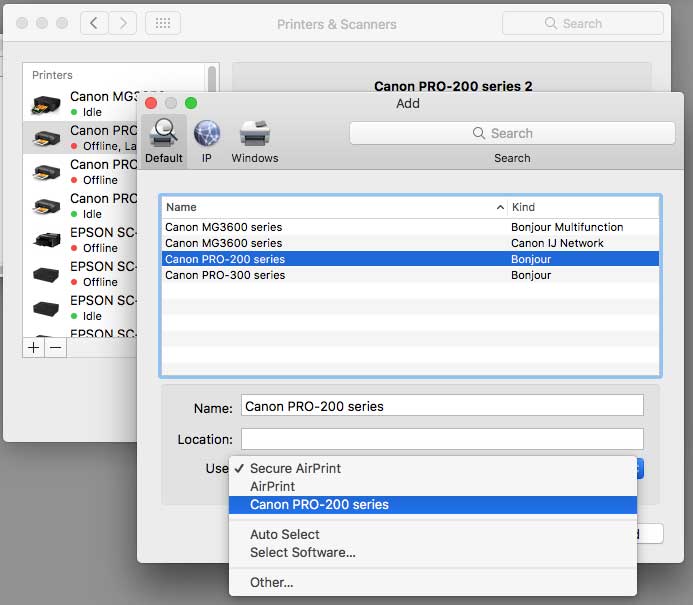
When adding a new printer, note how ‘Secure AirPrint’ has been ticked – make sure it’s not selected.
It’s caught me out before, so I always check.
Basically, avoid any setting that mentions AirPrint. It may well have a use, but none I’ve yet found.
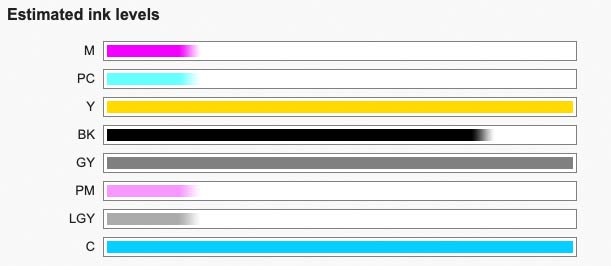
The driver offers the usual info and utilities, such as these ink levels not long after setup.

Or you can see them in a browser…
Web interface

The printer has its own web page which is good for going through various settings and options. It’s accessed on my Macs from the printer driver settings (I added a bookmark to my browser for convenience).
In this example, I was printing from a computer elsewhere in our house and had an error message appear in the print queue monitor.
A quick check of the ink levels on the web page shows that the black cart is at the ‘you really need to change’ this level.

Most of the front panel options are available, along with vast amounts of technical network and comms stuff. So obscure that even here, there isn’t space to cover it.
You may find a password is needed – this can be set/deleted from the printer itself.
It’s also a convenient place to see the manual – take a bit of time to have a look through it.
It’s at https://ij.manual.canon/ij/webmanual/Manual/All/PRO-200%20series/EN/CNT/Top.html
Ink replacement
A warning appears when ink is low. This can be ignored for a while but after a few more big prints you should definitely make sure you have a spare cart ready. The carriage moves over for ink access when you open the printer lid.
Yellow was the first to go for me, followed by Black, Grey and Cyan
After unwrapping the ink cart, the orange tab just twists off.

The carts are of similar size to the PRO-100, but no longer have the red LED indicator.
How many prints?
The ink carts are the same 14.4ml capacity of the PRO-100 but Canon suggest that the page yield is increased. The numbers given in the specifications are for printing a standard test image.
I can’t personally compare the PRO-100 with PRO-200 since I didn’t install from new for my original PRO-100 review.
There is no ‘waste ink’ tank for the printer, ink from cleaning and overspray (borderless) is collected internally.
It’s difficult to give accurate ink usage information with all the non standard printing I do in my testing. With the initial ink carts I got 50+ large prints before the yellow ran out – I cannot give any more detail, yet alone costs. However do look at the number of prints shown collected together later in this review.
The best article I’ve seen on ink use is at Red River in the US – ink usage will be similar to the PRO-100, but you’ll have to do the maths yourself to apply your local ink costs for the PRO-200
Here’s the sponge under the print area, after a few borderless prints.

This sponge remains wet for a long time, so take care when cleaning paper dust, which can collect if using some papers, after a few months of use.
Cleaning is described in detail in the on-line manual.
Other features
The printer includes a number of preset template print options. It’s not the most economical way of producing it, but I have run off the odd sheet of graph paper and music score paper when required

Borderless A4 graph paper on plain paper.
Media handling
One change that PRO-100 users will notice is that Canon’s insistence on certain fixed margin sizes for some papers is a thing of the past. This gives a lot more flexibility in paper choices. When coupled with borderless printing and a 990mm page length, media handling is (IMHO) the biggest advance in the PRO-200.

For normal sheets, there are the top and rear feed slots. The top one can take several sheets and had no difficulty with a dozen A3+ sheets of lustre paper.
Here are the listed paper sizes:
- A3+ / A3 / A4 / A5 / B4 / B5 / LTR / LGL / Ledger / Hagaki / 7″×10″/12×12L (3.5″×5″) / KG (4″x6″) / 2L(5″×7″) / 8″×10“ / 10″×12“ / Square (127 mm) / 210 ×594 mm
- Custom size (width 89 mm – 329 mm length, 127 mm – 990.6 mm)
- Envelopes (DL, COM10)
That’s a useful range – even more so if you are interested in borderless printing
- A3+ / A3 / A4 / A5 / LTR / Ledger / Hagaki / 7×10 /12×12 / 5×7/L (3.5″×5″) / KG (4″x6″) / 2L(5″×7″) / 8″×10“ / 10″×12“ /Square (127 mm) / 210 ×594 mm
Note that double A4 size (210mm x 594mm) – that’s what I used for the borderless panoramic print here. along with a custom size for the big panoramic print. (254mm x 990mm here)

I’m printing the big print via Canon’s PPL software, running on my old (2010) Macbook Pro. The image was opened in Photoshop and then sent to the PPL software.
The rear feed is often suggested for use with art papers, but I didn’t actually -need- to use it at any time during my testing.

The print path is curved, just not quite such as sharply as via the top feed. It may be better for some specialist papers/media, but none I have here to try.
There is a paper jam access button on the side of the rear tray.

Pressing this lowers the tray for a less curved path, but the paper won’t then feed. However, raise the tray a bit and the printer will print. Something to experiment with if you have media that will bend a bit, but it’s at your own risk.
The printer has automatic skew correction, which meant that in all my testing, the only skewed print I noticed was an A3+ borderless one on a heavy art paper where I knocked the paper whilst it was initially loading.
When loading paper you can select the media type/size on the front panel. The printer driver can override this but I always use it as a way of minimising printing with the wrong settings. I’m regularly changing media and sizes, and use the setting to reduce my number of messed up sheets of paper.

There are other settings for the paper you can change, such as the head height, but if I need special settings I’ll make a custom media type, with the Canon Media Configuration Tool (MCT).
The MCT means that rather than using the generic Heavy Art Paper setting, which I used for much of my profiling of art type papers, I could have a custom name on the screen. I’ll look at using the MCT in a bit.

CD/DVD printing
The printer comes with a CD/DVD holder for printing. Canon refer to it as a Multi-purpose Tray in their documentation
The holder has a clip that keeps the disk in place. It seems it also supports printable nail stickers.
I was most disappointed not to get any samples of these to test, although Karen seemed less so…
A flap folds down at the front of the printer to reveal the slot for feeding in the disc.

You only feed it in as far as the marks shown. The printer will then draw it in for printing and eject when done.

Colour management is going to be a bit hit and miss, so best to start with ‘printer manages colours’ unless you want to make your own profiles. [SpyderPrint is the only application I know of which supports this].
Software
 Image layout for disks is tricky without an application specifically supporting it.
This is where I’m happy to use one of Canon’s print utilities, the Easy Photo-print Editor (this works on phones and iPads too)
It’s a free bit of software that supports all kinds of photo printing. This includes composite prints such as calendars and cards.
Whilst I write these reviews from the point of view of a photographer wanting to print their images, I always have a look at the ‘easy’ software provided by manufacturers.
In recent years this has improved to a point where I no longer just include a mention because it exists, but because it does something of use.

Media Configuration Tool (MCT)
The Canon MCT is a relatively advanced feature that I’m used to seeing on higher end and larger printers. I’ll not go into too much detail here, but have explored its use with the PRO-300 (it works just the same).
- Custom media settings for the PRO-300
- Using the MCT in my Canon PRO-1000 review
You can create your own media setting (which can include a default colour profile) based on an existing one, or you may be able to download a file from a paper manufacturer. These ‘AM1X’ files are intended to give all the information needed to print on a particular paper. This is something new for many suppliers and personally I still stick to using the plain ICC profile and the recommended media settings. Whilst I trust the accuracy of ones from Canon, others may be less experienced in getting optimal results from the system.
On my Mac the software was installed in the Canon Utilities folder in my Applications folder.
The MCT needs to download information from the printer in order to work. Here, it’s found the PRO-200 and PRO-300 on my network.

It can take a minute or two for all the info to be acquired.

Key things to note are that there are a maximum number of media types that can be registered in the printer (35 here) and that there are already 30. Some can be deleted, others not.
One other thing I noted is that a media may appear in the list (and in the printer driver), but not on the front panel.
There seems no obvious reason as to why I can’t delete Hagaki ones for instance? Not a paper type I’ve ever seen.
The software can connect to Canon servers and download new media if available (there were none when I just tried). The media info from a particular printer can be backed up and if need be download to another printer. Something useful in Lab environments – perhaps less so for myself at home.
Creating a custom paper starts with selecting a base paper type. You need to update the printer (and driver) before you get to the page letting you change paper settings. Once there you have the option for custom paper feed adjustments, ink use (only for some paper base types) and profile associated with the media.
These options can be quite advanced, so if this is something that interests you, have a read of what I did with the PRO-1000 and PRO-300, but above all dip into the Online MCT Guide.
I should note that I used the MCT regularly when I had my Canon iPF8300 44″ large format printer here. If you intend to do a lot of printing with a few specific 3rd party papers it may be worth looking at.
Colour management
The printer software installs a good collection of paper ICC profiles. Whilst I’ve no complaints, I prefer to make some of my own profiles. I typically print targets of nearly 3000 patches on an A3+ sheet.
With the variability in drying times, I prefer to leave target for several hours to dry – overnight is my preference.

For the full list of profiles I created, see the list of papers further below.
I did use Canon supplied profiles as well, and they were perfectly usable. There’s nothing wrong with them, just I like the process of making my own – it gives a deeper feel for how a paper performs in a printer.
Profiling the PRO-200 is pretty straightforward using my i1Isis spectrophotometer and i1Profiler. The profiles are made from nearly 3000 patches, so somewhat more detailed than many commercial profiling services.
My profiles worked well with both Perceptual and Relative Colorimetric rendering intents – the choice of which to use comes down to paper type, experience and what sort of image it is. For this soft proofing was of some help, either in Photoshop or the Canon PPL software. However I’d note that I regard soft proofing as an occasional tool to use, not a part of my regular print workflow – it is widely overused in my opinion. For more about my approach to printing see:
Looking at profiles I’d made, it was easy to compare some with ones I’d created for the same papers for the PRO-300 a few months ago.
Canon Fine Art Museum Etching
I’m not keen on including many of these gamut display graphics, but these three views using the Mac ColorSync Utility give a overall feel for the differences you’ll see between the dye and pigment inks of the 200/300.
Feel free to skip this detail – I’ll be summarising it in the conclusions
The solid shape is from the profile for the PRO-300 and the wire-frame from the PRO-200

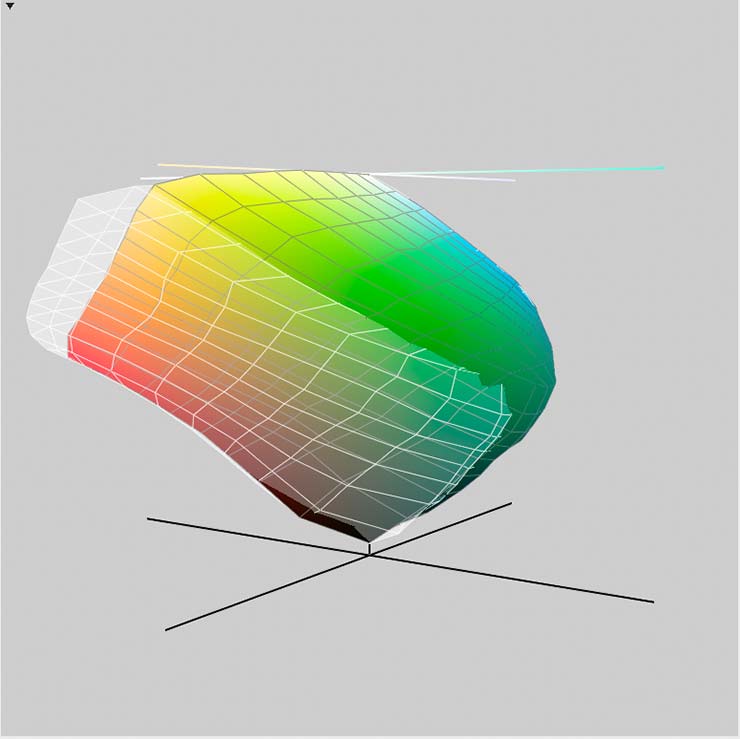

The dye inks (200) generally give more range to warm light colours, whilst the pigment inks (300) give more range to the darker blue/green colours.
What’s not shown here is that the dye inks are getting deeper blacks (on art papers). For those that like some numbers, here is a screenshot from when I was making the PRO-200 profile above.

The deepest black (aka DMax) with the dye inks (on a matte art paper) was in ~1.9 whilst pigment inks get to ~1.6. This is a noticeable difference.
There is a ‘however’ in this…
Note that slight rise in the response curve at longer wavelengths. This suggests that the dye inks are not so dark in the deep red. This means that lighting with a lot of red in it (especially tungsten and very warm white LED) will exacerbate illuminant metamerism.
What does this actually mean? Well, I’d expect black and white print quality to be much more variable than with pigment inks, leading to the common B&W print problem of prints looking to have a greenish or magenta-ish tint to them.
As I’ll show in a bit – the PRO-200 is superb for colour prints, but somewhat more variable when it comes to B&W
Using profiles – something to note.
With the profiles I make, and printing from Adobe Photoshop, I’ll typically print many images using the relative colorimetric (RelCol) rendering intent, ensuring that I’ve enabled BPC (black point correction) for matt papers. For some images I’ll use perceptual rendering, but it depends on the image and the paper. Soft proofing can help give a feel for the difference, but a test print trumps any screen simulation if you’re unsure. See some of the printmaking videos I’ve made for the PRO-200 for more examples.
With the Canon Professional Print and Layout software it seems that a different CMM (colour management module) is being used under the hood, since Perceptual is recommended and the BPC option changes the soft proof look of perceptual and RelCol intents, so needs use with some thought.
I first noticed this with the PRO-300 printer, and it seems to be the same with using the 200. It’s not ‘wrong’ just something to take note of.
Black and White
There are effectively two ways of making B&W prints with the PRO-200. One is to print a B&W image exactly as you would a colour one, with an ICC profile. However, the printer driver also offers a special black and white print mode.
I’ll assume that you’re starting with a B&W image to print. If it’s in colour I’d usually recommend converting it to B&W before thinking about printing. If you’re new to B&W I’d suggest having a look at my recent article:
With the pigment ink PRO-300, the B&W print mode delivers very good result, however past experience has seen mixed results for B&W printing with dye based inks, so I was keen to test the PRO-200 in some depth. In this review I’ve an overview of the results, but have written a separate article with more details.
In this first example I’m printing from Photoshop, selecting an ICC profile I’ve made for the paper (at the standard print quality setting).

It’s exactly the same way I’d print a colour image.
The printer driver has a ‘Black and White Photo Print’ option I can use.
I need to set the Photoshop printer dialog to ‘printer manages colour’ for this.

This B&W mode has an option to change the tone of the print, but can be a bit hit and miss in setting up.

For using the B&W mode, the PPL software gives more options.

Here’s the tone adjustment and a strength setting. The default is ‘hard tone’ – leave it at this unless you are experimenting.

There is also a curve adjustment and the ability to save/load curves – this is potentially very useful in print linearisation.
Finally there is an option to do a pattern print. Lots of images all with slight colour tones applied. Thes might be used to try and correct unwanted colour tints under some lighting.

The best way?
Is there a particular way of printing B&W I’d choose?
Unfortunately there is no simple answer, it depends on both your paper choice and viewing lighting.
Take these photos of B&W prints made using my own ICC profiles. Both papers make excellent colour prints.

The profiles I’ve made (non Canon papers) both look more neutral than using the B&W print mode.

Digital photos can exacerbate any tints, but the baryta paper (one I use a lot for B&W with pigment inks) did show a magenta tone under the LED lighting. The cotton rag art paper looks good and the blacks it gives are indeed deeper than I see with pigment inks.
I’ve more detail in the B&W article, but I’ll leave it with this example, using Canon’s Fine Art Museum Etching paper

Here the Canon BW mode is superior to the Canon paper profile, which beats my normal 3k patch icc profile and a special test one with nearly 9000 patches.
My takeaway from this is that you can get great B&W with some papers, but this depends on the viewing lighting and possibly profiling.
My clear warning to people who get a PRO-200 with a preconceived list of their favourite B&W papers, is prepare to perhaps find they are nowhere near as good as you thought. I’ve always said that you need to re-evaluate your paper choices from scratch, when you get a new printer. Never was this more true than for my testing of the PRO-200 after all the pigment ink printers I’ve reviewed in recent years.
Choose your papers based on results, not brand reputation (never a good starting point IMHO)
- Black and white on the PRO-200
- B&W Printer test image
- B&W printer linearisation check using the i1iSis
- Black and white printing on the PRO-300
Canon software
Canon provide a range of applications beyond the basic printer driver. I’ve mentioned the MCT and Easy-PhotoPrint Editor earlier, but the ‘Professional Print and Layout’ (PPL) is an excellent solution for basic printing from many other applications or can be used stand-alone.
I normally use Photoshop for preparing images and my printing as well. In the past I used to use Canon’s print plugin for my 44″ iPF8300, but in general I’ve tended to stick to what I know. The latest version of the PPL software might well change that.
The Canon Professional Print and Layout software can work stand-alone or (as I did) as a plugin application for Photoshop.
The latest version is linked from the PRO-200 on-line manual
When you open it for the first time you need to select a printer and allow it to get media info from the printer. I’ll not attempt to cover all the software does. Note that if your printer is on a network and its address changes, you will need to add it back to the list of printers in PPL – I noted this when I moved a printer to a different room and plugged an ethernet cable in to it rather than use the wireless
There’s a lot of documentation to explore if you want to print multiple images or gallery wraps.
Here’s an example printing a gallery wrap for a 9″ x 12″ frame on an A3+ sheet of glossy canvas.

It’s printed with a soft mirrored edge for the wrap function. This software is very useful for larger printers as well.
Even if you’re happy using LR or Photoshop to print, give the Canon software a go. I found it quite easy to adapt to.
Canon camera specific functions
The print software includes options for HDR Print and other Canon camera specific functionality such as DPRAW Print. This requires a wholly different workflow to how I’d normally work as a photographer.
So, whilst I can see how it looks good to be able to offer an ‘end to end’ Canon camera to print solution, I have difficulty in seeing how I’d actually make use of any of it, since it’s all stuff I’d want to do in Photoshop or some other software.
The print/layout software includes a sharpening option that has no controls or preview – not something I’d be happy with. It’s linked to camera/lens info – it may work, but I don’t like ‘black box’ adjustments of this sort (YMMV).
Fortunately this stuff doesn’t get in the way of the software being rather useful, and worth looking at.
Printing
During my testing I’ve created quite a few prints, using a mix of Canon and third party papers.

These are the ink levels (from setup) after all the prints above were printed – as you can see, I’ve replaced 4 carts, and only the black is showing any significant use. I’ve not counted them but with all the profiling sheets, there are rather a lot of prints.
The papers included:
- Canon Pro Platinum Gloss
- Canon Pro Luster
- Canon Fine Art Museum Etching
- Canon Fine Art Photo Rag
Other papers:
- Canson Rag Photographique 310
- Olmec Matte 230 photo paper
- Pinnacle Lustre 300
- Pinnacle Silk Baryta 310
- Pinnacle Velvet 275
- Permajet Titanium Gloss 300
- Permajet Titanium Lustre 280
- HP Artist Matte Canvas 380*
- HP Hahnemuhle Smooth Fine Art 265*
- HP Hahnemuhle Watercolor Paper 210*
- HP Aquarelle 240*
I have profiles for all of these, which are available on request for non commercial personal use. Email me with which you want, and don’t say ‘all of them’ ;-)
* Note that the HP papers are from many boxes of A3+ sample packs I was sent years ago when I reviewed the Z3200 – the papers were from when HP used to make good photo printers such as the 9180. This means I don’t know if they are still available, but I still have boxes of them…
All of these papers went into the top slot – even the canvas sheet.

A3+ borderless canvas sheet
The saturation is relatively low on this matte canvas, but I suspect a coat/spray of varnish would give it real punch.
Many art papers give particularly good blacks – denser than on any pigment ink printer I’ve used.

A3+ smooth cotton rag paper 265gsm
The soft proofing option in PPL can be helpful, here, since I found the inks of the PRO-200 giving deeper colours than I might expect, even on a textured watercolour paper like the Aquarelle.

A misty dusk at Cannon Beach in Oregon.

A quick wireless test
It’s quite easy to print directly to the printer from cameras and phones. I tried the direct Canon Camera link in my PRO-300 testing, and it works exactly the same with the PRO-200. At many levels these printers are quite similar.
In printing from my iPhone (SE20) I used the Canon Print App.
First up the phone needs to find the printer. The PRO-200 is connected wirelessly to the house network, as is Karen’s MG3600 office printer. The PRO-300 is connected via Ethernet up in my office.

It takes a short while to connect. The printer does offer direct wireless connection if required, although this is not available if using the Ethernet connection.

I’ve selected a photo, just taken, of some profiling targets.
I’d loaded paper and set its size/type on the printer display. The Phone App will pick this up and offer it as a printing option.

Finally, here’s the print, straight from the phone.

Printing times
See the printer specs for more details, however I did notice that the PRO-200 seemed slightly faster than the PRO-300 (I have no PRO-100 data). Whilst printing at high quality was slower than ‘standard’ the difference was not that great. Little enough that for high enough quality source images and larger prints, I’d not think twice about using the high quality setting. That said, the differences are not huge – try a small print and see if it matters to you before deciding.
Borderless
Borderless printing can be set for the following print sizes (see the specifications for full details and limitations.
- A3+ /A3 /A4 /LTR /Ledger /Hagaki /7*10 /12*12 /5*7 /L(3.5″*5″)
- KG (4″x6″) /2L(5″*7″) /8″*10″ /10″*12″ /Square(127 mm) /210 *594 mm (double A4)
These A3 size borderless prints are printed on a metallic gloss paper and show to some extent why I’d happily choose the the PRO-200 for glossy colour prints for many uses.
The paper is PermaJet Titanium Metallic Gloss [review]

Panoramic
Now for limitation that’s irked me with several Canon desktop printers in the past. The restriction on maximum page length.
The PRO-200 raises the maximum custom page size to 990mm or around 39″. I was able to use a custom page size in both my normal Photoshop print dialog or in the Canon PPL software.
See my video about making wide PRO-200 prints for more

This example is printed with a border on a cut sheet of 10″ width roll paper.
Borderless printing is available with the standard ‘Double A4’ or 210mm x 594mm paper size.

Below, I’ve selected it and borderless in the PPL settings.

This size is exactly half (lengthwise) of an A2 sheet – my test papers this size here came from my local (Leicester) supplier Paper Spectrum. They also do double A3 size paper (297mm x 900mm) which will of course need printing with a border. Their 300 gsm Lustre paper has long been my standard for general purpose printing and my very large commercial prints.
In the UK I’ve also tried the Fotospeed panoramic papers, and have a review with more general discussions about such wide images.

Note the amount of space needed – you can fold the paper over, but keep an eye on it as it feeds through.

Just one note of caution before you rush off making giant wide prints – give some thought as to how you intend to mount/display them.

So, you’d like a dye based printer?
Yes, if I printed a lot of bright colour images. In fact, if Canon produced a larger dye based printer, with some work on fixing the illuminant metamerism (tints) for B&W I think it could do well. Of course there are people who will bang on about print longevity and the like, but that’s mostly a marketing argument IMHO…
Conclusions
Following on from my testing of the Canon PRO-300, the (cheaper) PRO-200 is an interesting printer.
In terms of size, usability and functionality, it is almost identical to the PRO-300, It has a slightly larger range of paper size options and media types. I’ve not tested the various iron-on fabric options or things like printable nail stickers.
Setup was simple and well documented, but do remember to do a print alignment for optimal print quality.
It has good wireless and wired network support and is easy to print directly from via mobile devices. Paper handling is robust and reliable with even quite heavy art papers working via the top feed slot. The rear slot feed path is still curved, so stopping very stiff media or board being used.
The printer feels solidly constructed, even though it’s lighter than its predecessor (PRO-100).
Inks
The primary difference is that the PRO-300 has 10 pigment ink carts and the PRO-200 has 8 dye based inks. It’s not quite such a difference in that one of the PRO-300 inks is a clear gloss optimiser coat.
Pigment inks are generally rated as lasting longer than dye based inks. However, with the latest inks in the PRO-200 rated at over 100 years, both will outlast me. Where dye inks are a problem is with cheap 3rd party inks – I simply won’t ever use them.
Where the PRO-200 excels is with glossy colour prints. The surface shows no signs of ink laying on the surface and gives a smooth print surface under different lighting angles

Particularly impressive was the surface finish of a glossy metallic paper I tried.
I’ve printed these images before and rarely seen the intensity and luminosity in a print.
Colour printing works well on lustre and baryta papers as well, although the comparison with pigment inks is less obvious. It’s here where the difference between pigment/dye inks shows to some extent with better performance in warm light colours for dyes and dark greens/blues for pigments.
That said, looking at the dark blue skies in the examples above, it’s not a big difference,
Matte papers
In general, the dye based inks of the PRO-200 gave deeper blacks and more intense colours that I’d seen with the same images on the same papers using pigment inks. The deep blacks and strong light colours can really give some images a feeling of physical depth that changed what I thought might be optimal paper choices..
However…
At this point you might be wondering why I’d ever choose a pigment based printer for some of my work?
Well, I’ve been a fan of black and white photography and printing for many years and have put in a lot of work testing and refining techniques and materials. I even have an entire section of this site devoted to B&W
In recent years black and white print performance had advanced considerably with printers, especially with the advent of custom B&W print modes in printer drivers. A key element of this has been banishing colour tints/tones from supposedly B&W images.
Unfortunately, dye based inks have a reputation for varying how B&W prints look under different lighting – varying from slightly magenta to slightly green.
Well, with the PRO-200 there is good news and bad news.
- The bad news is that with some papers and settings you get distinct colour tints under some lighting conditions
- The good news is that with some papers and settings you can get very nice looking B&W prints
If you are prepared to do a bit of testing, then the PRO-200 can give good B&W performance, just don’t assume that your favourite papers from your old printer will work optimally in your new PRO-300
Please don’t just send me names of papers and ask how well they will work ;-)
The only ones I’ve tested are listed here (all UK papers BTW)
So, what did you think of the PRO-200?
I was impressed. I never liked the ‘big button’ interface of the PRO-100. so the screen and controls make the printer much easier to use and manage. More information (such as the on screen guides) are great for people just getting into printing, and give a confidence that can only help in mastering printing.
The annoying paper size and margin limitations of the PRO-100 are banished, giving a wide range of paper options and robust paper handling.
The Canon PPL software is easy to use and offers functionality that now makes it an easy choice for printing. Of course the results still depend on having suitably prepared images to print. If you’ve rubbish images to start with, a better printer just gives a better printed versions of rubbish images (yes, that goes for me too!)
Replacing a PRO-100?
The jump from PRO-100 to PRO-200 is one of the biggest jumps in usability I’ve seen in a few years. That said, if you have a working PRO-100 and are happy with using it and the results, there is no pressing need to upgrade. The new ‘ChromaLife 100+’ inks are similar to the PRO-100 and whilst print quality differences likely exist, they won’t be that obvious to most people. The PRO-100 was sold incredibly cheaply in some countries, and that won’t happen any time soon for the PRO-200
Questions?
Do feel free to email me at Northlight, or via the comments on the PRO-200 video.
I’ve related articles that may be of interest.
- Canon PRO-200 printer initial setup
- More details about B&W printing on the PRO-200
- Canon PRO-300 review
- Canon PRO-1000 review
PRO-200 or PRO-300?
A good question – see my short comparison video
—
Thanks to Canon UK for loaning me the printer. I have no business relationship with Canon other than using their cameras for my work as a professional photographer.
Order your printer from Adorama | B&H
—
Improving your own printing?
I’ve lots of printing related articles on the site…
- Better photography through printing your photos
- Choosing the best paper for your photos
- What goes into a great print
- Printing – articles and reviews index page
Full PRO-200 Specifications
| GENERAL FEATURES | |
| Model | PIXMA PRO-200 |
| Ink Type | 8-colour Dye |
| Maximum Print Resolution | 4800 (horizontal)*2 x 2400 (vertical) dpi |
| Size | Approx. 639 x 379 x 200 mm
Approx. 25.2 x 15 x 7.9 inch |
| Weight | Approx. 14.1kg Approx. 32lb |
| Display | 3.0 inch / 7.5cm LCD (Display Panel, Colour) |
| Interface | USB / Wireless / ethernet |
| Input Power | AC 100 -240 V 50 / 60 Hz |
| PRINT SPEED | |
| Colour 11″x14″ image on A3+ with Border | Approx.1 m 30s |
| Black 11″x14″ image on A3+ with Border | Approx. 2 m 55s |
| POWER CONSUMPTION | |
| Standby USB connection to PC | Approx. 1.0W |
| OFF | Approx. 0.2W |
| Printing USB connection to PC | Approx. 1.6W |
| Standby(all ports connected) | Approx. 2.5W |
| ENVIRONMENT | |
| Operating Environment*24 | Temperature: 5~35 ℃ Humidity: 10~90 %RH (no dew condensation) |
| Recommended Environment *25 | Temperature: 15~30 ℃ Humidity: 10~80 %RH (no dew condensation) |
| Storage Environment | Temperature: 0~40 ℃ Humidity: 5~95 %RH (no dew condensation) |
| ACOUSTIC NOISE (PC PRINT) | |
| Plain Paper(A4, Colour)*27 | Approx. 42.5db |
| Photo Paper Pro Platinum(PT-201)(L,Colour,borderless) | Approx. 42.5db |
| Photo Paper Pro Platinum(PT-201)(4×6,Colour, borderless) | Approx. 42.2db |
| PRINT HEAD / INK | |
| Type | User fitted at printer setup – the head is the same as the PRO-100 |
| Number of Nozzles | Total 6,144 nozzles(Y / M / C / PC / PM / Gy / Bk / LGY each 768 nozzles x 8) |
| Ink Tank | 8-colour = Y / M / C / PC / PM / Gy / LGy / BK |
| MAXIMUM PRINTABLE PAPER LENGTH | |
| Top Tray | Top Tray: 322.2 mm (12.7 inch), Borderless Printing: 329 mm (A3+) (13 inch) |
| Manual Feed | Manual Feed: 323.4 mm (12.7 inch), Borderless Printing: 329 mm (13 inch) |
| PRINTABLE AREA | |
| Borderless Printing | Top / Bottom / Right / Left margin: each 0 mm |
|
Bordered Printing |
Top margin: 3 mm, Bottom margin:5 mmLeft/Right margin: each 3.4 mm (LTR / LGL: Left: 6.4 mm, Right: 6.3 mm)
Recommended Top / Bottom / Right / Left margin for Fine Art Paper: each 25mm |
| SUPPORT MEDIA | |
|
Top Tray |
Plain Paper / Photo Paper Pro Platinum (PT-101) / Photo Paper Plus Glossy II (PP-201/PP-301) / Photo Paper Pro Luster (LU-101) / Photo Paper Plus Semi-gloss (SG-201) /Matte Photo Paper (MP-101) /Photo Stickers (PS-101 / Heavyweight Fine Art Paper (BOX) / Inkjet Greeting Card / Cardstock / Photo Paper Plus Glossy II (PP-208) / High Resolution Paper (HR-101N) / Photo Paper Glossy (GP-501/GP-701) / Envelop / T-Shirt Transfer / Light Fabric Iron Transfers (LF-101) / Dark Fabric Iron Transfers (DF 101) |
|
Manual Feed |
Photo Paper Pro Platinum (PT-101) / Photo Paper Plus Glossy II (PP- 201/PP-301) / Photo Paper Pro Luster (LU-101) / Photo Paper Plus Semi-gloss (SG-201) / Matte Photo Paper (MP-101) / Photo Paper Pro Premium Matte (PM-101) / Heavyweight Fine Art Paper (BOX) / Extra Heavyweight Fine Art Paper (BOX) / Premium Fine Art Rough / Inkjet Greeting Card / Cardstock / Photo Paper Plus Glossy II (PP-208) / Photo Paper Glossy (GP-501/GP-701) / Light Fabric Iron Transfers (LF-101) / Dark Fabric Iron Transfers (DF 101) |
| Multi-purpose Tray | Printable Nail Sticker (NL-101) / Printable Disk |
| PAPER SIZE | |
|
Top Tray |
A3+ / A3 / A4 / A5 / B4 / B5 / LTR / LGL / Ledger / Hagaki / 7″×10″/12×12L (3.5″×5″) / KG (4″x6″) / 2L(5″×7″) / 8″×10“ / 10″×12“ / Square (127 mm) / 210 ×594 mm
Custom size (width 89 mm – 329 mm length, 127 mm – 990.6 mm) Envelopes (DL, COM10) |
| Manual Feed | A3+ / A3 / A4 / A5 / B4 / LTR / LGL / Ledger / 12×12 8″×10“ / 10″×12“ / 210×594 mm
Custom size (width 203.2 mm – 330.2 mm, length 254 mm – 990.6 mm) |
| Multi-purpose Tray | 120 x 120 mm |
| PAPER SIZE (BORDERLESS) | |
| Top Tray | A3+ / A3 / A4 / A5 / LTR / Ledger / Hagaki / 7×10 /12×12 / 5×7/L (3.5″×5″) / KG (4″x6″) / 2L(5″×7″) / 8″×10“ / 10″×12“ /Square (127 mm) / 210 ×594 mm |
| PAPER HANDLING (TOP TRAY) (MAXIMUM NUMBER) | |
| Plain Paper | LTR / A4 / A5 / B5 = 100 B4 / A3 / LGL / LDR = 50 |
| PAPER WEIGHT | |
| Top Tray | Plain Paper:64-105 g/m2Canon Genuine paper (maximum): approx. 380 g/m |
| Manual Feed | Canon Genuine paper (maximum): approx. 380 g/m, or Paper Thickness 0.1 ~0.6 mm or less |
| PRINTING SOLUTIONS | |
| Available for | Canon PRINT Inkjet / SELPHY (for iOS / Android) / AirPrint / Mopria*36 / Canon Print Service (for Android) / Windows 10 Mobile / PIXMA Cloud Link (from smartphone and tablet) |
- Ink droplets can be placed with a pitch of 1/4800 inch at minimum.
- Document print speeds are the averages of ESAT (Word, Excel, PDF) in Office Category Test for the default simplex mode, ISO/IEC 24734.
- Photo print speed is based on the default setting using ISO/JIS-SCID N2 on Photo Paper Plus Glossy II and does not take into account data processing time on host computer.
- Acoustic Noise is measured based on ISO7779 standard with default setting.
Never miss a new article or review - Sign up for our occasional (ad-free) Newsletter
and please do subscribe to Keith's YouTube Channel
Other areas of our site that may be of interest...
All the latest articles/reviews and photo news items appear on Keith's Photo blog

Keith explains tilt and shift lenses
Keith has written a book that looks at the many ways that tilt/shift lenses can benefit your photography from a technical and creative point of view. If not in the UK check for import issues and maybe try an on-line bookshop. Keith has no connection with sales of the book.
ISBN 9781785007712
There is also a specific index page on the site with links to all Keith's articles, reviews and videos about using tilt and shift.
We've a whole section of the site devoted to Digital Black and White photography and printing. It covers all of Keith's specialist articles and reviews. Other sections include Colour management and Keith's camera hacks - there are over 1200 articles/reviews here...
Assorted Google ads - sorry but we have no control over external content. One day you might see one that is remotely of interest
We're an Amazon.com affiliate, so receive payment if you buy via Amazon US
Keith | Mar 13, 2024 at 2:01 pm
300…
Pigment every time for that range of papers
Patrick | Mar 8, 2024 at 7:12 am
Dear Keith,
I just came across your excellent reviews of different printers. I’ve been in mostly landscape photography for some years now. I wonder which inks – dye (pro-200) or pigment (300) – would more fit my style of photography? I do a lot of Japanese landscape – cherry blossoms, flowers, vivid moss, autumn foliage – and I prefer my prints on lustre, baryta or fine art papers, e.g. on Ilford Smooth Pearl paper or Hahnemühle PhotoRag, Torchon, William Turner, or PhotoRag Baryta. With your experience, what would you rather go for?
Thanks :)
Keith | Nov 12, 2023 at 1:02 pm
Lovely place – looking forward to returning again!
Christia Hall | Nov 12, 2023 at 11:23 am
I used to live by Haystock Rock. It was fun seeing that after following your excellent reviews and articles. Keep it up, thank you!
Keith | Sep 30, 2023 at 2:10 pm
Email me – they are only available on request [licensing issues]
karl dutton | Sep 26, 2023 at 7:57 pm
just bought the pro 200 this morning based on your youtube videos. where can i get the icc profiles to download? i am most definitely an armature and they are solely for personal use.
Keith | Oct 26, 2022 at 11:18 am
Bye is not inherently ‘better’ in this respect
The 8550 would be my choice for many uses, especially if ink costs matter…
Michael | Oct 25, 2022 at 1:53 pm
Hi Keith!
I am a advanced amateur in photography and i just digged into starting to print my photos. (Because i more and more hate to have a good camera gear and throw it into the trashcan by just posting the pics on Instagram or the web itself…)
Now i did a lot of reading on this topic for the past few days, and my conclusion to all question´s thrown on me is, that i am fine with printing DIN A3 (13″) or even a bit larger for now… No need for A2 at the moment.
Now to my biggest concern: I am not quite sure if i want, or better say, i´m able to print a few times a week to get the printer maintained. So i am looking for a device which can also be used after 2-3 weeks without printing while not emptying the expensive inks due to cleaning cycles.
Is it true that DYE-based printers are less prone to clogging?
Favourites right now are wether the Canon Pro 200 or the Epson ET-8550. Looking on the ink cost, the Epson will likely outperform the Canon?
Keith | Jun 7, 2022 at 12:58 pm
The 200 is pretty robust – I left one for a couple of months on purpose, and after a bit of whirring on start-up, it printed a nozzle check just fine.
However it did promote two carts from ‘Low’ to ‘needs replacing’ very shortly afterwards.
A bi-weekly check is what I’d try for, but the occasional longer gap should be OK if it’s not stored in hot/dry environment
Jeff Lastofka | Jun 5, 2022 at 5:10 pm
I subscribe to your YouTube and got a Canon Pixma 200 after your reviews (thank you) and like it a lot. I print at least a nozzle check page every week. I wonder if I’d be safe going every two weeks, or three, or monthly? I want to be sure to keep the printer healthy, but sometimes I want to be away from home longer and maybe can’t get a friend to babysit the printer:-) I’d value your opinion/experience on the printer maintenance/storage question.
Keith | Apr 19, 2021 at 11:09 pm
No idea I’m afraid – we’re in the UK and supplies are limited here too (I don’t sell printers or ink, so have no connections with anyone selling them)
Thomas F. Palik | Apr 19, 2021 at 6:56 pm
Where can you buy replacement ink for this printer that is not on back order? I would like to purchase this printer, but unless I can find a dependable replacement ink source, I will not buy this printer. I cannot get an answer from either Canon or B & H.
Keith | Mar 13, 2021 at 9:41 am
Sounds like the pearlescent surface is suitable for inkjet, but the other isn’t (I don’t actually know what ‘text weight’ means though?)
If the ink runs on a card stock, there is usually nothing you can do with settings. Inkjet only works on some card surfaces.
Dawn Z | Mar 12, 2021 at 6:20 pm
Just bought the Pixma Pro-200 and LOVE it. And your videos have been super helpful! I printed some invitations on a pearlescent cover stock (almost metallic) and it printed beautifully, but on the text weight of the same stock, it is printing blotchy and wet. I’ve tried all different settings – any suggestions??