


Museo Max 250 cotton rag paper
Museo Max 250 cotton rag paper
Archival fine art paper – a short review

Keith has removed all Google ads. Too many deceptive and irritating adverts.
Any ad links left are non tracking, to companies we know, trust and we've worked with for years [Park Cameras]
Ads helped pay for site running costs, so if you found something useful, please
...Make small KoFi donation?
...Subscribe to Keith's YouTube Channel
...Get Keith's book about how to use tilt/shift lenses
Our site contains affiliate links - these help support the site. See our Advertising policies for more
Canon, in the UK, are now supplying several Museo papers under the Oce brand. These are available via normal Canon paper distributors.
Keith Cooper takes a look at two of these papers, Museo Max 250, a cotton OBA free smoothish (‘velina’) matt art paper, and in a separate article Museo Silver Rag, a lustre finish coated rag paper.
The paper is capable of taking ink well and can gives richer colours than often associated with matte papers in the past.
This review has a lot more about profiling and printer settings than the Silver Rag one.
Article Index

About the paper
There are two versions of this paper available, a lighter 250gsm and a noticeably thicker 375gsm.
The lighter paper is available in roll formats and is what is tested here.
The texture is very light to the touch, enough to barely catch the light at glancing angles (see photo at foot of article)
Specifications
The following specifications are from Museo:
- 100% cotton
- internally buffered
- no optical brighteners
- brightness: 91
- acid free
- pH: 7.9-8.5
- weight: 250 gsm and 365 gsm
- calliper: 0.015” and 0.021” (380 µm and 530 µm)
- velina finish
- optimised for pigmented inkjet inks, also compatible with dye-based inks
- flake-free coating
For UK information about the Museo range contact:Canon (UK) – Wide Format Graphics Team
0800 623 623 or suppliesadmin@cuk.canon.co.uk
http://www.canon.co.uk/mediaguide
Available sizes
Via Canon (the unusual mix of dimensions is as written)

Note that the range supplied by Canon via OCE is slightly different to the listings at Museo (below)
| Museo Max 250 gsm Sheets | Museo Max 365 gsm Sheets | Museo Max 250 gsm Rolls | ||
| Size | Pack | Size | Pack | |
| 8.5″ x 11″ | 25 | 17″ x 22″ | 25 | 17″ x 50′ roll |
| 13″ x 19″ (A3+) | 25 | 35″ x 47″ | 25 | 24″ x 50′ roll |
| 17″ x 22″ | 25 | 36″ x 50′ roll | ||
| A3 | 25 | 44″ x 50′ roll | ||
| A4 | 25 | 50″ x 50′ roll | ||
| 60″ x 50′ roll | ||||
This is the sort of paper I often use when I supply black and white versions of my architectural photography.

For a building like Phoenix Arts above, I need good deep blacks, but to keep detail in shadows. Matt art papers can’t manage the intense deep blacks of gloss and semi-gloss papers, but for the right images, you don’t need all the extra contrast that can bring.
As well as this paper I’m looking at Museo Silver Rag (in another article) – a very different finish, with deep rich blacks and a semi-gloss finish.
I wish I could say what sort of image goes best with what sort of paper, but I’m afraid you need to experiment.
In general I’ve found that I like my colour images better on lustre/semi-gloss papers, since the gamut is often noticeably larger.
To get the best from any paper, I like to build my own ICC profiles.
In making profiles for this paper I noticed quite rich colours, which suggested that a few more colour images than my usual ‘pastel’ ones might work.
ICC profiles and media settings
There are a wide range of profiles available on the Museo site for many models and makes of printer. Both the downloaded profile (and media setting file) and custom profiles of my own were tried out using our Canon iPF8300 printer.
Results were interesting and I’ll cover them at a bit more length than usual, since they also illustrate potential pitfalls in the way of getting quite excellent print quality from this paper.
I like to create custom media settings for papers I’m testing – on our iPF8300 there is software to do it.
If you’re using other printers then have a look at the suggested settings that come with Museo’s own profiles.
Here are the media types I have available.
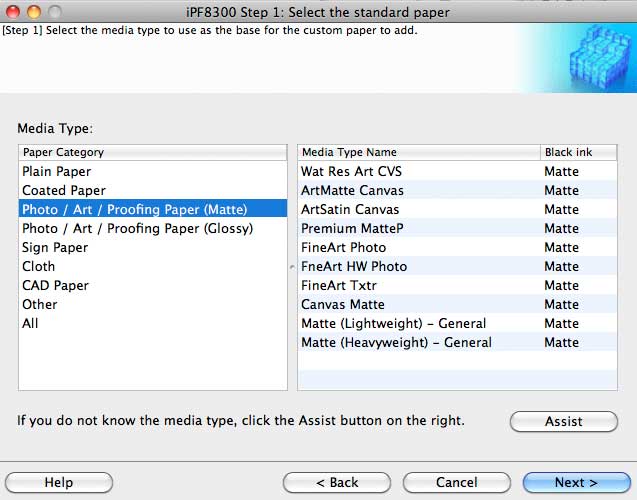
I’m picking ‘Premium Matte Paper’ to use in this instance.
You could just use it anyway, but I like custom settings on the printer display, since they also remind me what paper I’ve left in the printer from a day or two before…
I’ve used it several times before for similar papers.

One other reason for picking the ‘Premium MatteP’ is that it allows me to use the B&W print mode of the Canon print driver, which with a few minor tweaks, often gives exceedingly good prints.
After the media settings stage, I’ll print a test target (on 24″ roll paper here) that will let me create a custom ICC profile.
The target has nearly 3000 patches (this is way beyond what many ‘custom profiling’ services use).

Here’s the target, just out of the printer. Paper curl is not a problem.

Whilst a photo isn’t perfect for this, it does give a feel for the relatively good range of colour available (for a matte art paper).
This target is measured to create an ICC printer profile – this can be used for normal colour and B&W printing.
I also print a special test image and target, for setting up the B&W print mode. This is a different print mode available for some printers (for example, it’s the ABW mode in Epson printers). I cover B&W printing in more detail in all our many printer reviews. 
I’m in the process of producing a brand new version of this test image, which I’ll publish shortly, but in the mean time, you can download the current version for free via our black and white photography page.
I measured the target with my X-rite i1 Pro 2 spectrophotometer.

If you’re interested, the full details of this linearisation process for B&W prints is in an article of its own:
One output from this process shows how linear the printer/paper is:

Ignore the detailed numbers (there is some interesting info there, but it’s the line of ‘L’s that I’m looking at most).
This curve shows that there is a slight compression of shadow detail in the darkest areas. This is the flattening of the curve of ‘L’s towards the bottom
This might not show up in many images, but I like to know that it is there, and that with the B&W correction profile I’ve created, I can correct for it if I want.
One other thing to note with picking the right media setting, is that with some choices (on Canon iPF printers) the Monochrome print mode is disabled (greyed out below).
Unfortunately, this also happens with the custom media profiles downloaded with the Museo profiles, which use the ‘Special’ media settings.

Why should this matter? Well, the B&W mode might give the best looking results and I want to be able to try it. If you want to use B&W mode I’d reccomend not using the Museo custom media setting (use Premium MatteP for testing).
I go to a lot of trouble when editing images to get the sort of tonal balance I want, to give the right feel to an image.
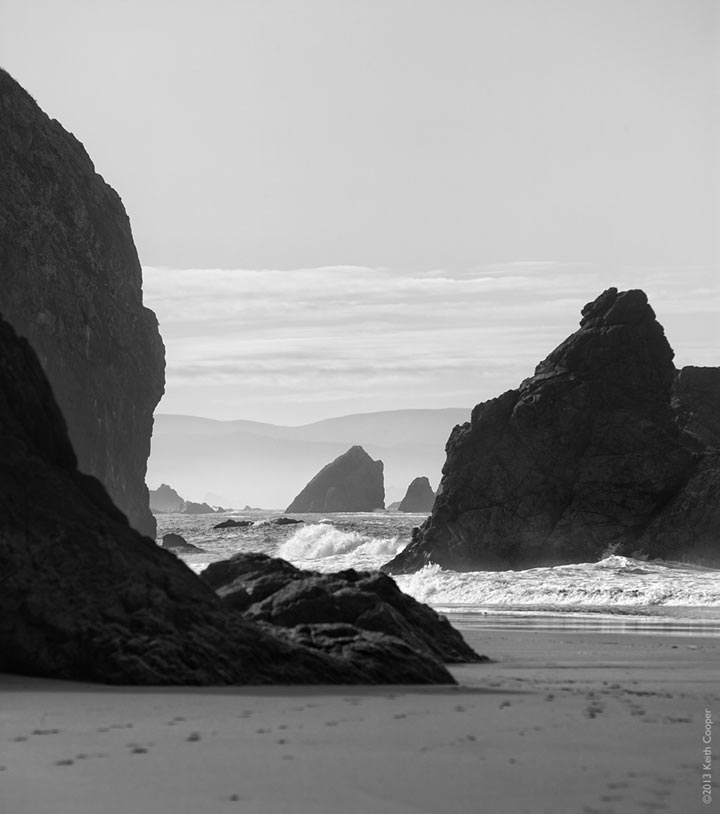
In this image of the Pacific coast, I want to make sure that the shadow detail has the prominence I’m after, to give the right depth to the image.
During my initial profiling I’ve already got a good idea of how the paper takes ink, and that it’s potentially capable of very nice looking prints. All the profiling and curve making is about getting the best from the paper and inks I’m using for whatever printer I’m using.
Print Quality
Here are just a few of the test images I produced whilst checking this paper.

I was expecting good results from the black and white prints, but the strength and depth of colour I was able to get from the evening shots of buildings in Leicester was impressive.
The original version of one image is below.

The John Lewis store, Leicester
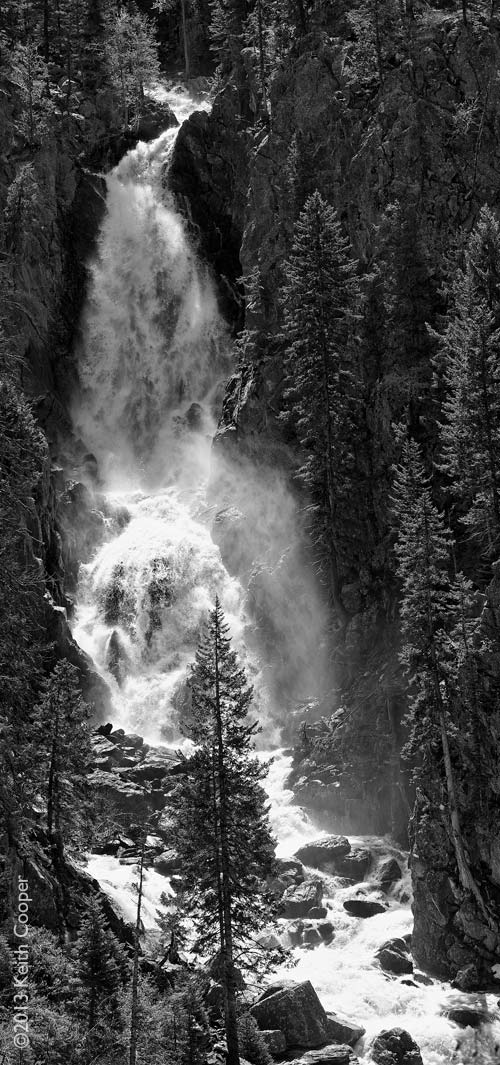
The view below, of Fish Creek falls (nr. Steamboat Springs, Colorado) makes for an excellent print if well lit.
I mention print lighting, since it’s an important aspect of how your prints will appear.
Personally I like the lower contrast look that a matte art paper gives to the image, but this is one where I’d also think about a much higher contrast paper, such as the Museo Silver Rag. The Silver rag is actually slightly less bright (90 vs 91) in the specifications than the Max 250, but has deeper blacks (Dmax 2.56 vs 1.65) that give a higher contrast range.
An image where I really do find that the lower contrast art paper works, is this one of the ‘Sea of Steps’ at Wells Cathedral.

I’d note that if you are showing a group of prints together, be very careful about mixing paper types. An excellent image on a low contrast paper can look very flat if hung next to a high contrast print.
The BPC issue
When you create profiles for papers like Museo Max, there can be problems when using them, in that the black of the profile doesn’t match the black of your image colour space.
If you use the Perceptual rendering intent, when printing, then blacks are matched, but if you use Relative Colorimetric (‘RelCol’), then there is a mismatch, which can lead to crunched up shadows and dark looking prints (the two intents can give a different look to a print, so I tend to use whichever looks best in soft proofing).
A quick example. The image below has important detail in the dark brickwork. However, if I look at a soft proof view in Photoshop, using the printer ICC profile, it’s all gone solid black.
Move your mouse over the image to see the option of selecting black point compensation (BPC) – the detail reappears.


I’ll always try and use BPC when printing to low contrast papers like this with the RelCol rendering intent. It has much less effect on more contrasty papers, but is worth knowing about.
There is an issue with some Canon printer drivers, in that BPC is only an option if running older 32 bit systems – an example would be the otherwise excellent Photoshop plugin for my iPF8300, where I no longer have any BPC option available.
This means that if you used the Canon driver ‘as-is’ with this paper, you might get quite awful results. This was quite obvious in the multiple test images I tried (bottom left of the picture of test prints above).
To get round this problem when needing to print with RelCol and a paper like this, I’ll manually convert the image to the printer ICC profile in Photoshop, and then print with no colour management.
If this is of interest, I’ve written more about it in my lengthy review of the Canon iPF6450 printer.
This problem also likely explains some of the ‘profile quality’ issues reported in early reviews of the Canon PRO-1 printer (I’ve discussed it in my own PRO-1 review)
I mention this here, since I’m trying to see what the paper is capable of producing at its best, and also out of a concern that some may be missing out on the capabilities of papers like this from just a few settings/workflow issues.
I found the Museo supplied ICC profile for my printer adequate, but distinctly lacking compared to my own custom profile (both my ICC profile and B&W linearising profile are available, on request, for non-commercial use – just email me)
Summary
An excellent cotton rag art paper with slight surface texture that has no optical brighteners. Takes ink well (no flaking or obvious scratching when passing through the printer parts).
This shot of a profiling target lit by sunlight coming through a gap in the curtains, give an excellent feel for the subtle texture and how the ink does not look as if it’s sitting on the surface (the shot is lit to emphasise texture, not colour gamut).

Some other related info on our site
- Museo Silver rag review
- Canon iPF6450 printer review
- All our printer/paper reviews
- Do your prints have ‘Depth’ ? Some of the difficulties in reviewing and describing print quality.
- Why don’t my prints match my screen?
A short article showing why there is more to getting your prints to match your screen, than just calibrating your monitor. It’s the vital first step, but you do need to consider some other factors for best results.
-- --
Never miss a new article or review - Sign up for our Newsletter (2-4 a month max.)More print related information from Keith
...or use the search box at the top of any pageReference pages and test images
- Printer Test Images
- B&W printer test image
- Printer cleaning
- Paper reviews
- Printer info/news/speculation Canon | Epson
We're an Amazon.com affiliate, so receive payment if you buy via Amazon US