


Review of DxO FilmPack V4.5
Review of DxO FilmPack V4.5
Image editing effects include very accurate recreation of film colour and grain.

Keith has removed all Google ads. Too many deceptive and irritating adverts.
Any ad links left are non tracking, to companies we know, trust and we've worked with for years [Park Cameras]
Ads helped pay for site running costs, so if you found something useful, please
...Make small KoFi donation?
...Subscribe to Keith's YouTube Channel
...Get Keith's book about how to use tilt/shift lenses
Our site contains affiliate links - these help support the site. See our Advertising policies for more
DxO have updated their FilmPack software, and Keith has been having a look at this application for giving your photos a ‘film look’.
The new version adds in extra film types and a number of refinements and effects to processing.
(The software is tested on a Mac, but works on both Mac & Windows)
Article Index

There is a free demo of the software available which gives a time limited, but fully functional version of the software.
[contentblock id=35 img=html.png]
Available from Amazon.com | Amazon.co.uk
The look of film
I used to use film, long before I had any ideas of becoming a professional photographer.
These days, it would take me a few rolls to get the hang of using it again, with somewhat more inconvenience than before, since I no longer have a darkroom, the labs I used to use are no more, and there isn’t a pro photo shop a few hundred yards away where I could just nip in and buy film…
The ‘dead tree’ photo press love stories about film having a ‘resurgence’ and people deciding to use it for various artistic reasons, but in truth, the market is still shrinking, and no longer able to support the range of manufacturers and support infrastructure that there were around the turn of the century.
However, the ‘look’ of film isn’t entirely dead (or just a reminiscence enhanced memory from those who used to work in the medium).
I’ve tried out two previous versions of DxO FilmPack (V2 and V3.2) and found that it gives very good renditions of how a shot would look, using a particular film stock (do check out these two reviews as well, since there are many more examples).
Given my relatively limited range of films used (transparency, colour negative and B&W), I can’t vouch for the effectiveness of all the options, especially since they are based on transformations applied to already processed digital images, unless you are using FilmPack ‘inside’ of DxO Optics Pro (see my review of V9.1 for more).
As a commercial photographer, it’s usually my job to provide fairly ‘vanilla’ treatments of images, and leave subsequent editing/processing of my work to clients (or the other people working for them).
I do sometimes get asked directly, for work with a particular ‘style’, so all the various film options are welcome.
I’m looking at images in this review processed with the plugin version of FilmPack 4.5 in Photoshop.
The interface is broadly similar when using it in other configurations.
FilmPack 4.5 – What do you get?
The software works as a standalone package or as a plugin for numerous common imaging programs. It is included in DxO Optics Pro, although functionality is dependent on which version you have.

Some tools, such as tone curves and protection of saturated colours are only available in the ‘Expert’ edition – this also offers a wider range of film types. See the chart below for details of this, and also the system requirements for running the software.
| Essential | Expert | Essential | Expert | |||
| Black and white films | 14 | 27 | Textures* | √ | ||
| Positive colour films | 16 | 26 | Light leakage* | √ | ||
| Negative colour films | 7 | 13 | Frames* | √ | ||
| Film grain | 33 | 62 | Creative blur vignetting* | √ | ||
| Designer presets | 12 | 39 | Black & white control | √ | ||
| Toning | 6 | 6 | Colour control | √ | ||
| Filters | 8 | 18 | Vibrancy & micro-contrast* | √ | ||
| Creative vignetting | √ | √ | Batch processing | √ | ||
| Cropping* | √ | √ | Custom presets | √ | ||
| Plugins & standalone application | √ | √ | Import/export of renderings | √ | ||
| Printing* | √ | √ | De-noising | √ | ||
| Favourite presets* | √ | √ | Snapshots* | √ | ||
| Preset search* | √ | √ | Tone curve* | √ | ||
| Export To Facebook* | √ | √ |
* NEW in DxO FilmPack 4
 The standalone version will open both JPEG and TIFF files (16 bit supported for TIFF).
The installer will find what applications you have (one license works for all on your computer).
Using DxO FilmPack
I’ll concentrate on using the software as a plugin for Photoshop.
There are so many film looks and effects that I’ll not go through them all – there is a very comprehensive list on the DxO site.
As with many photographers, there are only a few film types that I’ve actually used, and that was so long ago that I’d be lying if I said I remembered how they ‘looked’.
My film use predates the majority of my knowledge of colour management for example.
I should also note that you are seeing these examples on a web page, with the restricted colour gamut and unsure colour management that entails. If you think one of my examples doesn’t look quite right, then do try the software demo yourself, on your own system.
In all the examples below, the screen shots have been converted to the sRGB colour space, for web use.
Here’s the basic window and panels that you’ll get when the plugin opens. In this case it’s showing a B&W version of a photo I took in Wyoming a few years ago.

The sections can be hidden and resized, but I’ve pushed them all together for this overview.
The bottom row shows various preset conversion options – this set being based on ones I’ve tried recently with the software. You can see the tabs for selections of slide and negative colour film, B&W film, and any custom ones you might have saved.
At the right are the controls for various effects and settings.
To the left are where previous ‘snapshots’ are shown (including, here, the original colour image).
The right hand panel has two subsets – Effects, such as film types, filters and grain, and Settings, for contrast, colour and noise removal.

There are lots of ways of viewing, such as this before/after view, with the controls out of the way.
This particular version shows a Fuji Velvia 50 conversion.
I only ever tried Velvia once and this rendition reminds me of the colour very well. I’m minded to wonder how many ex-Velvia fans may have subsequently found a home with the fashionable ‘HDR style’ of photography (no I’m not a fan).

A split view, showing a Kodak Tri-X 400 version (I’ve still got prints and scans of my work with this film, and it looks very good in the grain simulation).

The Kodachrome 25 (right) version seems to have got some of it’s coolness.

Whilst a Kodachrome 64 version matches the look of a 1970’s box of slides I fished out to look at
I say matched, but given the age of the slides, and location (Suffolk coast), such matches are always going to be rather subjective.

Let’s try some 1970’s architecture (Built 1975, due for demolition this year or next).
New Walk Centre. Home of the city council for Leicester (UK) (shot hand held with 17mm shift lens)

Kodachrome 25

Kodachrome 64

Fuji Velvia 50

Fuji Superia Reala 200 (colour negative)

and another more modern film
Kodak Portra 160VC

This other Portra 160 (with the less vivid NC film) shows that hue changes can be noticeable, and do depend on what image you are starting with.

An 100% zoomed in example shows the film grain. In this instance set for 35mm film.
Note the ‘Color Protection’ settings. This can help with strong colours in your source images, which might be overly affected by changes needed to get the rest of the image processed.

A black and white image shows the difference (at 100% size) of settings for grain at 35mm and ‘Large Format’ (custom options available).


Some options can look very different, such as this ‘cross processed’ treatment.

There are many such options in the ‘Designer Presets’ – look at these more as jumping off points for exploring some of the many adjustments and effects you can add.

You can store a whole series of snapshots of different settings.
I find this helps when exploring such image processing software, since it’s all too easy to lose something you liked.

Some effects, such as this toned ‘old postcard’ look might seem a bit over the top to me, but this software is aimed at designers who have to create images for specific uses, as much as for photographers like myself.
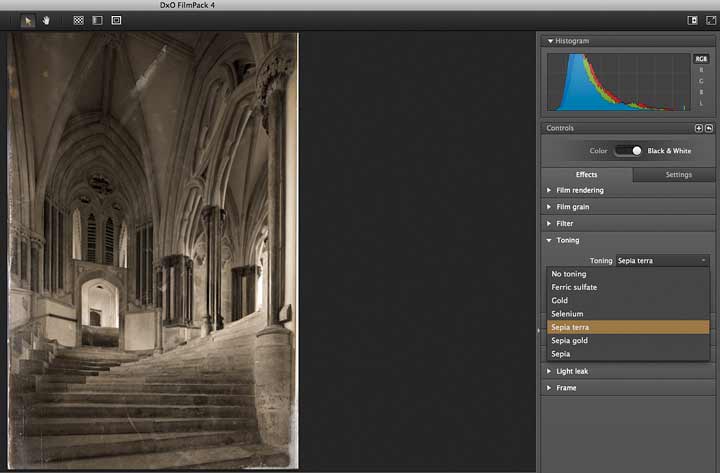
A wide range of ‘defects’ can be added.


Here’s an old tatty postcard version of my photo of the steps up to the chapter house at Wells cathedral (after ‘Sea of steps’ by Frederick H. Evans in 1903).

You can also print from within the software.

This print functionality is quite basic, but reasonably effective.
I do note that the available printer resolutions were seemingly set by someone who had only ever used Epson printers though.
Ideal for making images that look as if they came out of a 1970’s magazine…

Repairing film scans and keeping the grain
I’ve copied this example from my earlier review, since I’ve not had any such repair work to do for a while.
An initially unexpected use for DxO FilmPack turned out to be repairing areas of scanned photographs.
The grain in the software is derived from real recorded film grain. Just pick a film stock that looks like the grain in a photo you are working on, and use it as a source for cloning (I’ve covered this in more detail in the FilmPack 2 review).

Conclusions
The results do seem to match quite closely to many aspects of my previous use of film.
Some useful extra features and extra films round out the functionality of FilmPack 4.5 very well.
The best plugins do relatively few things but do them very well. FilmPack still falls into this category, but any more new functionality needs adding carefully. There is only so much more you can add though, before the plugin starts attempting to become a more general image editor (remember that I’m using it via Photoshop, which affects my views of what’s best doing elsewhere).
Some great looking effects to explore to give your images a very different ‘look’, but still within the bounds of what could have come from a real camera.
Used carefully, this is not just another ‘creative’ filter that make your images look like ‘yet another Instagram picture’.
A large amount of Instagram pics suck because the underlaying images are dismal, not just because of the banal ubiquity of the filters applied.
There is good documentation and a lot of additional information on the DxO web site.
Why I use the software…
My main use has been with large black and white prints where grain can work well and look better than the more regular digital noise you can get in some images.
I’ll often add such grain -after- sharpening for print, since I want the sharpening to enhance detail and structure in my image, not of the grain I’ve added. For finer control I’ll add the grain to a duplicated layer, so I can back off its opacity if needed.
It would be nice to have the option of the software returning its results in a new layer, but that’s only because I sometimes forget to duplicate the layer first.
There’s another place where the film effects are of interest, and that’s when processing RAW files with DxO Optics Pro. Having the full version of FilmPack installed enhances the range of film effects available when processing files in DxO Optics Pro, where I’ve found that a film effect can enhance the look of very high ISO images which have had the powerful ‘Prime’ noise reduction applied [see DxO Optics Pro V9.1 review]. Note that to use the designer effects within DxO Optics Pro, you need to download them for it [See FilmPack/DxO Optics Pro integration]
The software allows for direct export to facebook, not a function I’ve tried…
A minor (Mac only) problem with colour management
Back when I looked at FilmPack 2, I found a problem in the display of images in certain colour spaces. This was fixed, but in the latest version, I’ve found another one.
If you use a large colour space, such as ProPhoto, then the strip of preview images is not correctly rendered. See this annotated screen shot, with the image opened in Photoshop behind, and the faulty preview below.

DxO are aware of this and I’m told that a fix will appear in due course. The software works fine, but do remember to check the results of selecting a film effect, rather than just the preview strip, if you use images in large colour spaces.
Image repair/retouching
With digitally captured images, the resulting clean and low noise files are often a lot easier to work on than scanned film images.
With scanned film, you need to be able to edit without damaging the grain structure – particularly for big prints.
Knowing the film type and size allows you to make source images (such as a grey ramp or bulls-eye pattern) that can be used as sources for repair.
Trying it out
There is a free demo of the software available which gives a time limited, but fully functional version of the software.
Available from Amazon.com | Amazon.co.uk
Disclosure: Keith sometimes tests pre-release software for DxO, but has no direct business relationship with the company. Some of his commercial photos are included on the DxO web site, for which he receives no payment.
Summary
Easy to use plugin adds film effects and image adjustments to an image. Used with Photoshop (and others), within DxO Optics Pro, or as a standalone application.
More details from DxO
[contentblock id=35 img=html.png]
System requirements
Software works as stand-alone program or a plugin for
- DxO Optics Pro v8.5 or higher
- Adobe Photoshop CS3, CS4, CS5, CS6, CC
- Adobe Photoshop Elements 9, 10, 11, 12
- Adobe Lightroom 3, 4, 5
- Apple Aperture 3
FilmPack can handle images of up to 200MP, but to process images larger than 20MP, a 64-bit system with 4 GB of RAM is strongly recommended.
System requirements
- 400 MB available disk space
- 2 GB RAM minimum
For Windows users:
- Microsoft Windows XP 32-bit, Vista 32- & 64-bit, Windows 7 32- & 64-bit, Windows 8/8.1 32- & 64-bit.
For Mac users:
- Mac OS X 10.6, 10.7, 10.8, 10.
Installation and activation
- Installing the latest Microsoft updates for Windows is recommended before installing the application.
- DxO FilmPack 4 is already included with DxO Optics Pro 8.2 (and higher).
- It can simply be activated via the “Help” (PC) or “DxO Optics Pro 6” (Mac) menu.
- The standalone application, Photoshop, Lightroom and Aperture plug-ins can all be installed by downloading and running the appropriate installer from the DxO website.
- One license allows you to install DxO FilmPack 4 on two different computers (Mac and/or PC).
- Activating one instance of DxO FilmPack 4 automatically activates all the other instances installed on the same machine (e.g., activating the standalone application also activates the DxO Optics Pro, Photoshop, Lightroom and Aperture plug-ins).
Never miss a new article or review - Sign up for our occasional (ad-free) Newsletter
and please do subscribe to Keith's YouTube Channel
Other areas of our site that may be of interest...
All the latest articles/reviews and photo news items appear on Keith's Photo blog

Keith explains tilt and shift lenses
Keith has written a book that looks at the many ways that tilt/shift lenses can benefit your photography from a technical and creative point of view. If not in the UK check for import issues and maybe try an on-line bookshop. Keith has no connection with sales of the book.
ISBN 9781785007712
There is also a specific index page on the site with links to all Keith's articles, reviews and videos about using tilt and shift.
We've a whole section of the site devoted to Digital Black and White photography and printing. It covers all of Keith's specialist articles and reviews. Other sections include Colour management and Keith's camera hacks - there are over 1200 articles/reviews here...
We're an Amazon.com affiliate, so receive payment if you buy via Amazon US